Before diving deep into the treasure trove of flavors that is the best gluten-free pizza crust sauce, let’s talk about what goes beautifully with this dish.
Picture it: a slice of pizza topped with that rich sauce, perhaps some gooey mozzarella, and an array of colorful veggies. Pair it with a crisp side salad—think mixed greens, a light vinaigrette, and maybe a sprinkle of nuts for crunch. Or, some light garlic bread for that perfect crunch.
It’s also a treat to enjoy pizza alongside classic Italian antipasti: olives, marinated artichokes, or capacious cheese platters. Honestly, the possibilities are as endless as the toppings for a pizza! Pair it with a cool, refreshing beverage, perhaps a sparkling water with a twist of lemon or a glass of your favorite red wine. The slight acidity in the wine complements the rich flavors of the pizza without overpowering it.

My Ingredient Line-Up
Each bottle and jar on my pantry shelf holds possibilities. Here’s what I use for the best gluten-free pizza crust sauce:
1. Extra Virgin Olive Oil (1 tablespoon): A vibrant and rich oil that makes the sauce luscious and flavorful.
2. Fine Sea Salt (1 teaspoon): Essential for enhancing all the flavors and ensuring the sauce is not flat.
3. Apple Cider Vinegar (½ teaspoon): It brings a subtle tang that balances the sauce, improving both flavor and texture.
4. Cane Sugar (2 to 3 tablespoons, divided): A hint of sweetness to unify the flavors, particularly when paired with acidic ingredients.
5. Gluten-Free Flour Blend (3 cups): This forms the foundation of our crust and binds everything together. It’s vital to use a quality blend.
6. Active Dry Yeast (1 tablespoon): This is the magic worker that makes our crust rise and adds delightful texture.
7. Warm Water (1¼ cups, divided): Activated yeast needs warmth, and the water ensures our dough is just right.

How to Make “The Best Gluten-Free Pizza Crust Sauce”
Let’s get to the good part. Making this sauce is as enjoyable as eating the pizza itself. Follow these steps, and you’ll be whipping up your own delightful crust sauce in no time.
Step 1: Prepare the Yeast Mixture
Combine 1 tablespoon of active dry yeast with ¼ cup of warm water (around 110°F). Add a pinch of sugar to the yeast. Let this sit for about 5 to 10 minutes until it becomes frothy. This is your yeast waking up from its slumber. It’s a vital step, ensuring that your crust rises beautifully.
Step 2: Mix Dry Ingredients
While waiting, whisk together 3 cups of gluten-free flour blend, 1 teaspoon of fine sea salt, and 2 tablespoons of cane sugar in a large mixing bowl. These dry ingredients set the stage for your crust. The blend effects pasta-like textures and structures.
Step 3: Combine the Mixtures
Once your yeast is nice and frothy, add it to the bowl with your dry ingredients. Pour in ¾ cup of warm water and 1 tablespoon of olive oil. Use a wooden spoon or your hands to mix everything until it’s thoroughly combined. This step may seem messy, but trust me, that’s where the fun begins.
Step 4: Massage the Dough
On a clean surface, turn out the dough. Knead it gently for about 3-5 minutes. The dough should be soft but not too sticky. If it sticks to your hands or the counter, don’t panic! Dust a little more gluten-free flour blend over it until you get the right consistency.
Step 5: Allow the Dough to Rise
Form the dough into a ball and place it in a greased bowl, covering it with a clean towel. Let it rise in a warm space for about 1 hour or until it doubles in size. This is when excitement brews—you’re on your way to deliciousness.
Step 6: Preheat the Oven
While your dough is rising, preheat your oven to 425°F (220°C). It’s important to have a hot oven ready for the crust to bake to perfection.
Step 7: Shape the Crust
Once the dough has risen, punch it down to release some air, then turn it onto a lightly floured surface. Roll it out using a rolling pin or shape it with your hands into a round shape of your desired thickness. Don’t worry about perfection; rustic is in!
Step 8: Bake it Blind
Place the shaped dough onto a parchment-lined baking sheet. Pre-bake the crust for about 10-12 minutes until it’s lightly golden. This step ensures that the center of the crust doesn’t become soggy later when you add sauce and toppings.
Step 9: Add Sauce and Toppings
Now, the best part! Spread your homemade sauce all over the pre-baked crust, then add your favorite toppings. From peppers to mushrooms, the sky’s the limit!
Step 10: Final Bake
Bake the pizza for an additional 10-15 minutes, until the cheese is bubbly and golden. Once out of the oven, let it rest for a few minutes before slicing.
Nutrition Information
Calories: 215
Carbohydrates: 48 g
Protein: 3.2 g
Fat: 1 g
Saturated Fat: 0.2g
Recipe Notes: The Ingredients Explained
- Extra Virgin Olive Oil: Choosing a high-quality olive oil enhances not just the flavors but also the health quotient of your dish. It’s packed with antioxidants and heart-healthy fats.
- Fine Sea Salt: The right salt does wonders. Sea salt not only brings flavor but is often less processed than table salt, maintaining essential minerals.
- Apple Cider Vinegar: This ingredient brings depth. Its slight tang adds brightness to your sauce, improving the overall balance of flavors.
- Cane Sugar: A hint of sweetness counteracts acidity, creating a well-rounded taste. It also promotes caramelization during baking.
- Gluten-Free Flour Blend: Using the right blend is crucial. Some brands combine rice flour, potato starch, and xanthan gum to replicate the gluten structure found in traditional flour.
- Active Dry Yeast: Yeast is the life force of our crust. It provides that airy texture that gluten-free flours often lack. Always check expiration dates for optimal results.
- Warm Water: Keep an eye on the temperature. Too hot, and it kills the yeast; too cold, and it won’t activate correctly.
Recipe Variations
- Herbed Crust: Add dried oregano, basil, or garlic powder to the crust for an aromatic twist.
- Cheesy Crust: Incorporate shredded cheese into the dough for added flavor and complexity.
- Spicy Crust: Mix in some crushed red pepper flakes or cayenne for an unexpected heat.
- Whole-Grain: Substitute part of the gluten-free blend with whole-grain gluten-free flour for additional fiber.
- Sweet Pizza: Use dessert toppings—nut butter spreads, fruits, and a drizzle of honey for a sweet treat.
- Cauliflower Crust: For a lower-carb alternative, mix steamed, riced cauliflower with cheese and eggs as the crust base.

Conclusion
Crafting the best gluten-free pizza crust sauce isn’t just about putting ingredients together; it’s about creating a beloved family favorite that can be passed down and adapted. From fueling laughter at family meals to standing out at potlucks, this recipe is versatile and inviting for all. The ingredients work in harmony—a true celebration of flavor. There’s something incredibly rewarding about seeing your loved ones gather around a homemade pizza.
Now it’s time for you to try your hand at this recipe. You’ll find that it’s not just about the taste; it’s the experience of creating something special, bit by bit. Share it with friends, use it to impress at gatherings, or simply relish it during a cozy night in. Regardless of the occasion, this pizza crust sauce is bound to be a win every single time you make it. So roll up those sleeves, gather your ingredients, and let’s make some pizza magic!
You’ll also like the following recipes!
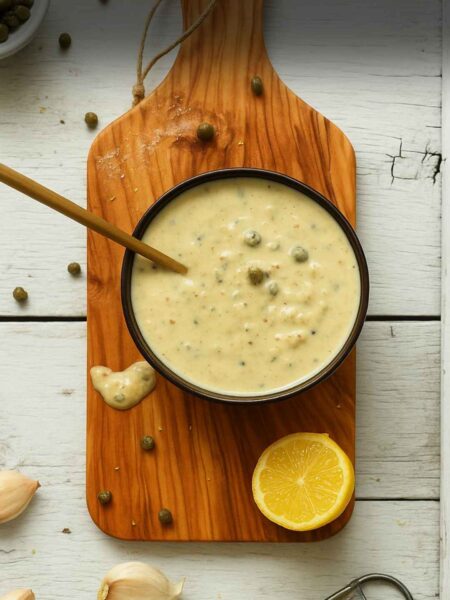
The Best Gluten-Free Pizza Crust Sauce – Affordable Food Ideas
Gather ‘round, pizza lovers! Whether you are gluten-sensitive or simply craving something new, allowing your taste buds to dance around a flavorful pizza crust sauce is an experience you won't want to miss.
This recipe isn't just any sauce; it’s custom-built for flavor, health, and versatility. You might be wondering, why make my own gluten-free pizza crust sauce? The answer is simple: control and creativity.
Let me take you through my journey with this sauce. I’ve experimented with a myriad of ingredients trying to strike the perfect balance. Every time I cook, I think of those treasured meals spent with family, laughter weaving in and out between bites.
This recipe has become a staple for me and has even turned the heads of my friends during dinner invites. Each ingredient is chosen with purpose, adding layers of flavor and health benefits that store-bought sauces often miss.

Ingredients
Instructions
Step 1: Prepare the Yeast Mixture
-
Combine 1 tablespoon of active dry yeast with ¼ cup of warm water (around 110°F). Add a pinch of sugar to the yeast. Let this sit for about 5 to 10 minutes until it becomes frothy. This is your yeast waking up from its slumber. It's a vital step, ensuring that your crust rises beautifully.
Step 2: Mix Dry Ingredients
-
While waiting, whisk together 3 cups of gluten-free flour blend, 1 teaspoon of fine sea salt, and 2 tablespoons of cane sugar in a large mixing bowl. These dry ingredients set the stage for your crust. The blend effects pasta-like textures and structures.
Step 3: Combine the Mixtures
-
Once your yeast is nice and frothy, add it to the bowl with your dry ingredients. Pour in ¾ cup of warm water and 1 tablespoon of olive oil. Use a wooden spoon or your hands to mix everything until it’s thoroughly combined. This step may seem messy, but trust me, that's where the fun begins.
Step 4: Massage the Dough
-
On a clean surface, turn out the dough. Knead it gently for about 3-5 minutes. The dough should be soft but not too sticky. If it sticks to your hands or the counter, don’t panic! Dust a little more gluten-free flour blend over it until you get the right consistency.
Step 5: Allow the Dough to Rise
-
Form the dough into a ball and place it in a greased bowl, covering it with a clean towel. Let it rise in a warm space for about 1 hour or until it doubles in size. This is when excitement brews—you’re on your way to deliciousness.
Step 6: Preheat the Oven
-
While your dough is rising, preheat your oven to 425°F (220°C). It’s important to have a hot oven ready for the crust to bake to perfection.
Step 7: Shape the Crust
-
Once the dough has risen, punch it down to release some air, then turn it onto a lightly floured surface. Roll it out using a rolling pin or shape it with your hands into a round shape of your desired thickness. Don't worry about perfection; rustic is in!
Step 8: Bake it Blind
-
Place the shaped dough onto a parchment-lined baking sheet. Pre-bake the crust for about 10-12 minutes until it’s lightly golden. This step ensures that the center of the crust doesn’t become soggy later when you add sauce and toppings.
Step 9: Add Sauce and Toppings
-
Now, the best part! Spread your homemade sauce all over the pre-baked crust, then add your favorite toppings. From peppers to mushrooms, the sky’s the limit!
Step 10: Final Bake
-
Bake the pizza for an additional 10-15 minutes, until the cheese is bubbly and golden. Once out of the oven, let it rest for a few minutes before slicing.
Nutrition Facts
Servings 8
- Amount Per Serving
- Calories 215kcal
- % Daily Value *
- Total Fat 1g2%
- Saturated Fat 0.2g1%
- Total Carbohydrate 48g16%
- Protein 3.2g7%
* Percent Daily Values are based on a 2,000 calorie diet. Your daily value may be higher or lower depending on your calorie needs.
Note
- Extra Virgin Olive Oil: Choosing a high-quality olive oil enhances not just the flavors but also the health quotient of your dish. It’s packed with antioxidants and heart-healthy fats.
- Fine Sea Salt: The right salt does wonders. Sea salt not only brings flavor but is often less processed than table salt, maintaining essential minerals.
- Apple Cider Vinegar: This ingredient brings depth. Its slight tang adds brightness to your sauce, improving the overall balance of flavors.
- Cane Sugar: A hint of sweetness counteracts acidity, creating a well-rounded taste. It also promotes caramelization during baking.
- Gluten-Free Flour Blend: Using the right blend is crucial. Some brands combine rice flour, potato starch, and xanthan gum to replicate the gluten structure found in traditional flour.
- Active Dry Yeast: Yeast is the life force of our crust. It provides that airy texture that gluten-free flours often lack. Always check expiration dates for optimal results.
- Warm Water: Keep an eye on the temperature. Too hot, and it kills the yeast; too cold, and it won’t activate correctly.