Before diving into the delightful world of jammy eggs, let’s talk about what you’ll want to serve them with. There’s a certain simplicity to this dish that makes it versatile, pairing well with a variety of meals. Imagine placing a perfectly cooked jammy egg atop a slice of avocado toast — the runny yolk seeps down, creating a deliciously creamy layer. Or picture serving it alongside a fresh summer salad, where the bright colors clash beautifully with the golden yolk.
You might also enjoy jammy eggs as a topping for ramen. They bring richness and depth to the broth, elevating it into something truly special. And let’s not forget breakfast! A classic breakfast plate with jammy eggs, crispy bacon, and some sautéed greens is bound to start your day on the right foot.
Now, let’s get into the nitty-gritty of how to make these delightful eggs.

What are Jammy Eggs?
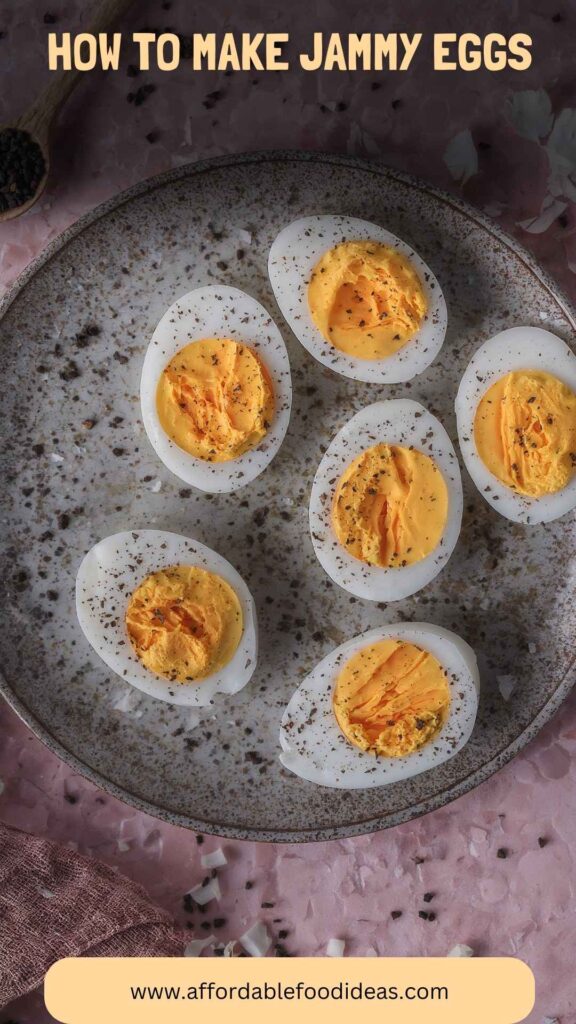
Simply put, jammy eggs are perfectly boiled eggs with a runny yolk. They achieve a unique balance between the classic hard-boiled egg and a soft-boiled egg. While a soft-boiled egg may have a more fluid yolk, jammy eggs maintain enough structure for delightful presentation.
They are typically boiled in water for about six to seven minutes, allowing the white to firm up while leaving the yolk enigmatically soft and rich.
Why This Recipe Works
Jammy eggs are impressive yet incredibly simple to make. The key swing on this dish is timing. With the right method, you can achieve that glorious running yolk that has become a breakfast sensation.
What makes the recipe reliable? Nothing feels more gratifying than cracking open an egg to find that the yolk has set just perfectly. This is achieved by following a few crucial steps which I will elaborate on shortly.
What You’ll Need to Make Jammy Eggs
You don’t need much to whip these up. Here’s your shopping list:
- Water: Enough for boiling your eggs.
- 4 large eggs: Opt for pasture-raised and organic if possible.
- For Serving:
- Freshly ground black pepper
- Sea salt flakes
- 1 teaspoon smoked paprika (optional) for that added flavor.
- 1 tablespoon finely chopped fresh chives (optional for garnish).
- Freshly ground black pepper
And that’s all—simple, right?

A Brief Introduction to the Cooking Method
Cooking jammy eggs involves a few steps: boiling, shocking, and seasoning. It’s a straightforward process, but small details can make a world of difference.
Let’s get into the detailed step-by-step instructions.
Step 1: Boil the Water
Start by filling a medium-sized pot with water. Aim for enough water to cover the eggs by at least an inch. Bring it to a rolling boil over medium-high heat.
Step 2: Prepare the Eggs
While your water is heating, take your eggs from the fridge and let them come to room temperature. This is an important step as it helps prevent the shells from cracking when they hit the boiling water.
Step 3: Lower the Eggs into the Water
Once the water is boiling, carefully lower the eggs into the pot using a slotted spoon. Be gentle to avoid cracking the shells.
Step 4: Boil for Six to Seven Minutes
Set a timer for six to seven minutes. If you prefer a slightly firmer yolk, go for the full seven.
Step 5: Prepare an Ice Bath
While the eggs are boiling, prepare an ice bath in a bowl with cold water and ice. This will stop the cooking process.
Step 6: Shock the Eggs
Once the timer chimes, remove the eggs from the pot and immediately transfer them to the ice bath. Let them sit for a minimum of five minutes. This cooling period will help the eggs peel more easily.
Step 7: Peel and Serve
After they’ve cooled, gently tap the eggs on a hard surface, then peel the shell under cool running water. Season them with salt, pepper, and optional paprika or chives. And there you have it!
Tips for Perfect Jammy Eggs
- Use Fresh Eggs: Fresh eggs are easier to peel. Older eggs tend to stick to the shell.
- Temperature Matters: Allow eggs to reach room temperature before boiling to reduce cracking.
- Timing is Key: Different stovetops may vary, so adjust your timing if necessary.
- Shock for Easy Peeling: The ice bath is essential. It halts cooking and makes the peeling process smoother.
- Experiment: Once you master the basic jammy egg, try seasoning differently or adding spices!
How to Store Leftovers
If you have any jammy eggs left, they can be stored in their shells in the refrigerator for up to one week. Just be sure to keep them in a covered container to maintain freshness.
Nutrition Information
Jammy eggs are a nutritious choice. They are high in protein, healthy fats, and provide essential nutrients like Vitamin D and B vitamins. On average, one large egg contains about 70 calories, 6 grams of protein, and 5 grams of fat.
For two eggs, you’re looking at:
- Calories: 140
- Protein: 12g
- Fat: 10g
How Would I Recommend Serving Jammy Eggs?
You can get creative with jammy eggs! Here’s how you might serve them:
- On Toast: Top toasted sourdough with jammy eggs and a sprinkle of chili flakes for a spicy kick.
- This is an easy meal that can be enjoyed at any time of day. The crunch from the toast pairs well with the creaminess of the yolk.
- This is an easy meal that can be enjoyed at any time of day. The crunch from the toast pairs well with the creaminess of the yolk.
- In a Salad: Blend sliced jammy eggs with mixed greens, roasted vegetables, and your favorite dressing.
- The eggs add richness, while the veggies contribute freshness. Add something crunchy like nuts or seeds for texture.
- The eggs add richness, while the veggies contribute freshness. Add something crunchy like nuts or seeds for texture.
- With Ramen: Include jammy eggs in a bowl of ramen for a hearty twist.
- Place them right on top, allowing that yolk to mingle with the broth. It takes your ramen from standard to gourmet with little effort.
- Place them right on top, allowing that yolk to mingle with the broth. It takes your ramen from standard to gourmet with little effort.
- As a Snack: Season with salt and pepper, and enjoy them on their own as a high-protein snack.
- Quick to prepare and easy to eat, they make an excellent post-workout option.
- Quick to prepare and easy to eat, they make an excellent post-workout option.
What Alternatives Can You Use for the Ingredients?
Suppose some of the ingredients aren’t available. Here are alternatives:
- Eggs: Use duck eggs instead of chicken eggs.
- Duck eggs have a richer flavor and creaminess that can elevate the dish.
- Duck eggs have a richer flavor and creaminess that can elevate the dish.
- Smoked Paprika: Swap it with regular paprika or cayenne pepper for heat.
- Regular paprika offers sweetness while cayenne can add a spicy kick.
- Regular paprika offers sweetness while cayenne can add a spicy kick.
- Chives: Green onions can substitute chives if they are not handy.
- They provide a mild onion flavor and are often readily available.
- They provide a mild onion flavor and are often readily available.
- Sea Salt Flakes: Table salt can be used in place of sea salt flakes.
- Just be cautious with the amount, as table salt is finer and saltier by volume.
- Just be cautious with the amount, as table salt is finer and saltier by volume.

Conclusion
In the end, making jammy eggs is a rewarding endeavor. They can add gourmet flair to your routines while being easy enough for any home cook to master. Their versatility is unmatched. From breakfast to dinner, jammy eggs find their way into meals effortlessly.
Experiment with sides, toppings, and cooking times until you nail your version of this delectable egg dish. Make this a staple in your kitchen; you won’t regret it. Who knew the process could be so enriching, right? Now pick up those eggs and get cracking!
You’ll also like the following recipes!
- Vietnamese Spring Rolls with Crispy Tofu
- Vegan Gluten-Free Black Bean Brown
- The Best Damn Vegan Biscuits
How to Make Jammy Eggs – Affordable Food Ideas
Jammy eggs have been making waves in kitchens around the globe. They combine the convenience of boiling eggs with the nuanced texture of a perfectly poached egg. The yolk is creamy, almost like a custard, while the white is firm enough that it can hold its shape.
They're a staple in many cuisines and have found their way into modern brunch offerings and gourmet dishes.
In my journey of exploring fresh and enjoyable recipes, I found that mastering jammy eggs was a game-changer. Not only do they look gorgeous on any plate, but they also boost the nutritional quality of your meals. Eggs are packed with protein, vitamins, and healthy fats.
So whether you're looking for a brunch item, a snack, or an ingredient to spruce up a dish, jammy eggs are here to please.
Ingredients
Instructions
Step 1: Boil the Water
-
Start by filling a medium-sized pot with water. Aim for enough water to cover the eggs by at least an inch. Bring it to a rolling boil over medium-high heat.
Step 2: Prepare the Eggs
-
While your water is heating, take your eggs from the fridge and let them come to room temperature. This is an important step as it helps prevent the shells from cracking when they hit the boiling water.
Step 3: Lower the Eggs into the Water
-
Once the water is boiling, carefully lower the eggs into the pot using a slotted spoon. Be gentle to avoid cracking the shells.
Step 4: Boil for Six to Seven Minutes
-
Set a timer for six to seven minutes. If you prefer a slightly firmer yolk, go for the full seven.
Step 5: Prepare an Ice Bath
-
While the eggs are boiling, prepare an ice bath in a bowl with cold water and ice. This will stop the cooking process.
Step 6: Shock the Eggs
-
Once the timer chimes, remove the eggs from the pot and immediately transfer them to the ice bath. Let them sit for a minimum of five minutes. This cooling period will help the eggs peel more easily.
Step 7: Peel and Serve
-
After they’ve cooled, gently tap the eggs on a hard surface, then peel the shell under cool running water. Season them with salt, pepper, and optional paprika or chives. And there you have it!
Nutrition Facts
Servings 8
- Amount Per Serving
- Calories 140kcal
- % Daily Value *
- Total Fat 10g16%
- Protein 12g24%
* Percent Daily Values are based on a 2,000 calorie diet. Your daily value may be higher or lower depending on your calorie needs.
Note
- Use Fresh Eggs: Fresh eggs are easier to peel. Older eggs tend to stick to the shell.
- Temperature Matters: Allow eggs to reach room temperature before boiling to reduce cracking.
- Timing is Key: Different stovetops may vary, so adjust your timing if necessary.
- Shock for Easy Peeling: The ice bath is essential. It halts cooking and makes the peeling process smoother.
- Experiment: Once you master the basic jammy egg, try seasoning differently or adding spices!