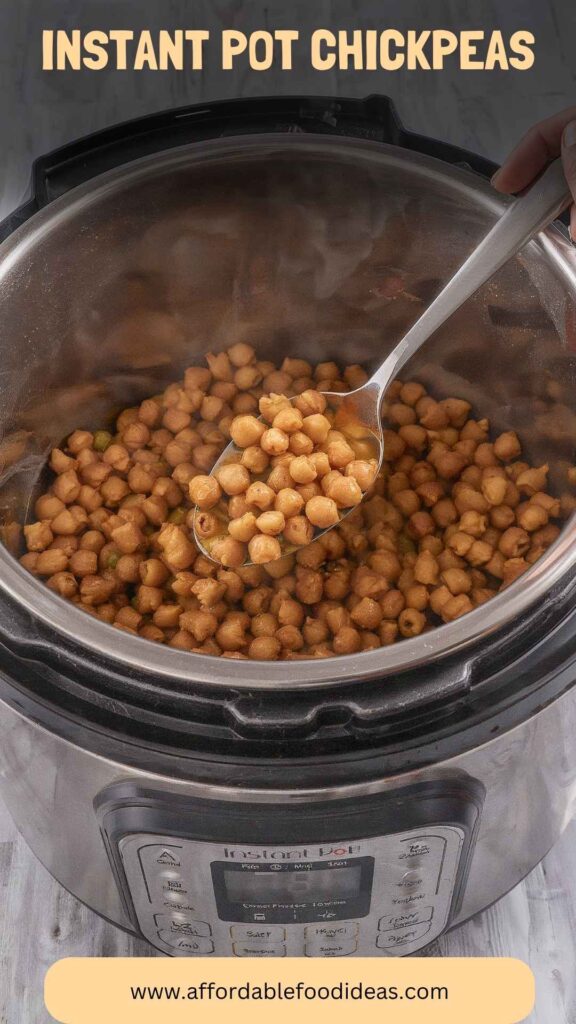
When I first laid eyes on the Instant Pot, I was skeptical. This gadget seemed like a shiny new toy sitting next to my older, trusty pressure cooker. However, once I brought it home, my cooking life changed forever.
One of the simplest and most cost-effective ingredients I discovered was the humble chickpea. Imagine the satisfaction of soft, creamy chickpeas ready to take center stage in your culinary creations—all in a fraction of the time you’d expect. So, grab your apron. Let’s dive into the world of Instant Pot chickpeas!

What Are Instant Pot Chickpeas?
Instant Pot chickpeas essentially refer to dried chickpeas cooked in the Instant Pot, allowing them to transform into tender delights in no time.
I’ve grown to appreciate dried chickpeas over their canned counterparts—they’re cheaper, require fewer additives, and, most importantly, have a more authentic flavor. The Instant Pot simplifies the cooking process, making the transformation from dried legumes to velvety chickpeas a breeze.
This method provides a nutrient-packed ingredient perfect for salads, stews, and even stand-alone recipes. Plus, cooking them yourself means you control the salt and spices.
Why You’ll Love Instant Pot Chickpeas
There’s no denying it: Instant Pot chickpeas can do wonders for your meals. Here’s why I fell in love with them:
1. Speed: Cooking chickpeas from scratch can take hours, but the Instant Pot knocks that time down significantly.
2. Versatility: Whether you’re throwing them into a salad, blending them into hummus, or adding them to a curry, chickpeas are your friend.
3. Nutrition: They’re high in protein and fiber, making them an excellent base or addition to any dish.
4. Cost-Effective: Buying dried legumes is often cheaper than canned, making chickpeas a budget-friendly option for anyone.
5. Simple Cleanup: Let’s be honest—there’s nothing worse than a pile of pots and pans to clean after cooking. The Instant Pot consolidates that.
The Ingredients
Before we get cooking, let’s gather our ingredients. For this recipe, you’ll need:
– 6 cups filtered water
– 1 bay leaf (for a gentle aromatic touch)
– 2 cloves garlic, smashed (adds mild depth of flavor)
– 1 pound dried chickpeas (about 2 cups)
– 1 teaspoon fine sea salt (optional)
These simple components are all you need. I find that sometimes less is more, especially when it means letting the natural goodness of chickpeas shine through.

Step-by-Step Instructions
Step 1: Rinse the Chickpeas
First things first, pour those dried chickpeas into a colander and rinse them well under cold water. You want to get rid of any dusty remnants or tiny stones. Trust me; you don’t want to bite into something that your tooth doesn’t agree with!
Step 2: Prepare the Instant Pot
Next up, grab your Instant Pot. Add the rinsed chickpeas, filtered water, smashed garlic, and the bay leaf. If you’re opting for salt, toss that in too. Just remember, you can always add more salt later, but you can’t take it out!
Step 3: Set the Instant Pot
Secure the lid on your Instant Pot. Make sure the valve is set to the sealing position. Choose the manual function and set the timer for 35 minutes. Yes, you read that right—35 minutes to chickpea perfection!
Step 4: Natural Pressure Release
Once the cooking time is up, let the pressure release naturally for about 10 to 15 minutes. This step is crucial; it lets those chickpeas continue cooking gently without overcooking. When you can, carefully move the valve to the venting position to release any remaining steam.
Step 5: Drain and Store
Once all the pressure has been released, remove the lid. Drain the chickpeas and discard the bay leaf and garlic. And there you have it! A pot full of fluffy chickpeas ready for your next culinary adventure.
Tips & Tricks
Here are some practical tips I’ve picked up along the way to ensure your Instant Pot chickpeas turn out fantastic every time:
– Soaking is optional: Some prefer soaking chickpeas overnight to save cooking time, but I’ve found the Instant Pot cooks them beautifully without soaking.
– Adjust cooking time: If you like chickpeas a bit firmer, reduce your cooking time by 5 minutes. If you want them softer for pureeing, add 5 minutes.
– Experiment with spices: Toss in spices like cumin or paprika before cooking to infuse the chickpeas with flavor.
– Store leftovers correctly: If you have any leftovers, store them in an airtight container in the fridge for up to five days.
– Don’t toss the cooking liquid: That pot liquor is liquid gold! Use it in soups or stews for extra flavor.
Nutrition Information
Understanding the nutritional benefits of chickpeas is essential. For every cup of cooked chickpeas, you get approximately:
– Calories: 269
– Protein: 15 grams
– Fat: 4 grams
– Carbohydrates: 45 grams
– Fiber: 12 grams
Chickpeas are an excellent source of protein, especially for vegetarians, along with essential vitamins and minerals like iron, magnesium, and folate.
Can I Store Instant Pot Chickpeas?
Absolutely! Cooked chickpeas store well. Allow them to cool completely before transferring them to an airtight container. You can keep them in the refrigerator for up to five days or freeze them for up to three months. If you freeze them, consider portioning them out into smaller containers for easy future use.
What Can I Serve with Instant Pot Chickpeas?
Chickpeas are incredibly versatile. Here’s how I often incorporate them into meals:
– Salads: Toss them into green salads or grain bowls for added heft.
– Curries: Add them to your favorite curry recipes for a protein boost.
– Soups: They work well in soups and stews, lending their lovely texture to the broth.
– Dips: Blend them with tahini, lemon, and garlic for hummus.
– Tacos: Use them as a filling with spices and toppings for tasty vegetarian tacos.
Variations
Feeling adventurous? Here are some exciting variations to jazz up your chickpeas:
– Spiced Chickpeas: Add 1 teaspoon cumin and 1 teaspoon coriander before cooking for a Middle Eastern flair.
– Coconut Chickpeas: After cooking, stir in 1 cup coconut milk and a pinch of salt for a creamy, tropical twist.
– Honey Garlic Chickpeas: Sauté cooked chickpeas in olive oil with 1 tablespoon honey and 2 minced garlic cloves for a sticky treat.
– Indian Masala Chickpeas: Add 1 tablespoon curry powder and substitute half the water with vegetable broth while cooking for a flavorful Indian-style dish.
– Chickpea Salad: Mix chickpeas with chopped veggies, a squeeze of lemon juice, and fresh herbs for a vibrant salad.

Conclusion
Learning how to prepare Instant Pot chickpeas transformed not just how I cook, but also how I view legumes. They’re nutritious, versatile, and can easily fit into any meal plan. Whether you’re whipping up a hearty salad for a summer gathering or a cozy chickpea stew in winter, this simple ingredient can do it all.
Embrace the world of chickpeas, and welcome them into your kitchen. Given the ease of cooking them in the Instant Pot, there’s no reason not to make them a regular in your recipes. So, what are you waiting for? Dust off that Instant Pot and get cooking!
You’ll also like the following recipes!
Instant Pot Chickpeas – Affordable Food Ideas
When I first laid eyes on the Instant Pot, I was skeptical. This gadget seemed like a shiny new toy sitting next to my older, trusty pressure cooker. However, once I brought it home, my cooking life changed forever.
Ingredients
Instructions
Step 1: Rinse the Chickpeas
-
First things first, pour those dried chickpeas into a colander and rinse them well under cold water. You want to get rid of any dusty remnants or tiny stones. Trust me; you don’t want to bite into something that your tooth doesn’t agree with!
Step 2: Prepare the Instant Pot
-
Next up, grab your Instant Pot. Add the rinsed chickpeas, filtered water, smashed garlic, and the bay leaf. If you're opting for salt, toss that in too. Just remember, you can always add more salt later, but you can’t take it out!
Step 3: Set the Instant Pot
-
Secure the lid on your Instant Pot. Make sure the valve is set to the sealing position. Choose the manual function and set the timer for 35 minutes. Yes, you read that right—35 minutes to chickpea perfection!
Step 4: Natural Pressure Release
-
Once the cooking time is up, let the pressure release naturally for about 10 to 15 minutes. This step is crucial; it lets those chickpeas continue cooking gently without overcooking. When you can, carefully move the valve to the venting position to release any remaining steam.
Step 5: Drain and Store
-
Once all the pressure has been released, remove the lid. Drain the chickpeas and discard the bay leaf and garlic. And there you have it! A pot full of fluffy chickpeas ready for your next culinary adventure.
Nutrition Facts
Servings 6
- Amount Per Serving
- Calories 269kcal
- % Daily Value *
- Total Fat 4g7%
- Total Carbohydrate 45g15%
- Dietary Fiber 12g48%
- Protein 15g30%
* Percent Daily Values are based on a 2,000 calorie diet. Your daily value may be higher or lower depending on your calorie needs.
Note
- Soaking is optional: Some prefer soaking chickpeas overnight to save cooking time, but I’ve found the Instant Pot cooks them beautifully without soaking.
- Adjust cooking time: If you like chickpeas a bit firmer, reduce your cooking time by 5 minutes. If you want them softer for pureeing, add 5 minutes.
- Experiment with spices: Toss in spices like cumin or paprika before cooking to infuse the chickpeas with flavor.
- Store leftovers correctly: If you have any leftovers, store them in an airtight container in the fridge for up to five days.
- Don’t toss the cooking liquid: That pot liquor is liquid gold! Use it in soups or stews for extra flavor.