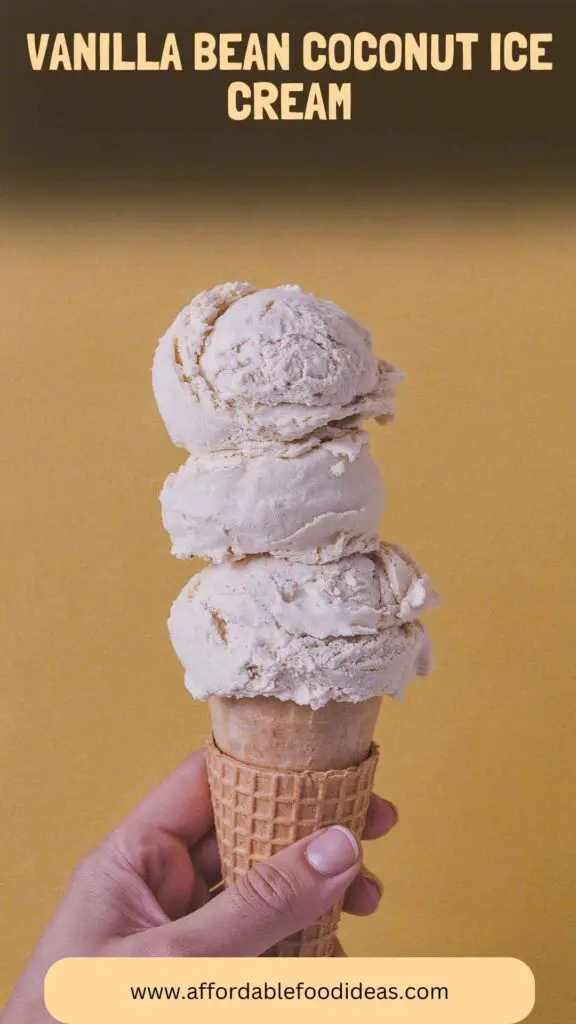
The sun is shining, birds are singing, and I’m sitting on my porch with a heaping bowl of vanilla bean coconut ice cream. I can already tell this will be the talk of the summer gatherings. You know that feeling when you take the first scoop, and your taste buds start doing a happy dance?
That’s what this ice cream does to me. It pairs beautifully with a warm slice of pie, fresh berries, or even served atop a tropical fruit salad. But enough about that for now—I can feel the excitement bubbling over!

What is Vanilla Bean Coconut Ice Cream?
Vanilla bean coconut ice cream is a luscious frozen treat made primarily from coconut cream and infused with the distinct flavor of vanilla beans. It carries a creamy texture and a balance of sweetness that can brighten up any occasion.
Unlike the typical dairy-based ice creams, this recipe uses coconut cream for richness, making it an excellent choice for those on a dairy-free or vegan diet. You’re in for a treat, whether it’s a hot summer day or a cozy evening under the stars.
The Ingredients
Creating this dreamy dessert doesn’t require a magician’s skill. Here’s what you’ll need:
- ½ teaspoon ground cinnamon: This adds a warm note.
- ½ cup organic cane sugar: A touch of sweetness; you can also swap it with maple syrup or agave for a twist.
- 2 teaspoons pure vanilla extract: The star of the show!
- Zest of ½ a fresh lime: For a zesty kick that elevates the flavor profile.
- Two 14-ounce cans of rich coconut cream or full-fat coconut milk: The base for this creamy goodness. Ensure you check the notes for preferred brands.
- A tiny pinch of fine sea salt: This brings out the sweetness.
- 1 vanilla bean pod, split and scraped: For those who want to take flavor to the next level, this gives you an authentic taste.

How to Make Vanilla Bean Coconut Ice Cream
Ready to dive in? Making this ice cream is simple and can be rewarding. You’ll want to gather your ingredients and follow the steps.
Step 1: Prepare Your Ingredients
Begin by gathering everything on your countertop. Make sure your coconut cream is chilled from the fridge. This will help achieve the ideal consistency when it’s time to churn. The vanilla bean pod should also be ready to be split.
Step 2: Mix the Base
In a large mixing bowl, add the two cans of coconut cream. Make sure you’re using the thick part and not the coconut water. Next, sprinkle in the sugar, cinnamon, and a pinch of sea salt. Use a whisk to combine these ingredients until you achieve a smooth mixture that looks enticingly creamy.
Step 3: Infuse Flavor
Now it’s time for the vanilla magic! For an intense flavor, scrape the seeds from the vanilla bean pod directly into the mixture. Toss in the vanilla extract and lime zest at this stage as well—talk about an explosion of flavor! Give everything another whisk to fully incorporate the flavors.
Step 4: Chill the Mixture
After your base is well mixed, cover the bowl and place it in the refrigerator. Let it chill for at least 2 hours. This step is crucial! It allows the flavors to meld together and thicken.
Step 5: Churn the Ice Cream
After the base is nicely chilled, pour it into your ice cream maker and churn according to the manufacturer’s instructions. I love watching it transform from a liquid to that soft-serve-like consistency. In about 20 minutes, you should have a luscious, creamy mix.
Step 6: Freeze Rigorously
Transfer the churned ice cream into an airtight container. Be sure to press down to avoid any air pockets. Seal it tight and pop it into the freezer for at least 4 hours. This step will help it become scoopable and firm up nicely.
Notes
Here are a few tips to make your ice cream experience even better:
- Use high-quality coconut cream: The creamier, the better.
- Don’t skip the lime zest: It brightens the flavor beautifully.
- Chill the bowl beforehand: This helps the ice cream churn faster.
- Experiment with sweeteners: Try different combinations of sugar, maple syrup, or agave to find your favorite.
- Let it sit: When serving, let the ice cream sit for about 5 minutes to become softer, making it easier to scoop.
Storage Tips
Store your ice cream in an airtight container in the freezer. It can last for around two weeks. However, if you’re like me, it won’t stick around for long!
Nutrition Information
While I focus on taste, I also consider nutrition. This recipe packs a satisfying punch in every scoop without the guilt. The exact nutrition will depend on your specific ingredients, but generally speaking:
- Calories: 230 per serving
- Fat: 15g
- Carbohydrates: 23g
- Sugar: 14g
- Protein: 2g
Serving Suggestions
Here are five fun serving ideas to elevate your ice cream experience:
- Over Warm Brownies: Imagine warm, fudgy brownies as a base, and then top them with scoops of vanilla bean coconut ice cream. It’s a match made in dessert heaven!
- Tropical Fruit Salad: Combine fresh pineapple, mango, and kiwi with a scoop of the ice cream. It’s like a vacation in a bowl!
- Milkshake Adventure: Blend a scoop with milk for a sensational milkshake. Add a dash of chocolate syrup to spice things up.
- Homemade Waffle Cones: Serve in a crispy waffle cone. Making your cones is easier than you think and adds an extra crunch!
- Chocolaty Sauce Drizzle: A drizzle of hot fudge on top can take your serving to a whole new level. Combining those flavors is fantastic!
What Other Substitutes Can I Use in Vanilla Bean Coconut Ice Cream?
Running low on ingredients or looking for a different twist? Here are five substitutes you can use:
- Almond Milk: Swap out some or all of the coconut cream with almond milk for a lighter option. It will yield a different texture but still holds up well in flavor.
- Cashew Milk: If you’re aiming for a creamier ice cream, consider using cashew milk. Its richness can be quite satisfying.
- Date Sugar: Instead of cane sugar, try date sugar for a natural sweetness. It will lend a unique caramel flavor.
- Coconut Sugar: This can serve as a one-to-one substitute for granulated sugar. Plus, it offers a nuttier flavor.
- Greek Yogurt: To enhance the protein content, blend a bit of Greek yogurt into your coconut cream. It will add a slightly tangy twist.

Conclusion
Making vanilla bean coconut ice cream has been one of my most rewarding culinary experiences. With each scoop, I am reminded of the simple joys of summer, the laughter shared over delicious dessert, and the vibrant flavors that light up life.
Whether you enjoy it on its own, topped with fresh fruits, or nestled in a waffle cone, this ice cream brings happiness with every bite. So why not fire up your own ice cream maker? Dive into this dessert adventure, and you’ll soon find yourself dreaming of creamy coconut goodness all year long!
You’ll also like the following recipes!
Vanilla Bean Coconut Ice Cream – Affordable Food Ideas
The sun is shining, birds are singing, and I’m sitting on my porch with a heaping bowl of vanilla bean coconut ice cream. I can already tell this will be the talk of the summer gatherings. You know that feeling when you take the first scoop, and your taste buds start doing a happy dance?
Ingredients
Instructions
Step 1: Prepare Your Ingredients
-
Begin by gathering everything on your countertop. Make sure your coconut cream is chilled from the fridge. This will help achieve the ideal consistency when it’s time to churn. The vanilla bean pod should also be ready to be split.
Step 2: Mix the Base
-
In a large mixing bowl, add the two cans of coconut cream. Make sure you're using the thick part and not the coconut water. Next, sprinkle in the sugar, cinnamon, and a pinch of sea salt. Use a whisk to combine these ingredients until you achieve a smooth mixture that looks enticingly creamy.
Step 3: Infuse Flavor
-
Now it’s time for the vanilla magic! For an intense flavor, scrape the seeds from the vanilla bean pod directly into the mixture. Toss in the vanilla extract and lime zest at this stage as well—talk about an explosion of flavor! Give everything another whisk to fully incorporate the flavors.
Step 4: Chill the Mixture
-
After your base is well mixed, cover the bowl and place it in the refrigerator. Let it chill for at least 2 hours. This step is crucial! It allows the flavors to meld together and thicken.
Step 5: Churn the Ice Cream
-
After the base is nicely chilled, pour it into your ice cream maker and churn according to the manufacturer's instructions. I love watching it transform from a liquid to that soft-serve-like consistency. In about 20 minutes, you should have a luscious, creamy mix.
Step 6: Freeze Rigorously
-
Transfer the churned ice cream into an airtight container. Be sure to press down to avoid any air pockets. Seal it tight and pop it into the freezer for at least 4 hours. This step will help it become scoopable and firm up nicely.
Nutrition Facts
Servings 8
- Amount Per Serving
- Calories 230kcal
- % Daily Value *
- Total Fat 15g24%
- Total Carbohydrate 23g8%
- Sugars 14g
- Protein 2g4%
* Percent Daily Values are based on a 2,000 calorie diet. Your daily value may be higher or lower depending on your calorie needs.
Note
- Use high-quality coconut cream: The creamier, the better.
- Don’t skip the lime zest: It brightens the flavor beautifully.
- Chill the bowl beforehand: This helps the ice cream churn faster.
- Experiment with sweeteners: Try different combinations of sugar, maple syrup, or agave to find your favorite.
- Let it sit: When serving, let the ice cream sit for about 5 minutes to become softer, making it easier to scoop.