This post contains affiliate links. As an Amazon Associate I earn from qualifying purchases.
When I’m planning weeknight dinners that won’t break the bank, chicken drumsticks are always on my shopping list. They’re affordable, versatile, and honestly? They taste incredible when you get them crispy in an air fryer. I love serving these alongside Baked Beans Recipe on the Stovetop or simple roasted vegetables. This recipe proves that restaurant-quality meals don’t require restaurant prices.
How a Small-Town Girl Discovered the Magic of Drumsticks
Growing up in a close-knit Massachusetts community, my mom stretched every dollar in the kitchen. She’d roast chicken quarters and legs because they were significantly cheaper than breasts, and somehow her kitchen always smelled incredible. She’d layer flavors with spice blends and taught me that seasoning is free confidence—it costs almost nothing but transforms simple ingredients into something memorable.
When I got my first air fryer five years ago, I immediately thought of those Sunday dinners. But instead of just replicating the oven method, I experimented. The air fryer’s circulating heat created something my mom’s conventional oven never quite achieved: a perfectly crispy exterior while keeping the inside juicy and tender. I’ve made these drumsticks dozens of times since, and I’m thrilled to share my tested method with you.

What is Air Fryer Drumsticks?
Air fryer drumsticks are seasoned chicken legs cooked using rapid air circulation technology to achieve a crispy, golden exterior without deep frying. This cooking method uses minimal oil—sometimes none at all—while delivering the textural results people crave from fried chicken.
The beauty of this approach is that it’s not a new concept dressed up in modern technology. Home cooks have been roasting chicken legs for generations. The air fryer simply accelerates the process and creates superior crispness. The drum (the thicker part attached to the thigh) and the thinner leg portion cook evenly in about 14-16 minutes total, which makes this one of my go-to solutions for rushed weeknights.
From a nutritional standpoint, drumsticks offer excellent value. They contain more collagen and connective tissue than breasts, which means when cooked properly, you get incredibly moist, flavorful meat—and drumsticks typically cost 40-50% less per pound at your local grocery store.
Why You’ll Love This Air Fryer Drumsticks Recipe
- Incredibly affordable protein – Drumsticks are one of the cheapest cuts of chicken you can buy, making this recipe perfect for feeding a family on a tight budget
- Minimal hands-on time – Once you toss and air fry, you’re done. About 16 minutes total cooking time means dinner ready when you need it
- Superior texture every single time – The air fryer’s design creates consistently crispy skin without the heaviness of traditional frying
- Flexible seasoning profile – This spice blend works as-is, but adapts beautifully to your family’s preferences and pantry staples
- Naturally gluten-free option – No breading required, making this accessible for various dietary needs
- Minimal cleanup – The air fryer basket requires just a quick rinse compared to oil-splattered stovetops or greasy sheet pans
- Perfect meal prep candidate – These reheat beautifully, making them ideal for batch cooking on weekends
The Ingredients
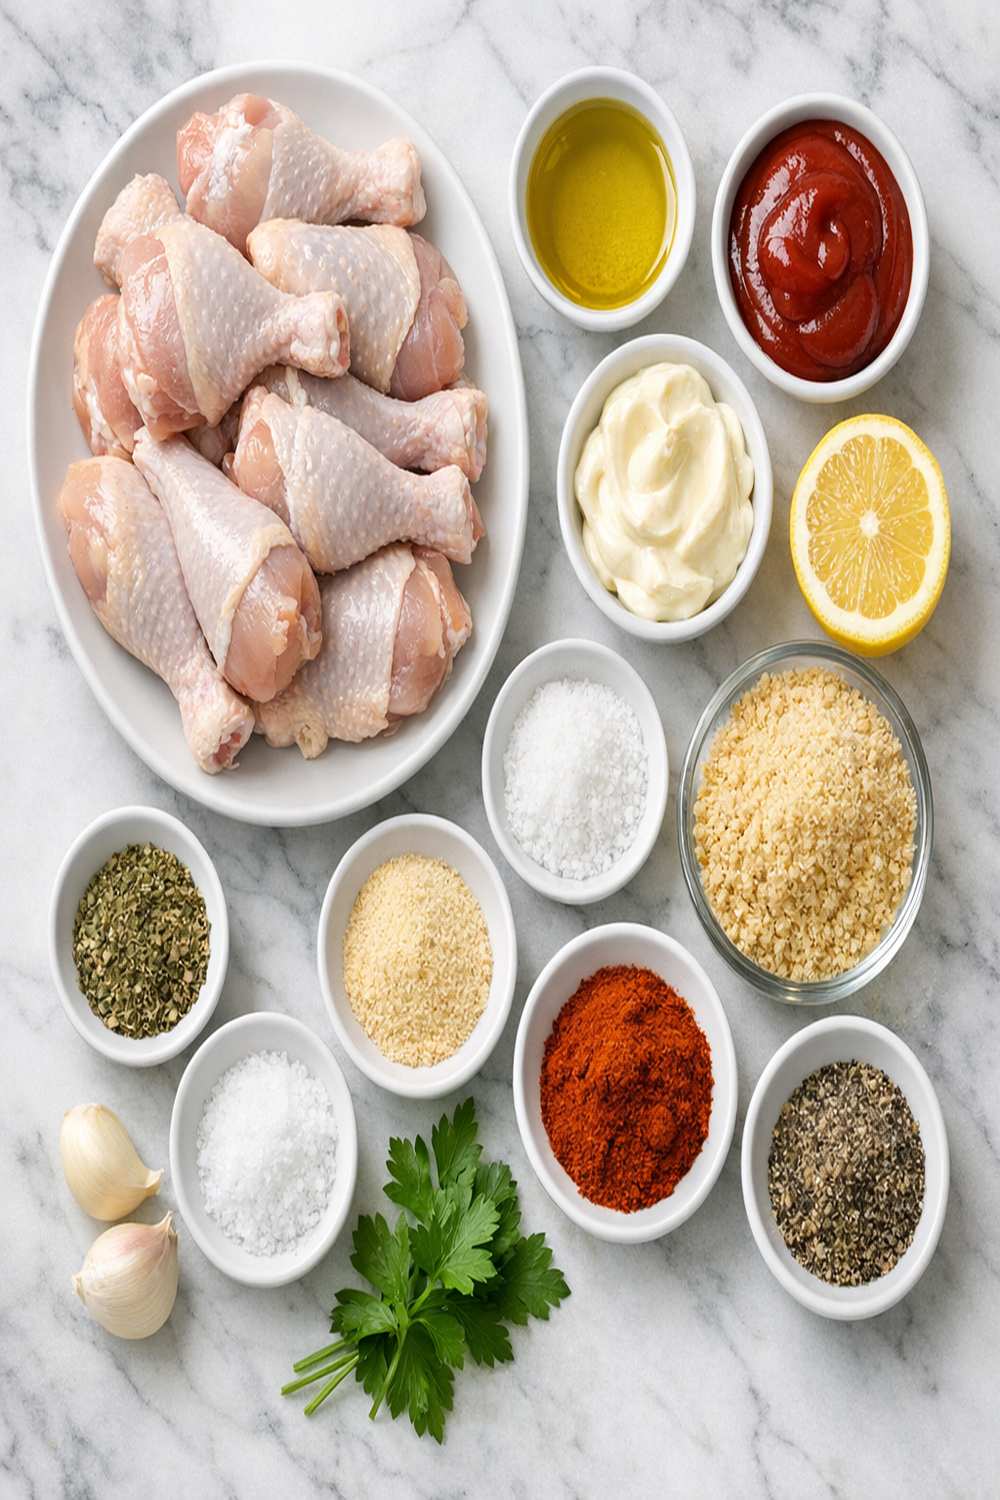
I’ve kept this ingredient list intentionally short because good seasoning doesn’t require a lengthy shopping trip. Most of these items are likely already in your pantry. The beauty of this recipe is that it proves you don’t need specialty ingredients to create something restaurant-worthy. Each component serves a specific purpose: some add depth of flavor, one creates crispness, and together they build complexity from simplicity.
- 2 teaspoons Italian seasoning (dried herbs save money versus fresh)
- 1 teaspoon smoked paprika (adds color and subtle smokiness)
- 2 teaspoons baking powder (creates the crispy exterior without frying oil)
- 1 teaspoon onion powder (adds savory depth inexpensively)
- 2 tablespoons olive oil (helps seasonings adhere and creates browning)
- 1 teaspoon garlic powder (more economical than fresh garlic for this application)
- 1 teaspoon salt (kosher salt preferred for better texture)
- 6 drumsticks (about 2 pounds total, patted completely dry before seasoning)
- 1 teaspoon brown sugar (balances savory flavors and aids browning)
- ½ teaspoon black pepper (freshly ground creates better flavor than pre-ground)
Serves: 4-6 people as a main course with sides
Expert’s Nutritional Insight
As a registered dietitian, I want to highlight something important: the baking powder in this recipe isn’t just a texture trick—it’s actually brilliant food chemistry. Baking powder is alkaline, and when it contacts the chicken skin’s moisture, it raises the pH level. This chemical change promotes browning through the Maillard reaction while you’re using minimal oil. You’re getting restaurant-quality results using foundational chemistry and ingredients you can pronounce.
How to Make Air Fryer Drumsticks?
I’ve broken this into straightforward steps that even if you’ve never used an air fryer before, you’ll feel confident. The entire process takes about 20 minutes from start to plating, and most of that time is hands-off while the air fryer does the work.
Step 1: Prepare Your Equipment and Preheat
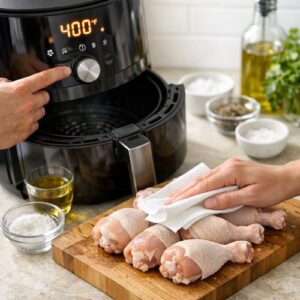
Set your air fryer to 400°F (200°C) and let it preheat for about 3-5 minutes. While it’s heating, remove your drumsticks from the refrigerator and pat them completely dry using paper towels. This step is non-negotiable—moisture is the enemy of crispness, and those few extra minutes of blotting make a measurable difference in your final texture.
Check that your air fryer basket is clean and dry. A quick wipe with a damp cloth works perfectly. You want no residual moisture or grease from previous cooking.

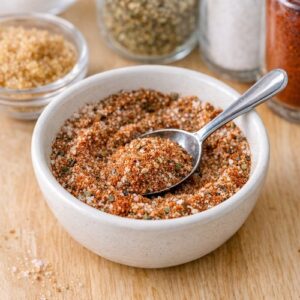
Step 2: Create Your Spice Blend
In a small bowl, combine the baking powder, salt, smoked paprika, Italian seasoning, garlic powder, onion powder, brown sugar, and black pepper. Mix thoroughly with a fork or small whisk, breaking up any clumps of brown sugar. The mixture should look fairly uniform with no visible powder pockets.
This blend can be made days ahead and stored in a sealed container, which is perfect if you meal prep. I often make a triple batch on Sunday and keep it ready for multiple cooking sessions throughout the week.

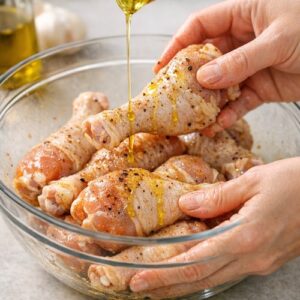
Step 3: Season the Drumsticks
Place your dried drumsticks in a large mixing bowl. Drizzle the olive oil over them and toss with your hands or tongs, ensuring each piece gets a light coat. This oil acts as an adhesive for the spice blend and helps create that coveted golden-brown exterior.
Once lightly oiled, sprinkle your spice mixture over the drumsticks. Work methodically, using your hands to massage the seasonings into the skin. You want every surface—the underside, the crevices between the drum and leg—to get coated. This attention to detail is what separates mediocre from exceptional.

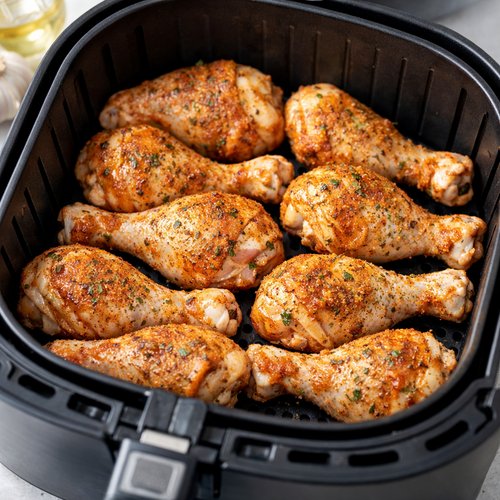
Step 4: Arrange in the Air Fryer Basket
Arrange your seasoned drumsticks in a single layer in your air fryer basket. They should fit snugly but not be piled on top of each other. If you’re cooking for a larger group and need to do this in batches, that’s perfectly fine—I’d rather cook two perfect batches than one overcrowded one where pieces steam instead of crisp.
Position them so the thicker drum portions face outward toward the heating element. This small adjustment ensures even cooking from start to finish.
Step 5: First Cooking Phase
Cook for exactly 8 minutes at 400°F. During this time, resist the urge to open the basket. Those circulating hot air are doing their job, and every time you open it, you release heat and extend cooking time. Patience here pays dividends in texture.
I set a timer on my phone so I’m not watching the clock. This first phase is where the exterior begins developing that signature crispness.

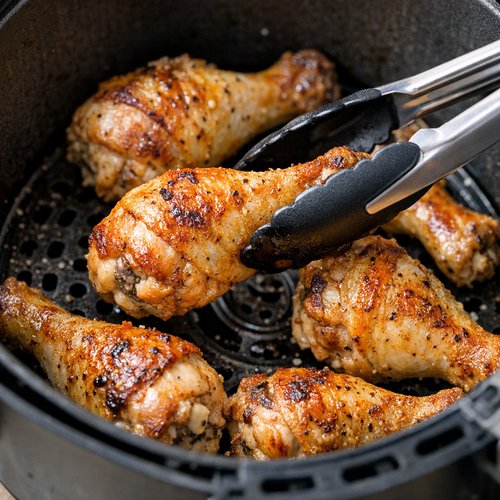
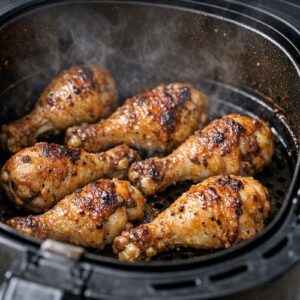
Step 6: Flip and Final Cooking
After 8 minutes, carefully open the basket and flip each drumstick. The skin should already be looking golden—that’s your visual confirmation things are on track. Return the basket to the air fryer and cook for an additional 6-8 minutes.
The total time can vary slightly based on your specific air fryer model and the exact size of your drumsticks. Start checking for doneness at the 6-minute mark. The internal temperature should reach 165°F (74°C) when measured at the thickest part of the thigh, away from bone. The skin should be deep golden-brown and crispy to the touch.
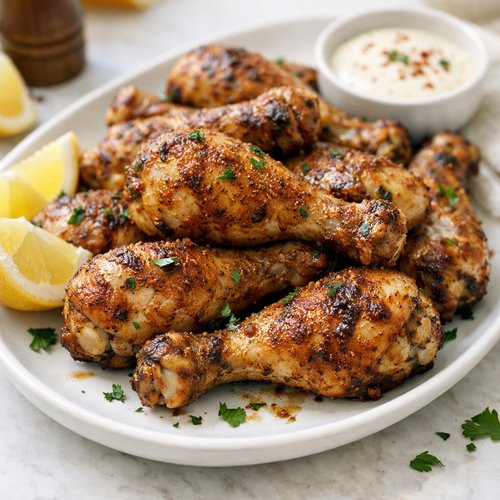
Step 7: Rest and Serve Immediately
Once cooked, transfer drumsticks to a serving platter. Ideally, serve within 5-10 minutes while they’re at their absolute crispest. The residual heat will continue cooking slightly, so don’t be alarmed if they continue browning a bit during this resting period.
If you’re meal prepping and plan to reheat these later, let them cool completely before refrigerating. This prevents steam from softening the crispy exterior.
Make-Ahead and Meal Prep Guide
One of my favorite things about this recipe is how beautifully it adapts to meal planning. Here’s my professional approach to getting maximum value from a single cooking session:
Day Before: Mix your spice blend in an airtight container the night before. Pat your drumsticks dry, cover loosely with paper towels, and refrigerate. This allows surface moisture to evaporate further, setting you up for even crisper results the next day.
Batch Cooking: If your household is larger or you want extras for the week, this recipe doubles beautifully. Cook in two separate batches rather than crowding the basket. I often make 12-18 drumsticks on a Sunday afternoon, which gives me multiple meals and snacks ready to go.
Storage and Reheating: Cooked drumsticks keep refrigerated in an airtight container for up to 4 days. To reheat and restore crispness, pop them back in the air fryer at 350°F for 3-4 minutes, or in a conventional oven at 375°F for 8-10 minutes. Microwaving will soften the exterior, so I avoid that method.
Freezing: These freeze beautifully for up to 3 months. Flash freeze them on a baking sheet for 2 hours, then transfer to freezer bags. Reheat from frozen at 375°F for 12-15 minutes until heated through and re-crisped.
Common Mistakes to Avoid
- Skipping the drying step – This is the most common error I see. Wet skin steams instead of crisps. Those few minutes with paper towels are absolutely essential, not optional
- Overcrowding the basket – Air fryers work by circulating hot air around food. If pieces touch or overlap, you’re blocking that circulation. Cook in batches; it’s worth it
- Opening the basket repeatedly – Every opening drops the internal temperature by 15-20 degrees. Set your timer and trust it. Peeking is tempting but counterproductive
- Using cold, wet drumsticks straight from the package – Let them come to room temperature and pat dry. Temperature consistency ensures even cooking
Tips and Tricks
- Make a larger spice batch – Triple this seasoning blend and store in a labeled container. I use it on drumsticks, chicken thighs, pork chops, and even roasted vegetables throughout the month
- Oil is your friend – The 2 tablespoons might seem minimal, but it’s calculated to coat without creating greasiness. Don’t skip it thinking you’re saving calories; the oil is what creates the crispy exterior
- Invest in a meat thermometer – Doneness by appearance takes experience. A simple instant-read thermometer removes all guesswork and ensures food safety, especially important when cooking for children or elderly family members
- Line your basket with foil – Some air fryers benefit from a perforated foil insert on the bottom to catch drippings. This makes cleanup easier and can be reused for weeks
- Experiment with seasonings based on your pantry – Once you nail this basic technique, try Cajun seasoning, barbecue spice blends, or Mediterranean herbs. The method stays identical; only seasonings change
- Serve with fresh lemon – A squeeze of fresh lemon brightens these richly seasoned drumsticks beautifully and costs pennies
Seasonal Variations
Spring: Add 1 teaspoon fresh lemon zest and ½ teaspoon dried tarragon to your spice blend. Serve with fresh asparagus and early spring potatoes.
Summer: Reduce brown sugar to ½ teaspoon, add 1 teaspoon smoked chili powder and ½ teaspoon cumin for a barbecue-inspired profile. Pair with corn and tomato sides.
Fall: Swap the Italian seasoning for 1½ teaspoons pumpkin pie spice blend combined with 1 teaspoon ground sage. Creates a surprisingly delicious autumn-inspired flavor that pairs beautifully with roasted root vegetables.
Winter: Add ½ teaspoon ground ginger and ¼ teaspoon cayenne pepper for warmth and complexity. Serve alongside hearty root vegetable mashes and winter greens.
Can I Store Air Fryer Drumsticks?
Absolutely, and storage is straightforward. Refrigerated drumsticks keep for 3-4 days in an airtight container. I prefer glass containers because they don’t absorb odors or staining from the paprika spice. You can store them stacked as long as they’re in a sealed environment.
For longer storage, freeze for up to 3 months. Flash freeze on a baking sheet first, then transfer to freezer bags with as much air removed as possible. Label with the date. When ready to eat, thaw overnight in the refrigerator or reheat directly from frozen.
I don’t recommend storing the seasoned-but-uncooked drumsticks for more than a few hours before cooking. Once you’ve added salt, it begins drawing moisture to the surface, which works against your crispness goal.
Nutrition Information
Based on USDA database analysis, each drumstick (approximately 3.5 ounces cooked) contains approximately 190 calories, 12g protein, 15g fat, and less than 1g carbohydrates. The exact values depend on how much skin you consume—skin contains more fat and calories than the meat underneath, but also delivers the crispy texture everyone loves.
The protein content makes this particularly valuable for muscle maintenance and satiety. Drumsticks contain selenium, zinc, and B vitamins—micronutrients that support immune function and energy metabolism. From a cost-per-gram-of-protein perspective, drumsticks outperform most other protein sources at your grocery store.
The baking powder adds minimal sodium (about 300mg per drumstick), which is reasonable when you consider it’s the only added salt in the recipe. If you’re managing sodium intake, you can reduce the salt to ½ teaspoon with minimal flavor impact, though seasoning quality will be slightly diminished.
What Can I Serve With Air Fryer Drumsticks?
These drumsticks are wonderfully versatile and pair with almost any side dish. I love building meals around them because they’re so flavorful that sides can be simple and budget-friendly. Try pairing them with Baked Creamy Chicken Recipe or complementary vegetable sides for an entire meal.
- Simple roasted vegetables – Toss whatever you have on hand (carrots, potatoes, green beans, broccoli) with a touch of oil, salt, and pepper. These can roast in your oven while the drumsticks cook in the air fryer
- Rice pilaf – Brown rice cooked in broth with sautéed onions creates a satisfying, affordable base that absorbs the flavorful drippings from the drumsticks
- Roasted sweet potato wedges – Cut sweet potatoes into wedges, toss with paprika and oil, and roast alongside your drumsticks for natural sweetness that balances the savory spice
- Garlic bread or crusty rolls – Perfect for sopping up any pan drippings and makes the meal feel more substantial
- Coleslaw with vinegar-based dressing – The acidity and crunch provide contrast to the crispy, savory drumsticks
- Steamed or sautéed greens – Spinach, kale, or collard greens cooked simply with garlic add nutritional balance without stretching your budget
- Baked potatoes or mashed potatoes – Classic pairing that’s both economical and satisfying
- Salad with vinaigrette – A fresh green salad cuts through the richness beautifully
Substitutes and Budget-Friendly Swaps
- Chicken thighs instead of drumsticks – Works beautifully with identical cooking time and seasoning. Thighs might be slightly more expensive depending on your store, but they’re equally flavorful
- Ground paprika for smoked paprika – You lose a subtle smokiness, but regular paprika works fine and often costs less. Use the same amount
- Dried oregano for Italian seasoning – Italian seasoning is already a blend; if you don’t have it, oregano alone is actually less expensive and quite good. Use 1½ teaspoons
- Avocado oil or vegetable oil for olive oil – Any oil works here; choose based on what you have and your budget. Olive oil is traditional but not required
- Honey for brown sugar – Adds the same browning benefit and sweetness. Use 1 teaspoon liquid honey mixed into the oil before applying to drumsticks
- Baking soda alternative – If you don’t have baking powder, you actually can’t substitute baking soda 1:1. Skip it entirely or purchase a small container; the cost difference is minimal and baking powder has countless other kitchen uses
- Salt substitute – Use half the recommended amount of kosher salt and add extra garlic powder for depth if managing sodium intake
Air Fryer Drumsticks Recipe
Ingredients
Method
- Set your air fryer to 400°F (200°C) and let it preheat for about 3-5 minutes. While it's heating, remove your drumsticks from the refrigerator and pat them completely dry using paper towels. This step is non-negotiable—moisture is the enemy of crispness, and those few extra minutes of blotting make a measurable difference in your final texture. Check that your air fryer basket is clean and dry. A quick wipe with a damp cloth works perfectly. You want no residual moisture or grease from previous cooking.
- In a small bowl, combine the baking powder, salt, smoked paprika, Italian seasoning, garlic powder, onion powder, brown sugar, and black pepper. Mix thoroughly with a fork or small whisk, breaking up any clumps of brown sugar. The mixture should look fairly uniform with no visible powder pockets. This blend can be made days ahead and stored in a sealed container, which is perfect if you meal prep. I often make a triple batch on Sunday and keep it ready for multiple cooking sessions throughout the week.
- Place your dried drumsticks in a large mixing bowl. Drizzle the olive oil over them and toss with your hands or tongs, ensuring each piece gets a light coat. This oil acts as an adhesive for the spice blend and helps create that coveted golden-brown exterior. Once lightly oiled, sprinkle your spice mixture over the drumsticks. Work methodically, using your hands to massage the seasonings into the skin. You want every surface—the underside, the crevices between the drum and leg—to get coated. This attention to detail is what separates mediocre from exceptional.
- Arrange your seasoned drumsticks in a single layer in your air fryer basket. They should fit snugly but not be piled on top of each other. If you're cooking for a larger group and need to do this in batches, that's perfectly fine—I'd rather cook two perfect batches than one overcrowded one where pieces steam instead of crisp. Position them so the thicker drum portions face outward toward the heating element. This small adjustment ensures even cooking from start to finish.

- Cook for exactly 8 minutes at 400°F. During this time, resist the urge to open the basket. Those circulating hot air are doing their job, and every time you open it, you release heat and extend cooking time. Patience here pays dividends in texture. I set a timer on my phone so I'm not watching the clock. This first phase is where the exterior begins developing that signature crispness.
- After 8 minutes, carefully open the basket and flip each drumstick. The skin should already be looking golden—that's your visual confirmation things are on track. Return the basket to the air fryer and cook for an additional 6-8 minutes. The total time can vary slightly based on your specific air fryer model and the exact size of your drumsticks. Start checking for doneness at the 6-minute mark. The internal temperature should reach 165°F (74°C) when measured at the thickest part of the thigh, away from bone. The skin should be deep golden-brown and crispy to the touch.

- Once cooked, transfer drumsticks to a serving platter. Ideally, serve within 5-10 minutes while they're at their absolute crispest. The residual heat will continue cooking slightly, so don't be alarmed if they continue browning a bit during this resting period. If you're meal prepping and plan to reheat these later, let them cool completely before refrigerating. This prevents steam from softening the crispy exterior.

Notes
FAQs
Can I cook frozen drumsticks in the air fryer?
Yes, though I don’t recommend it as your first choice. Frozen drumsticks require about 20-24 minutes at 400°F instead of 14-16 minutes fresh. They’ll cook unevenly—the exterior overcooks while the interior catches up. If you must cook from frozen, add 6-8 minutes to your cooking time and check the internal temperature carefully at 165°F before considering them done.
Why does my air fryer smoke during cooking?
Smoke typically comes from rendered fat dripping onto the heating element. This is completely normal and not dangerous. It’s actually a sign the drumsticks are cooking properly and releasing fat. If smoke bothers you, place a piece of foil or a drip tray on the shelf below your air fryer basket to catch drippings. Never block the air circulation—just catch drips below the basket.
Can I make this recipe without an air fryer?
Absolutely. Use your conventional oven set to 425°F. Place seasoned drumsticks on a lined baking sheet and bake for 35-40 minutes, flipping halfway through at the 18-minute mark. You won’t achieve quite the same crispness as an air fryer, but the results are still delicious. The exterior will be golden and the meat perfectly cooked.
How do I know if my drumsticks are actually cooked through?
The reliable method is using a meat thermometer. Insert it into the thickest part of the thigh without touching bone. You need 165°F (74°C) minimum for food safety. Visually, the skin should be deep golden-brown and the juices should run clear when you pierce the meat. Meat should easily pull away from the bone—if you have to wrestle with it, it needs more time.
My drumsticks came out dry. What went wrong?
Overcooking is the most likely culprit. Drumsticks are actually forgiving compared to chicken breasts, but leaving them in the air fryer too long still dries them out. Check your temperature at the 12-minute mark rather than waiting the full 14-16 minutes. Also ensure you’re not cooking at a temperature higher than 400°F. Different air fryer models vary in actual temperature, so you might need to adjust. If your model runs hot, try 375°F instead.
More Recipes You’ll Love
- Buffalo Wings Recipe – Another air fryer favorite that uses the same crispy technique with bold, tangy flavoring
- Baked Creamy Chicken Recipe – A comforting weeknight alternative that’s equally budget-friendly and ready in under 30 minutes
- Baked Beans Recipe on the Stovetop – The perfect economical side dish to pair alongside these drumsticks for a complete meal
- Baked Chimichangas Recipe – Another air fryer-friendly recipe that proves healthy, crispy food doesn’t require traditional frying
Final Thoughts
These air fryer drumsticks have become a staple in my kitchen and I hope they become one in yours too. They’re proof that some of the most satisfying meals come from treating humble, affordable ingredients with care and proper technique. This recipe represents everything I believe about feeding a family well on a budget—no shortcuts on flavor, no compromises on quality, and no expensive specialty ingredients required.
The spice blend is forgiving and adaptable to your family’s preferences. The cooking method is reliable and fast. The cost per serving is hard to beat. Whether you’re cooking for a weeknight dinner, meal prepping for the week ahead, or looking to impress without effort, these drumsticks deliver.
I’d love to know how they turn out for you! Give this recipe a try and don’t forget to mention @affordablefoodideas if you share it on social media. Your success stories inspire me to keep developing budget-friendly recipes that prove nourishing food is absolutely achievable for every budget.