Ingredients
Method
Step 1: Build Your Spice Blend and Prepare the Chicken
- In a small bowl, combine your smoked paprika, garlic powder, salt, and black pepper. Stir them together with a small spoon so everything is evenly distributed. This takes about one minute, but it matters—uneven seasoning creates uneven flavor. Pat your chicken thighs dry with a paper towel. This step isn't optional if you want proper browning. Moisture on the surface of the chicken creates steam, and steam prevents that beautiful golden crust we're after. If any of your thighs are particularly thick (more than an inch), cut them in half lengthwise so you end up with four pieces total that are roughly similar in size. This ensures even cooking. Sprinkle your spice mixture generously on both sides of each chicken piece, using your fingers to rub it into the meat gently. You want every inch of surface seasoned, not just the top.

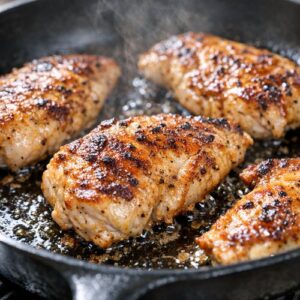
Step 2: Sear the Chicken Until Golden and Cooked Through
- Place your skillet over medium heat and add the cooking oil. Give it about 90 seconds to heat up. You'll know it's ready when a small piece of chicken placed in the oil sizzles immediately—not violently, but a confident, purposeful sizzle. Carefully add your seasoned chicken to the hot oil, skin-side down if your thighs still have skin, or just any side down if they're skinless. Do not move them. Resist the urge. Let them sit undisturbed for 5 to 7 minutes. Listen for that gentle sizzle to continue. The chicken will release naturally from the pan when it's ready. After 5-7 minutes, check the bottom with a spatula. It should be deep golden brown with some caramelization at the edges. Flip each piece and cook the other side for another 5 to 7 minutes. The second side typically cooks slightly faster because your pan is now at optimal temperature. Check for doneness by pressing the thickest part of a thigh gently. It should feel firm, not soft and yielding. If you have a meat thermometer (which I recommend for confidence), you're looking for an internal temperature of 165°F. The total cooking time should be 10 to 14 minutes.
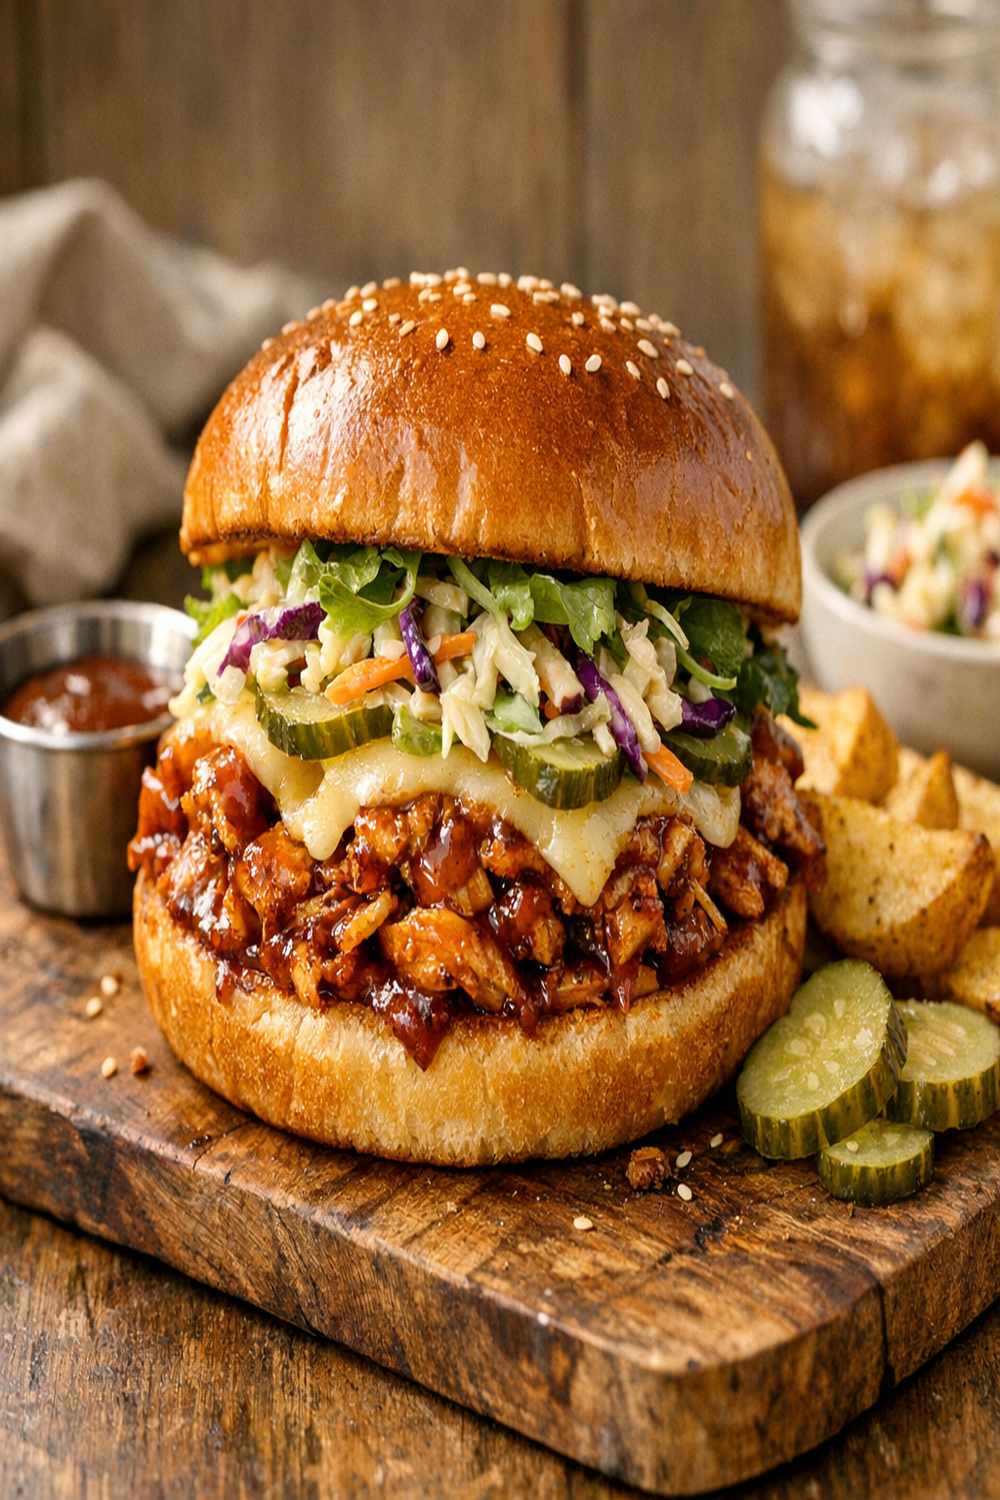
Step 3: Add the BBQ Sauce and Build Flavor
- Once your chicken is cooked through, reduce heat to low. Working with one piece at a time, brush both sides generously with your barbecue sauce. I use a small pastry brush, but honestly, a spoon works fine too. You want about one tablespoon total per piece—enough to coat fully but not so much it drips everywhere. Let the sauced chicken sit in the warm pan for just about 30 seconds on each side. This allows the sauce to caramelize slightly and adhere to the meat rather than sliding right off when you build your sandwich. Then transfer the chicken to a clean plate and set aside while you make the slaw.

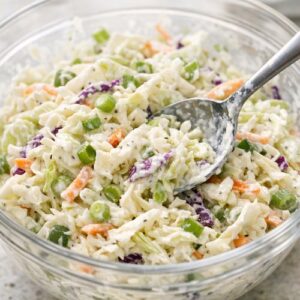
Step 4: Make the Creamy Ranch Slaw
- In a medium bowl, combine your pre-shredded coleslaw mix, sliced green onions, and ranch dressing. Using a sturdy spoon or fork, toss everything together until the vegetables are evenly coated. The slaw should look creamy and cohesive, not dry. If it seems too thick, add another tablespoon of dressing. Taste a small spoonful. You want to notice the tang of the dressing, the sweetness of the carrots, and the fresh bite of the green onions. Adjust seasoning if needed—a tiny pinch of salt or pepper can brighten the whole thing. You can make this slaw up to 4 hours ahead of serving. It actually tastes better with a little time for flavors to meld, though it may release some liquid. Simply drain any excess before building your sandwiches.
Step 5: Build and Serve Your Sandwiches
- Lightly toast your buns if you'd like (this prevents them from getting soggy and adds a subtle textural contrast), or serve them as-is if toasting isn't your style. Place one piece of sauced chicken on the bottom bun of each sandwich. Top each piece of chicken with a generous scoop—about ¼ cup—of the ranch slaw. The slaw should mound slightly above the sandwich, creating visual appeal and ensuring every bite includes that creamy vegetable component. Place the top bun gently on top and serve immediately. Have napkins ready. These sandwiches are meant to be eaten fresh while the chicken is still warm and the slaw is still cool and crisp.

Notes
- Don't skip the paper towel step - Dry chicken browns better. Wet chicken steams. Steam is the enemy of the crispy exterior you're after. This single step is why your sandwich will look restaurant-quality.
- Use your nose as a cooking guide - When the chicken releases a rich, meaty aroma (especially once the spices hit the hot oil), you know your heat is right. If you smell burning, your temperature is too high.
- Choose quality coleslaw mix - Some pre-shredded varieties are older and have lost crispness. Look for packages that feel light and don't have visible moisture. If your local store's coleslaw mix disappoints, shred ½ small head of cabbage and one carrot yourself—it takes 5 minutes with a box grater.
- Make the slaw ahead but assemble last-minute - The slaw is delicious when prepared hours ahead (flavors meld beautifully), but building the sandwich at the last second ensures the slaw stays crisp and cold against the warm chicken.
- Toast your buns if they're soft or thin - Sturdy buns can handle the moisture from the slaw and sauce, but delicate buns benefit from a quick toast to prevent sogginess.
- Brush sauce onto warm chicken, not hot - If the chicken is too hot, the sauce will slide right off. If it's cooled completely, the sauce won't adhere. Warm is the sweet spot.