This post contains affiliate links. As an Amazon Associate I earn from qualifying purchases.
Back then, I didn't understand nutrition the way I do now as a registered dietitian. But I understood something equally valuable: wholesome, nourishing meals don't require expensive ingredients or endless prep time. That lesson shaped my entire approach to feeding my own family, and it's what I want to share with you today.
What Are Black-Eyed Peas From Can?
Black-eyed peas are a legume with a distinctive small white circle on their dark skin—that "eye" is where the magic happens nutritionally. Unlike dried peas that require overnight soaking, using canned versions means you skip the prep work entirely while keeping most of the nutritional benefits intact.
This dish has deep roots in African American cuisine and Southern cooking traditions. It's traditionally served on New Year's Day for good luck, but honestly? This recipe is delicious enough to deserve a spot on your table any day of the week. The combination of smoky meat, aromatic vegetables, and tender peas creates something that tastes like you've been cooking all day—but you haven't.
The beauty of this version is that it uses convenience without sacrificing authenticity or nutrition. We're building flavor through proper technique, not relying on processed shortcuts.
Why You'll Love This Black-Eyed Peas Recipe
- Under 30 minutes start to finish - Because canned peas are pre-cooked, you're really just building flavor and heating through. This isn't a recipe that demands your entire afternoon.
- Budget-friendly ingredients - The entire dish costs roughly $8-10 to feed a family of four. Bacon, sausage, and fresh vegetables are on sale frequently if you shop strategically.
- Protein powerhouse - Each serving delivers approximately 12-15 grams of protein from the peas, meat, and broth combination. As a dietitian, I appreciate how this keeps you satisfied for hours.
- Meal prep champion - This recipe actually improves after a day or two in the refrigerator as flavors deepen and meld. Perfect for batch cooking.
- Makes incredible leftovers - Reheat gently, add a splash of broth, and serve over rice for lunch or dinner throughout the week.
- Naturally gluten-free - No flour, no thickeners needed. The starches from the peas create that perfect creamy-but-not-watery texture naturally.
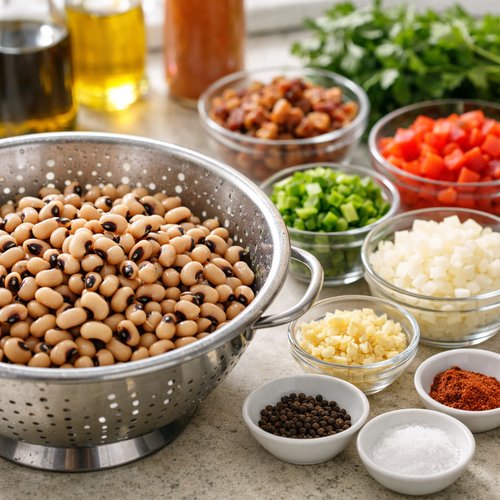
The Ingredients
I've organized these by category to make shopping and prep easier. Here's what I reach for when building this dish. Notice I'm using canned peas—this isn't cutting corners; it's being smart with your time and budget.
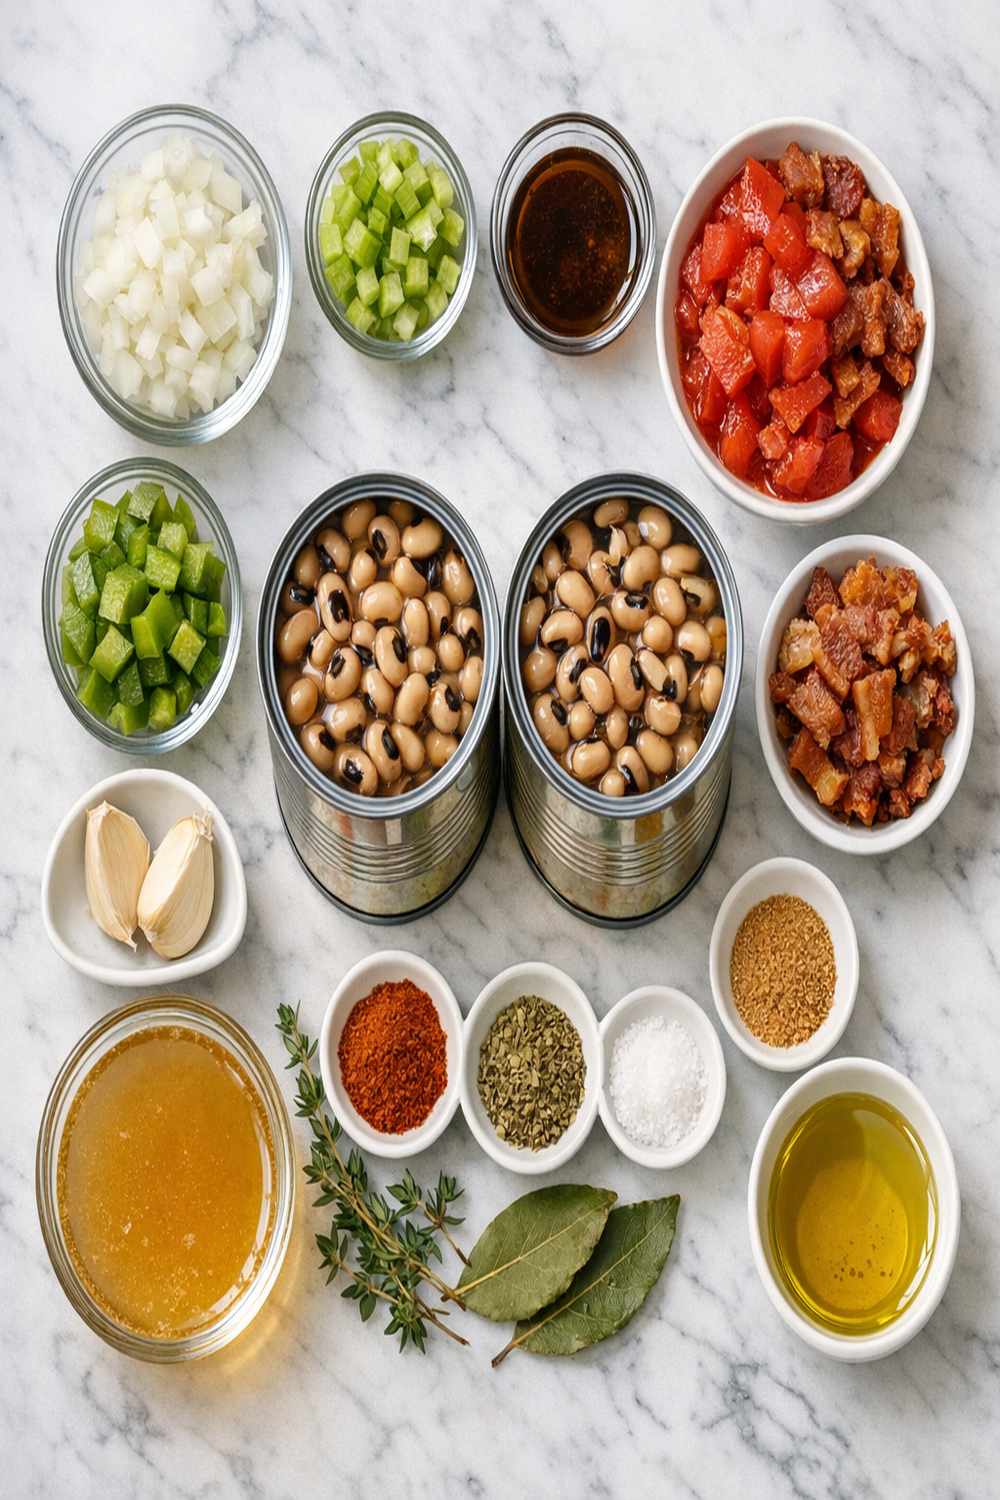
For the Base
- 7 cups low-sodium chicken broth (or vegetable broth as a budget swap)
- 4 cans (15 ounces each) black-eyed peas (drained and rinsed thoroughly to remove excess sodium)
- 1 bay leaf (fresh if possible, adds subtle depth)
For Flavor and Protein
- 1 large yellow onion (diced into ¼-inch pieces)
- 1 stalk celery (diced, about ¾ cup)
- 3 cloves garlic (minced finely)
- 6 thick slices bacon (chopped into bite-sized pieces)
- 1 cup smoked turkey sausage (diced; or use regular pork sausage if that's what's affordable in your area)
For Heat and Aromatics
- 1½ teaspoons Creole seasoning blend (or make your own with paprika, garlic powder, and cayenne)
- 2 teaspoons fresh thyme leaves (stripped from stems; dried thyme works but use only 1 teaspoon)
- 1 fresh jalapeño pepper (minced, seeds removed if you prefer less heat—or substitute ¼ teaspoon cayenne pepper for $0.10 instead)
For Finishing
- ¼ cup green onion tops (sliced thin, for garnish)
- 3 cups fresh collard greens (roughly chopped; kale or even frozen spinach work here)
- Sea salt and freshly cracked black pepper (to taste)
Yield: Serves 4-5 people generously, with enough for one or two additional lunches if you're careful with portions.
How to Make This Black-Eyed Peas Recipe
I'm going to walk you through this step-by-step, but let me be honest—the technique matters more than precise timing. You're looking for doneness cues, not a stopwatch. That's how you develop intuition in the kitchen.
Step 1: Prepare Your Ingredients
Before you turn on any heat, get everything prepped and within arm's reach. Drain and rinse all four cans of black-eyed peas under cool running water for about one minute, swirling them gently with your fingers. This removes roughly 25% of the sodium without washing away nutrients. Chop your bacon, sausage, onion, celery, and garlic. Mince your jalapeño (or measure out cayenne if using that route). Tear the thyme leaves from their stems.
This is mise en place—professional cooking shorthand for "everything in its place." When you have everything ready, the actual cooking becomes intuitive and relaxed rather than frantic.
Step 2: Render the Bacon
In a large, heavy-bottomed pot or Dutch oven, add your chopped bacon over medium heat. Don't rush this. You're not just cooking the bacon; you're rendering the fat slowly so it becomes liquid gold for flavor. Listen for it—you'll hear a gentle sizzle, not aggressive popping. Cook for 5-6 minutes, stirring occasionally, until the bacon edges turn mahogany brown and crispy. The fat should look like clear liquid pooling in the bottom of the pot.
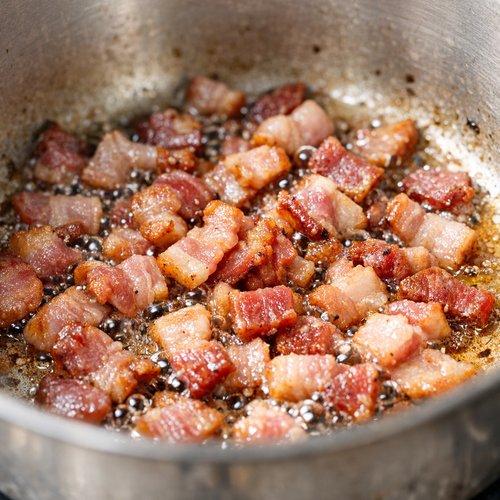
This rendered bacon fat is liquid flavor. Don't drain it away. It's the foundation everything else will cook in, and it's what makes this taste like home cooking rather than something assembled from a box.
Step 3: Add the Sausage
Add your diced turkey sausage to the bacon and its fat. Stir to coat everything. Cook for 3-4 minutes, stirring occasionally, until the sausage develops a light golden crust on the outside. You'll smell the smoke, the seasonings from the sausage releasing into the fat. That's what you're waiting for—not gray sausage, but sausage with some color and caramelization.
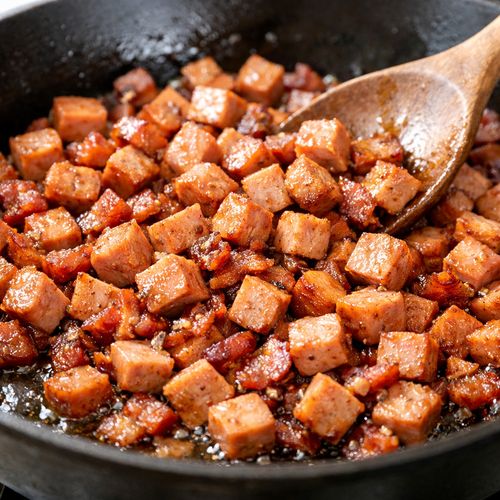
Once the sausage shows color, remove both the bacon and sausage with a slotted spoon, leaving all those beautiful drippings behind. Set them on a clean plate. You'll stir them back in later.
Step 4: Build Your Flavor Base
To that same pot with all the rendered fat still in the bottom, add your diced onion, celery, and garlic. Stir to coat everything in that fat. You'll hear it sizzle immediately—that's good. Cook for 4-5 minutes, stirring frequently, until the onion becomes translucent and soft and the whole kitchen smells like a restaurant kitchen. The celery will soften, and the garlic will mellow out rather than bite.
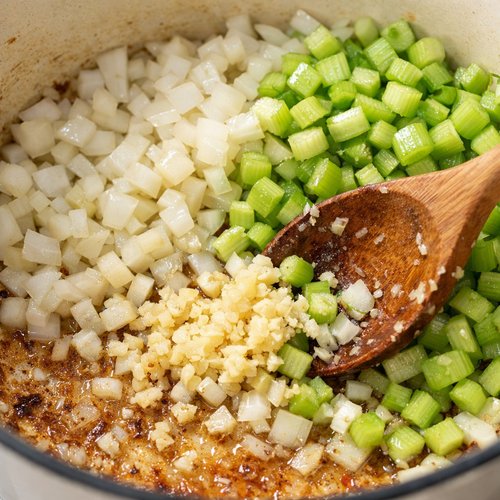
This is called building a flavor base, and it's where amateur cooking becomes intentional cooking. We're not just throwing everything in a pot and hoping. We're developing layers of flavor through proper technique.
Step 5: Add Aromatics and Seasonings
Add your minced jalapeño (or cayenne if using), fresh thyme, bay leaf, and Creole seasoning to the onion mixture. Stir constantly for 1-2 minutes until the seasonings bloom and become fragrant. You'll notice the color of the mixture deepen and the aroma intensify—that's the spices releasing their essential oils into the fat. This is crucial for deep flavor.
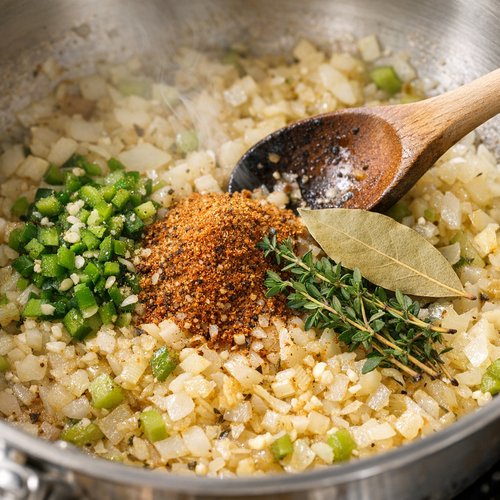
This step separates good home cooking from great home cooking. Taking 90 seconds to bloom your spices in fat creates complexity that tastes like you've been working for hours.
Step 6: Add Broth and Peas
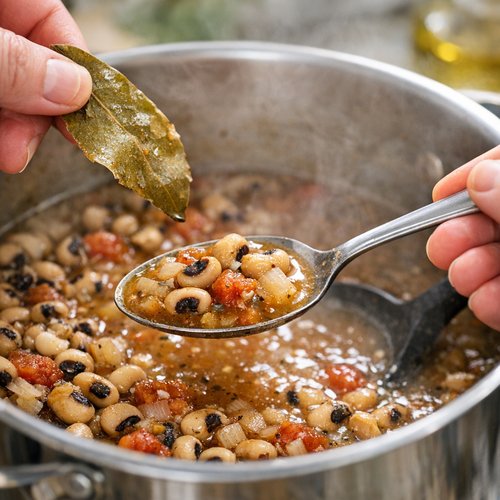
Pour in your chicken broth carefully. The mixture will bubble and hiss as the liquid hits the hot pan—expect this. Stir well, scraping the bottom of the pot with a wooden spoon to loosen any caramelized bits (this is called deglazing, and those bits are pure flavor). Add your rinsed black-eyed peas, stirring to combine.
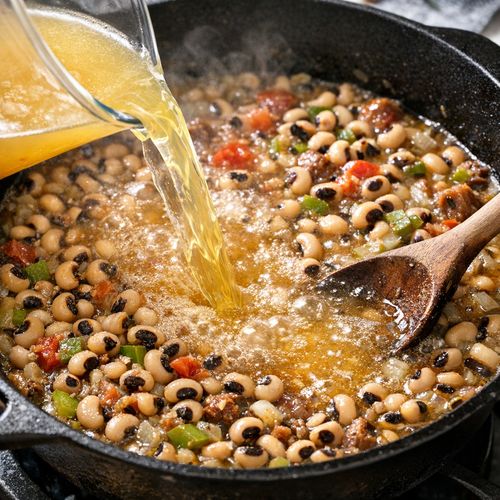
The liquid should come about three-quarters of the way up the peas. If it doesn't, add another cup of broth or even water. Stir in the bacon and sausage you set aside earlier. Season with salt and pepper to taste—remember the Creole seasoning and sausage are both salty, so taste before adding more.
Step 7: Simmer Until Everything Comes Together
Bring the mixture to a gentle boil, then immediately reduce heat to low-medium and maintain a quiet simmer (just a few bubbles breaking the surface, not a rolling boil). Cook uncovered for 12-15 minutes. The peas will continue to soften, and the flavors will deepen. Stir occasionally and taste as you go.

You're looking for the broth to reduce slightly and thicken as the starch from the peas releases into the liquid. It should coat a spoon lightly but still pour easily. This is the perfect consistency—thick enough to feel substantial, thin enough that it's not gluey.
Step 8: Fold In Greens and Final Cook
Add your chopped collard greens (or kale, or frozen spinach if that's what you have). Stir well, pushing the greens down into the liquid. They'll seem like a huge volume at first, but they'll wilt down within 2-3 minutes. Continue cooking for another 10 minutes, stirring occasionally.
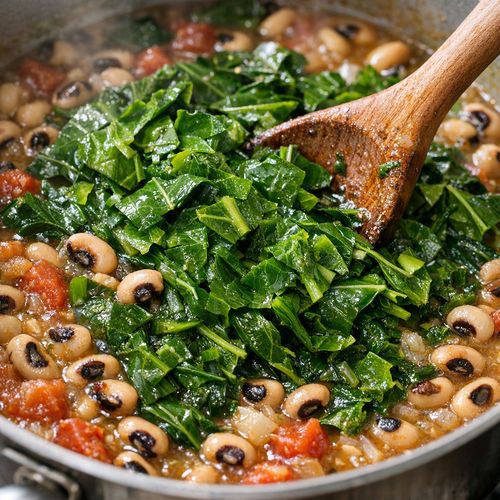
The greens add nutrition (especially iron and calcium), color, and subtle bitterness that balances all the richness from the meat and broth. The whole pot will smell incredible at this point—smoky, savory, and inviting.
Step 9: Taste, Adjust, and Rest
Remove the bay leaf. Taste a spoonful of the broth carefully (watch for heat!). Does it need more salt? More pepper? A pinch more Creole seasoning? Adjust to your preference. Remove from heat and let the pot sit, uncovered, for 5 minutes. This resting period allows everything to settle and the flavors to deepen slightly.
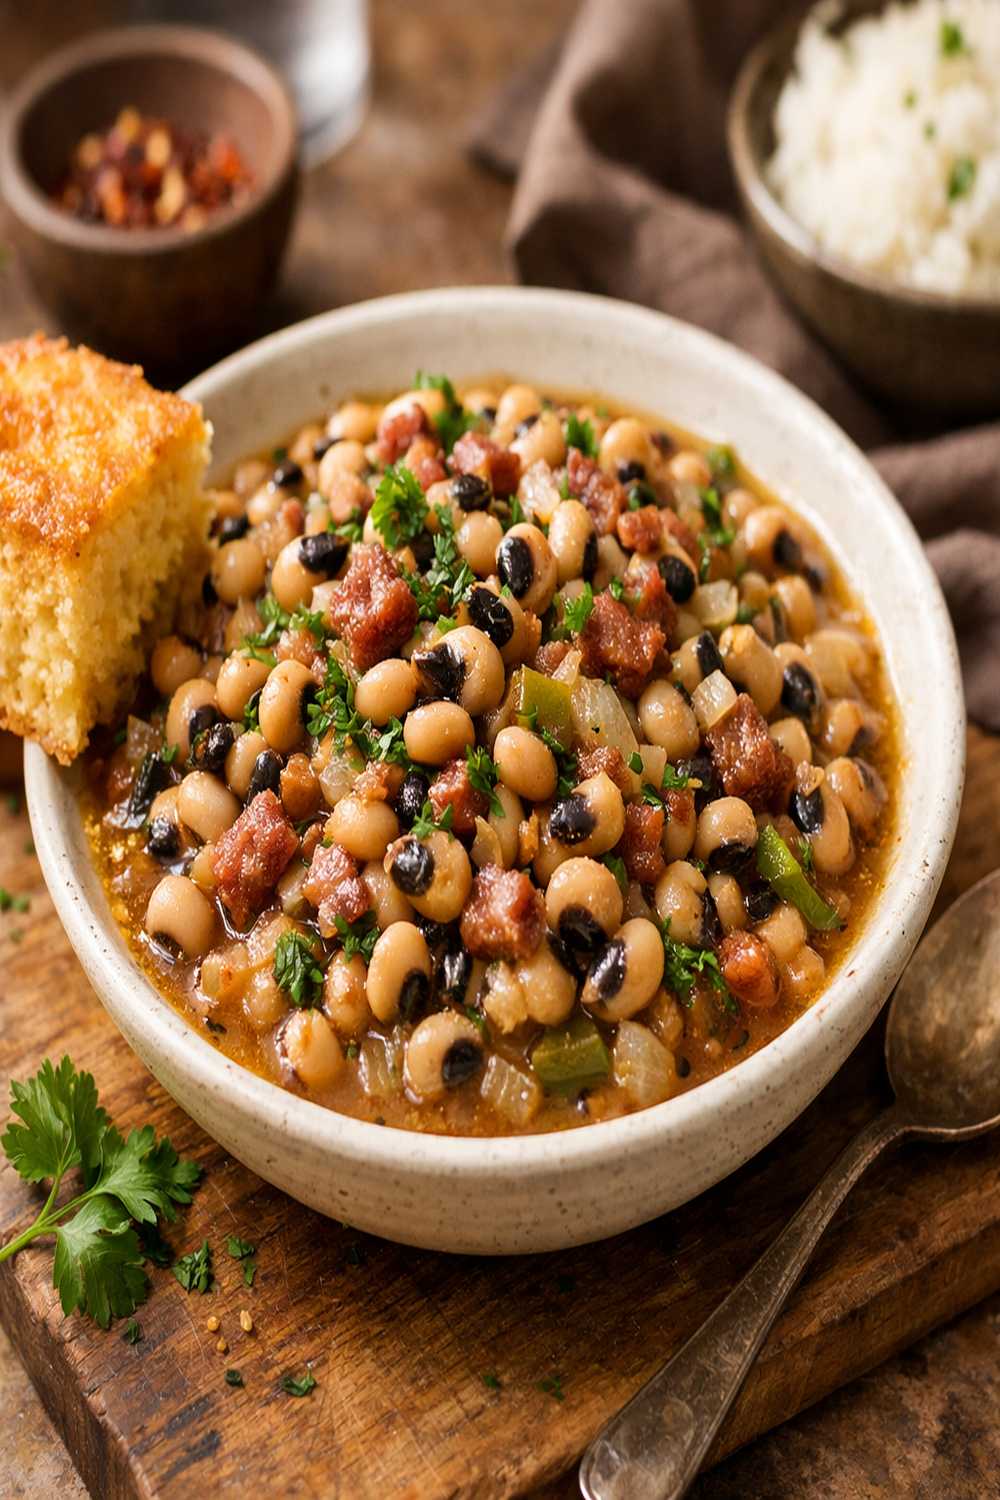
Serve in bowls over white rice, topped with sliced green onion and a crack of black pepper. The rice soaks up all that gorgeous broth and balances the richness of the meat. This is the dish that made my grandmother's kitchen smell like love.
Tips and Tricks From My Kitchen
- Don't skip rinsing the canned peas - This removes roughly 25% of the sodium without compromising nutrition or taste. It's a 60-second step that matters.
- Invest in a good heavy pot - A Dutch oven or heavy-bottomed pot distributes heat evenly and prevents scorching. If you're on a tight budget, this is one kitchen tool worth buying secondhand.
- Make it vegetarian - Skip the bacon and sausage entirely. Use 2 tablespoons of olive oil instead, and add 1 teaspoon of smoked paprika for that smoky depth. The dish is still delicious and costs about 40% less.
- Use what's on sale - If turkey sausage is expensive in your area, use regular pork sausage. If jalapeños are overpriced, stick with cayenne. The recipe is forgiving because the technique matters more than exact ingredients.
- Batch cook for the week - This recipe actually improves after a day in the refrigerator. Make a full pot on Sunday, portion into containers, and you have lunch ready for three days.
- Freeze with intention - Freeze portions in quart-sized containers, leaving ½ inch of headspace for expansion. Thaw overnight in the refrigerator and reheat gently with an extra splash of broth.
Expert's Nutritional Tip: Why Canned Peas Are Actually Smart
As a registered dietitian, I need to address the myth that canned legumes are nutritionally inferior to dried. The truth is more nuanced. Canned peas retain approximately 85-90% of the fiber, minerals, and most water-soluble vitamins from dried peas. The trade-off is sodium, which is why rinsing matters.
What's remarkable is bioavailability—the amount of nutrients your body can actually absorb. The canning process partially breaks down the cell walls of the peas, actually making minerals like iron and zinc more available for absorption. Combined with the vitamin C in the collard greens in this recipe, your body absorbs even more iron. That's not a compromise; that's strategic nutrition.
The time savings also matters nutritionally. Someone who makes this quick weeknight dinner is more likely to prepare home-cooked meals consistently than someone intimidated by overnight soaking and long cooking times. Consistency beats perfection in nutrition every single time.
Make-Ahead Guide: Smart Meal Prep Strategy
Full Make-Ahead (Up to 4 Days): Make the entire recipe through step 8. Cool completely, then divide into glass containers with lids. Refrigerate for up to 4 days. To serve, reheat gently over medium-low heat with an extra splash of broth (about ¼ cup), stirring occasionally, until heated through (about 8-10 minutes). The flavors will actually deepen in the refrigerator as ingredients meld overnight.
Partial Make-Ahead (Up to 3 Days): Complete steps 1-5 (through building your flavor base). Cool completely and refrigerate the mixture. When you're ready to cook, reheat, add the broth and peas, and continue from step 6. This saves about 15 minutes on busy nights and requires no sacrifice in flavor.
Freezer Strategy (Up to 3 Months): Cool the finished dish completely. Portion into quart-sized freezer containers, leaving ½ inch of headspace for expansion. Label with the date. Thaw overnight in the refrigerator, then reheat gently as described above. Do not freeze and reheat in the same container—transfer to a pot for reheating.
The Rice Element: Cook rice fresh for best texture, but if you want true convenience, cook rice in advance and refrigerate. Reheat individual portions by adding 2 tablespoons of water, covering, and microwaving for 90 seconds.
Common Mistakes to Avoid
- Skipping the bacon rendering step - I understand the temptation to speed up, but those 5-6 minutes of proper bacon cooking create the entire flavor foundation. You can't rush this without sacrificing taste. This isn't overthinking; this is technique.
- Not rinsing the canned peas - Raw, unrinsed canned peas create a tinny, overly salty broth. That 60 seconds of rinsing is the difference between "this is okay" and "this tastes homemade and delicious."
- Adding all the seasonings at once - If you dump everything in at the beginning, the spices become bitter and harsh. Blooming them in fat (step 5) mellows them and makes them work together. Don't skip this.
- Cooking at too high heat - This causes the liquid to reduce too quickly, the peas to break down into mush, and the flavors to become harsh. Low-medium heat and gentle simmering creates a silky, cohesive dish.
Can I Store Black-Eyed Peas From Can Recipe?
Refrigerator Storage (Up to 5 Days): Cool the finished dish to room temperature before transferring to airtight containers. The cold temperatures slow bacterial growth, making this an excellent candidate for batch cooking. Reheat gently over medium-low heat with an additional splash of broth, stirring occasionally, until heated through.
Freezer Storage (Up to 3 Months): Cool completely before freezing. Use quart-sized freezer-safe containers (glass or plastic), leaving about ½ inch of headspace for expansion as the food freezes. Label clearly with the date. Thaw overnight in the refrigerator before reheating. Do not reheat directly from frozen, as this creates uneven heating and can scorch the bottom.
Signs of Spoilage: If the dish develops an off-smell, visible mold, or sour taste, discard immediately. Properly stored leftovers should smell like you remember—smoky, savory, and inviting—when you open the container.
Pro Tip: Store the rice separately if you made it ahead. Rice maintains better texture when reheated separately, and it gives you flexibility to use the peas with different sides throughout the week.
Nutrition Information
Per Serving (1 cup of peas and broth, not including rice): Approximately 285 calories, 12 grams protein, 8 grams fat, 32 grams carbohydrates, 7 grams dietary fiber, 890 milligrams sodium. Based on USDA nutrition database for canned black-eyed peas, pork products, and collard greens.
The protein content is particularly impressive for a plant-forward dish—it rivals lean beef while being significantly more budget-friendly. The fiber (7 grams per serving) supports digestive health and helps maintain stable blood sugar levels, meaning this meal keeps you satisfied for hours rather than causing energy crashes.
The sodium comes primarily from the broth and cured meats. If you're monitoring sodium intake, use low-sodium broth (which I recommend anyway) and reduce the added salt. You'll still have a flavorful, satisfying meal.
The collard greens add significant amounts of calcium and iron—nutrients many people don't get enough of. Combined with the vitamin C in the same greens, your body absorbs the iron more efficiently than from many other sources.
What Can I Serve With This Black-Eyed Peas Recipe?
This dish is naturally versatile because it's built on a foundation of bold, balanced flavors. The broth is rich and savory without being heavy, and the greens add nutrition and lightness. Think about what complements these qualities.
White rice is the traditional pairing—it's neutral enough to let the peas shine while absorbing all that gorgeous broth. For something different, try creamed corn on the side for a Southern-style complete meal. Or serve it alongside simple affordable salad for brightness and contrast.
- Cornbread - The sweetness and crumbly texture balance the savory richness. Budget hack: make it from a simple mix (usually under $1) and you have a complete meal for a family of four under $10 total.
- Buttered white rice - The traditional pairing. Cook rice separately and drizzle with just a touch of butter. The peas' broth does the actual flavoring work.
- Simple green salad - Greens tossed with lemon juice and salt. The acidity cuts through richness and cleanses your palate between bites.
- Roasted root vegetables - Carrots or sweet potatoes roasted with a little oil and salt add earthiness and texture contrast.
- Simple coleslaw - Shredded cabbage with a light vinegar dressing provides crunch and tang.
Seasonal Variations: Adapt This Recipe Year-Round
Spring Version: Replace half the collard greens with fresh spring greens (spinach, arugula, or even tender kale). Add 1 cup of fresh snap peas in the last 5 minutes of cooking. The brightness of spring vegetables lightens the earthiness of the dish. Use fresh thyme from the garden if you grow herbs.
Summer Version: This is traditionally a winter dish, but summer entertaining deserves it too. Add fresh corn kernels (about 1 cup) in the last 10 minutes. Finish with fresh basil instead of green onion. Serve at room temperature as a hearty salad rather than a hot dish. The flavors still sing but feel lighter.
Fall Version: Add diced roasted sweet potato (about 1 cup) with the peas. The sweetness complements the savory meat beautifully. Use half collard greens and half kale for deeper earthiness. Finish with crumbled crispy bacon on top for texture.
Winter Version (Original): This is the version I've given you. Double down on it. The warm broth and hearty vegetables are exactly what you crave when it's cold outside. Add extra bacon if you want richness, or add more greens for nutrition.
Substitutes and Budget-Friendly Swaps
- Turkey sausage → Regular pork sausage - Often 30-40% cheaper in most areas. The flavor is richer and bolder, which actually works well here. Use the same amount.
- Smoked sausage → Kielbasa - Even more affordable in some regions and just as flavorful. Slice rather than dice for texture variation.
- Bacon → Pancetta or salt pork - If bacon is expensive, pancetta or even just diced salt pork provides the same smoky fat. You'll need slightly less because the salt is more concentrated.
- Collard greens → Kale, spinach, or even frozen versions - Fresh collards are wonderful but expensive in some seasons. Frozen kale or spinach (thawed and squeezed dry) works beautifully and costs 50% less. Nutritionally comparable.
- Fresh thyme → Dried thyme - Use one-third the amount (so ⅔ teaspoon dried instead of 2 teaspoons fresh). Add it when blooming the spices, not at the end, so it has time to soften.
- Fresh jalapeño → Cayenne or hot sauce - ¼ teaspoon cayenne provides the same heat for about 90% less money. Or add a splash of hot sauce at the end and taste as you go.
- Creole seasoning → Homemade blend - Mix 2 teaspoons paprika, 1 teaspoon garlic powder, ½ teaspoon cayenne, ½ teaspoon black pepper, and ¼ teaspoon onion powder. This costs roughly 20 cents compared to $1.50 for purchased seasoning.
- Chicken broth → Vegetable broth or water - Water works fine, honestly. You're building most flavor from the meat and vegetables, not broth. Vegetable broth costs similar to chicken and works perfectly for vegetarian versions.
- Canned peas → Frozen black-eyed peas - If your store has frozen (not canned) peas, they're sometimes cheaper and arguably fresher. No need to rinse. Cook following package directions, then continue with recipe.
FAQs
Can I make this recipe with dried black-eyed peas instead of canned?
Absolutely, but understand you're adding significant time, not just changing ingredients. Soak 1 pound of dried black-eyed peas overnight (8-12 hours) in cold water. Drain, rinse, and place in a pot with 6 cups of fresh water. Bring to a boil, then simmer for 45-60 minutes until just tender. Drain completely, then proceed with the recipe starting at step 2. The finished dish will be slightly firmer and more substantial because dried peas don't break down as easily. Budget-wise, dried peas cost roughly 60% less per serving than canned, so if you have time, they're worth it.
What if I don’t eat pork products?
This is completely workable. Skip the bacon and sausage. In step 2, use 2 tablespoons of olive oil instead of bacon fat. In step 3, add 1 cup of diced mushrooms (cremini or cremini blend) and cook for 4-5 minutes, stirring occasionally, until they release their moisture and begin to brown. The umami (savory) depth from mushrooms replaces much of what the meat provides. Add 1 teaspoon of smoked paprika when blooming your spices in step 5. The dish becomes vegetarian without tasting like something's missing.
Is this recipe spicy? Can I make it less spicy or more spicy?
As written with one jalapeño and standard Creole seasoning, it's moderately seasoned but not particularly hot. If you're sensitive to spice, omit the jalapeño entirely and reduce Creole seasoning to 1 teaspoon. If you want real heat, add two jalapeños (don't remove seeds), increase cayenne in your Creole blend, or stir in ⅛ teaspoon of cayenne at the end and taste before adding more. Spice should build gradually; you can't remove it once you've added too much.
Can I make this in a slow cooker?
Yes, with modifications. Complete steps 2-5 in a skillet on your stovetop (building all that flavor takes 15 minutes total). Transfer the cooked mixture to a slow cooker. Add broth and drained peas. Cook on low for 4-6 hours or high for 2-3 hours. In the last 30 minutes, add collard greens. The slow cooker makes everything softer, which some people love and others find less appealing. For best results with this recipe, the stovetop method creates better texture and more controlled flavor development.
How do I prevent the peas from getting mushy?
Use canned peas (which are already cooked) rather than dried peas you've cooked yourself. Keep heat at low-medium throughout—no rolling boils. Don't exceed the stated cooking time once peas are in the pot (12-15 minutes simmer). If you're making this hours ahead and reheating, reheat gently over low heat rather than high heat, which breaks down the already-tender peas further. Some mushiness is natural and desirable (it creates that creamy broth), but you're aiming for peas that hold their shape while being tender enough to mash easily against the roof of your mouth.
More Recipes You’ll Love
- Baked Beans Recipe on the Stovetop - Another budget-friendly legume dish with similar flavor foundations and make-ahead potential.
- Baked Chimichangas Recipe - If you love the comfort-food satisfaction of this dish, you'll appreciate how chimichangas deliver similar richness with different cultural roots.
- Affordable Salad Recipe - A bright, fresh side that pairs beautifully with black-eyed peas for nutritional balance.
- Baked Eggs with Spinach - Another iron-rich, protein-packed dish that features greens beautifully and costs just as little per serving.
I hope this recipe brings some of my family's warmth to your table. Black-eyed peas aren't fancy, and they don't pretend to be. What they are is honest food that nourishes your body and feeds your soul without emptying your wallet. They're the kind of dish that reminds us that wholesome eating doesn't require expensive ingredients or complicated techniques—just intention and care.
This recipe batch-cooks beautifully, freezes well, and actually improves as it sits in your refrigerator. More importantly, it tastes like you've been working in the kitchen all day, even when you've only spent 30 minutes total. That's not a shortcut; that's smart cooking.
Try making this this week, and I'd love to hear how it turns out. Don't forget to mention @affordablefoodideas if you try this recipe!
META DESCRIPTION: Quick