This post contains affiliate links. As an Amazon Associate I earn from qualifying purchases.
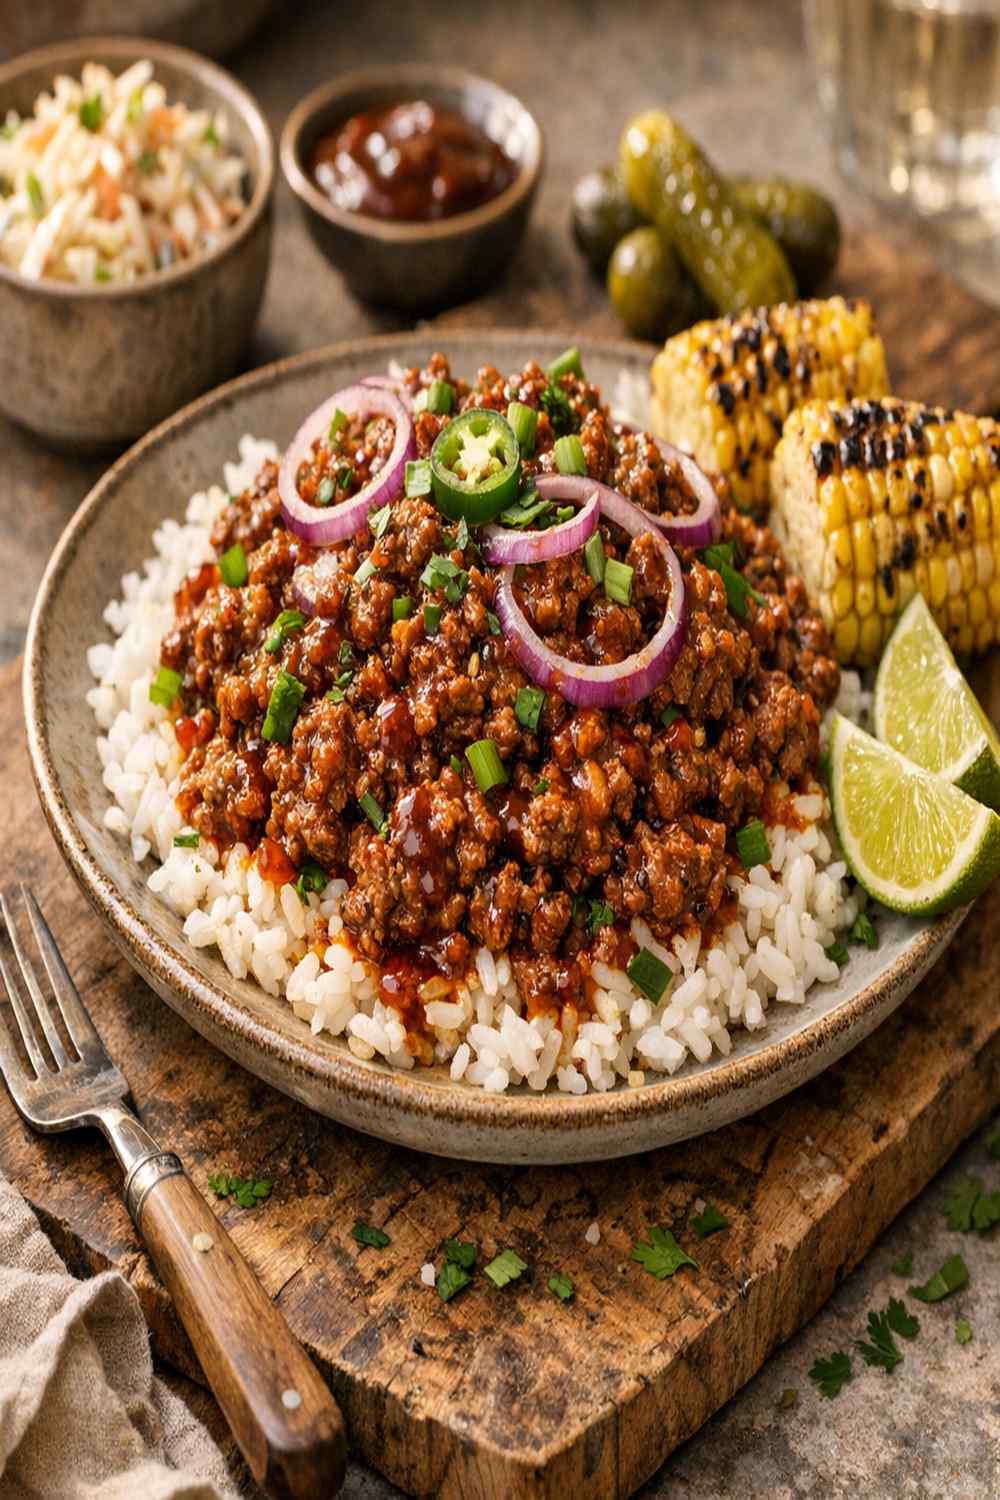
This hearty ground beef and bean bowl became my go-to weeknight dinner about five years ago when I was struggling to feed my growing family on a tight budget. What started as a desperate attempt to stretch ground beef into something satisfying turned into one of my most-requested recipes. The beauty of this dish is how the homemade barbecue sauce clings to each spoonful, making every bite taste restaurant-quality—without the restaurant price tag. Pair it with an affordable fresh salad or a side of roasted vegetables to round out the meal.
How a Half-Pound of Ground Beef Became Our Family Favorite
I remember standing in my tiny kitchen in Waltham, staring at half a pound of ground beef and wondering how I’d make it work for four hungry people. My kids had just finished a growth spurt, and our grocery budget was stretched thinner than ever. I’d spent years studying nutrition science in school, learning about complete proteins and amino acid profiles, but what I really needed was a practical solution that didn’t sacrifice nutrition or flavor.
That night, I raided my pantry and found two cans of beans I’d bought on sale weeks earlier. By combining them with that modest amount of ground beef and layering flavors with vinegar, molasses, and smoked paprika, I created something I hadn’t expected: a dish that my family asked for repeatedly. What’s more, the cost per serving came to just $1.70—a number that stuck with me because I realized how many families were probably facing the same dilemma I was.
This recipe changed how I think about meal planning. It taught me that stretching proteins doesn’t mean compromising on taste or satisfaction. Instead, it means getting creative with pantry staples and understanding how layered flavors can make modest portions feel abundant.
What is BBQ Ground Beef and Bean Bowl?
This is a one-skillet, family-friendly dish that combines lean ground beef with two types of canned beans—kidney and black—in a tangy, slightly sweet homemade barbecue sauce. Unlike restaurant versions loaded with high-fructose corn syrup and artificial ingredients, this sauce comes together from basic pantry staples you likely already have at home.
The genius of this recipe lies in the beans. They’re not just filler—they’re a powerhouse source of fiber and plant-based protein that stretches the ground beef further while improving the nutritional profile of the entire dish. The combination of vinegar, molasses, and tomato creates a depth of flavor that tastes like it’s been simmering for hours, when in reality it comes together in about 20 minutes.
This dish represents everything I believe about affordable eating: that wholesome, satisfying meals don’t require expensive ingredients or complicated techniques. They require understanding how to layer flavors and pair affordable proteins with nutrient-dense additions that make everyone feel full and happy.
Why You’ll Love This BBQ Ground Beef and Bean Recipe
- Costs less than $2 per serving – This meal feeds four people for under $8 total, making it perfect for budget-conscious families who don’t want to sacrifice nutrition or taste.
- Ready in 20 minutes – From pantry to table, this is a genuine weeknight dinner that doesn’t require advance planning or special ingredients.
- Packed with protein and fiber – The combination of ground beef and two types of beans delivers 18 grams of protein and 12 grams of fiber per serving, keeping everyone satisfied for hours.
- Made with real ingredients you can pronounce – No mystery sauces or artificial flavors. Every ingredient serves a purpose and contributes to the final flavor.
- Naturally versatile – Serve it over rice, in lettuce wraps, over baked potatoes, or stuffed into tortillas depending on what you have on hand.
- Freezer-friendly – Make a double batch and freeze half for those nights when cooking feels impossible.
- Requires minimal cleanup – One skillet means one dish to wash and more time with your family instead of at the sink.
The Ingredients
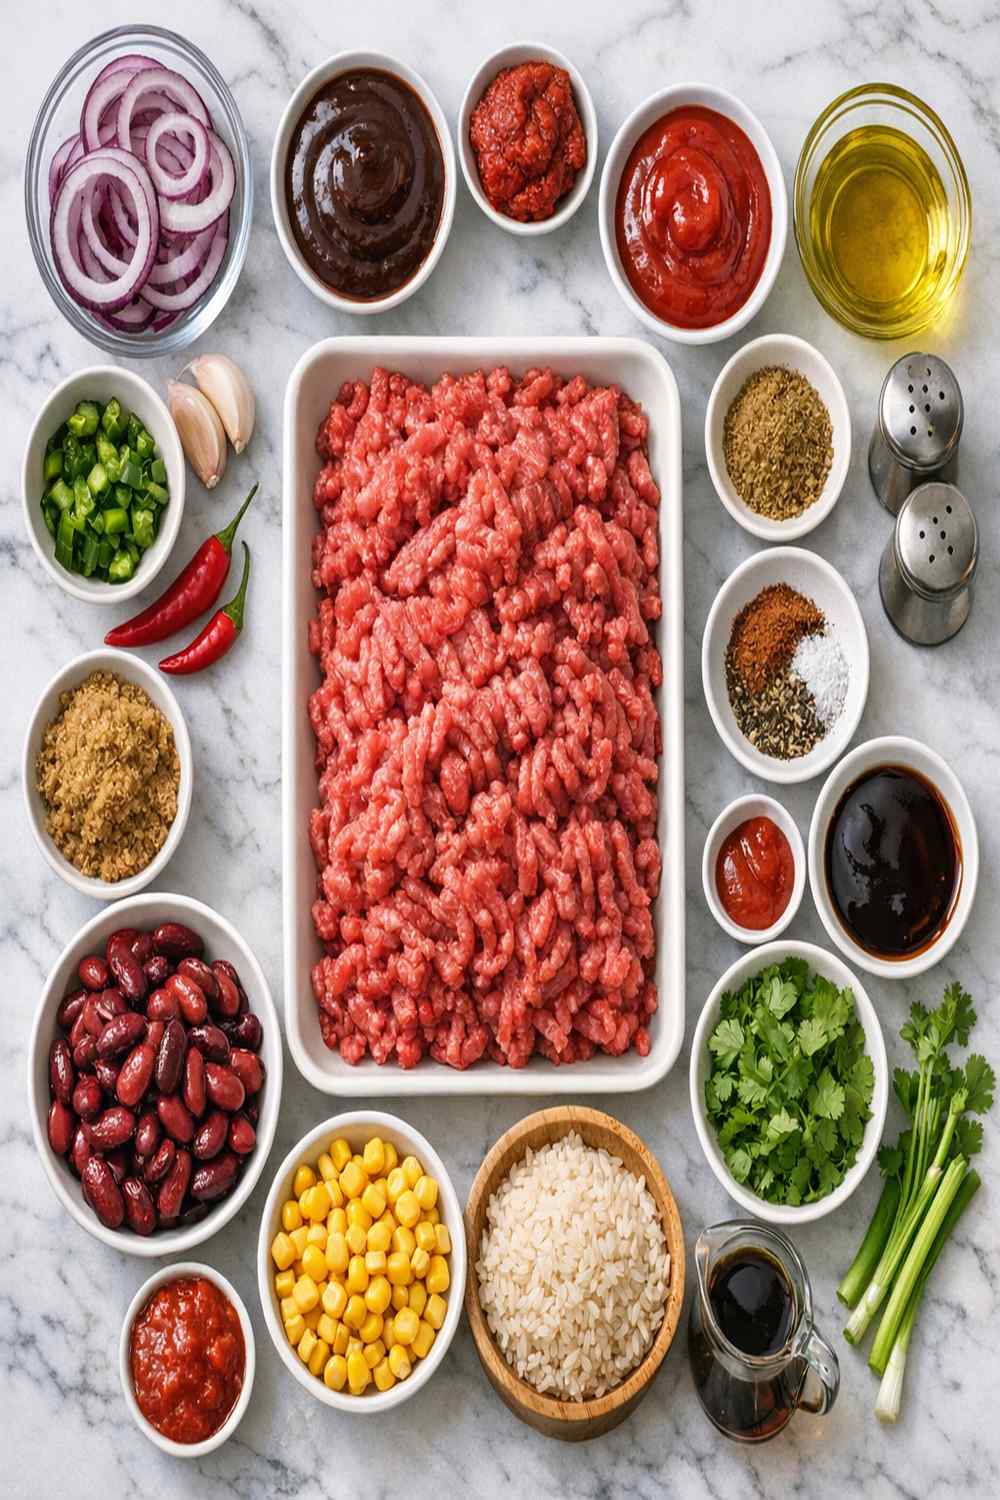
I’ve organized these ingredients by category to make your shopping and prep easier. Most of these items are pantry staples, which means you might already have several on hand. I’ve included budget-friendly notes for each ingredient because knowing where to find the best prices is part of what makes affordable eating actually work in real life.
For the Base
- 8 ounces ground beef (I use 85/15 blend for the best balance of flavor and cost, about $2.65)
- 2 cloves garlic (minced fresh, about $0.16 or use jarred minced garlic if it’s cheaper in your area)
- 1 tablespoon neutral cooking oil (vegetable or canola works perfectly and costs about $0.04)
For the Beans and Base Sauce
- 2 tablespoons tomato paste (concentrated flavor in a tiny amount, about $0.10)
- 1 fifteen-ounce can black beans (rinsed and drained thoroughly, about $0.89)
- 1 fifteen-ounce can kidney beans (rinsed and drained thoroughly, about $0.89)
- 8 ounces tomato sauce (the plain version without added spices, about $0.25)
For the Signature Barbecue Flavor
- 2 tablespoons apple cider vinegar (the acidity brightens everything, about $0.12)
- 1 teaspoon Worcestershire sauce (umami bomb in small doses, about $0.02)
- 2 tablespoons packed brown sugar (adds sweetness without being overpowering, about $0.08)
- ½ tablespoon Dijon mustard (adds tang and helps emulsify the sauce, about $0.05)
- 2 tablespoons unsulfured molasses (brings depth and slight bitterness that balances sweetness, about $0.35)
- 1 teaspoon smoked paprika (provides that smoky depth, about $0.10)
For Seasoning and Serving
- 2 green onions (sliced, for garnish, about $0.22)
- ¼ teaspoon onion powder (adds background sweetness, about $0.02)
- 4 ounces shredded sharp cheddar cheese (sharp cheddar has more flavor so you use less, about $0.85)
- 4 cups cooked rice (about $0.80 for the rice itself—I use white, brown, or jasmine depending on what’s on sale)
- Salt (to taste, about $0.02)
- ¼ teaspoon garlic powder (concentrated garlic flavor, about $0.02)
- ⅛ teaspoon cayenne pepper (just enough heat to make people wonder what the secret ingredient is, about $0.01)
- Freshly cracked black pepper (to taste, about $0.02)
Total Cost: $8.12 for four generous servings = $2.03 per person
How to Make BBQ Ground Beef and Bean Bowl
I’m going to walk you through this step-by-step, but I want you to understand the “why” behind each action. When you understand what’s happening in the pan, you’ll feel confident adjusting the recipe based on what you have on hand. This is how real home cooking works—not rigidly following orders, but understanding principles.
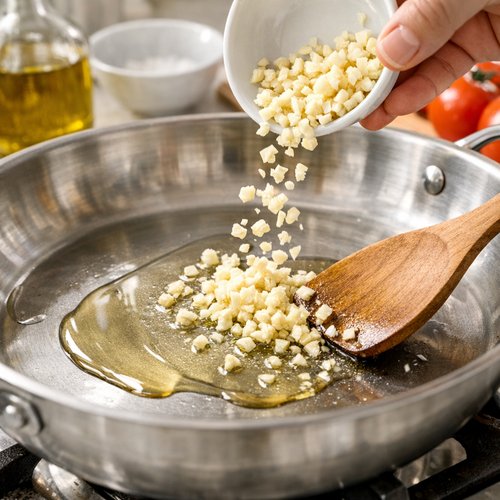
Step 1: Build Your Flavor Base with Garlic
Pour your tablespoon of oil into a large skillet and set it over medium heat. Once the oil shimmers slightly—you’ll see it move easily across the pan—add your minced garlic. Let it cook for about one full minute, stirring occasionally. You’re listening for a gentle sizzle and looking for the garlic to turn from raw white to pale golden. This is crucial: don’t rush this step or let the garlic brown, because burnt garlic tastes acrid and bitter.
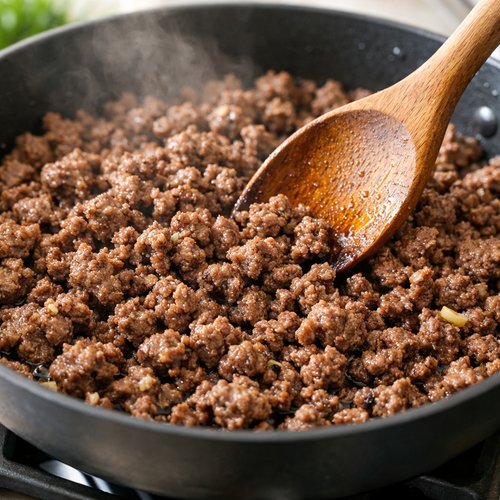
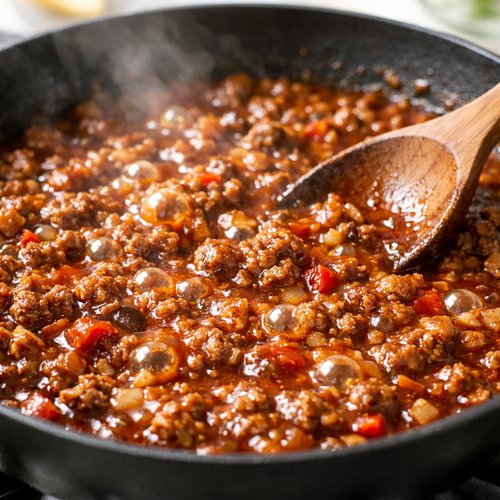
Step 2: Cook the Ground Beef Until It’s Completely Browned
Add the ground beef to the pan with the garlic and increase the heat slightly to medium-high. Break it up with a wooden spoon as it cooks, reaching into the corners of the pan and making sure no large chunks remain. You want it to brown evenly, which takes about 6 to 8 minutes. When the beef is completely cooked through with no pink remaining, you’ll notice the pan looks a bit greasy if you used a higher-fat ground beef. This is fine—don’t panic. If you see a visible pool of grease, carefully tilt the pan and spoon off the excess fat into a container (save it for cooking vegetables, or discard it).
Step 3: Rinse and Add Your Beans
While the beef is cooking, take both cans of beans to your sink. Open them, pour the liquid into your sink, and rinse each can thoroughly under cool running water. Spend about a minute rinsing; this step removes excess sodium and the starchy liquid that can make your sauce cloudy. Now add the drained beans to the cooked beef and stir everything together to combine. The beans should be slightly warm from the pan.

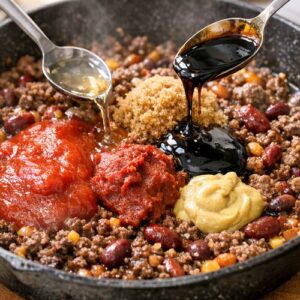
Step 4: Create the Barbecue Sauce
This is where the magic happens. To the beef and beans, add the tomato sauce, tomato paste, apple cider vinegar, brown sugar, molasses, Dijon mustard, Worcestershire sauce, smoked paprika, garlic powder, onion powder, and a generous crack or two of fresh black pepper. Don’t add salt yet—we’ll taste at the end. Stir everything together thoroughly, making sure the tomato paste and molasses are fully incorporated and there are no lumps. The mixture should look deep reddish-brown and smell amazing.

Step 5: Simmer Until the Flavors Marry
Increase the heat to medium-high and let the mixture come to a simmer. You’ll see small bubbles breaking the surface consistently. Once it reaches a simmer, reduce the heat back to medium and let it cook for 5 to 7 minutes, stirring often. You’re not looking for rapid boiling; you want a gentle, consistent simmer where the sauce thickens slightly and the flavors deepen. The longer it simmers, the more the molasses and vinegar flavors develop. Taste it after five minutes and decide if you want to let it go longer.
Step 6: Taste and Season
Remove the pan from heat and taste a spoonful carefully (blow on it first—it’s hot). Does it need salt? I typically add about ½ teaspoon, but your amount might differ based on the sodium in your beef and beans. Stir the salt in and taste again. The sauce should taste tangy, slightly sweet, and savory all at once—no single flavor should dominate.

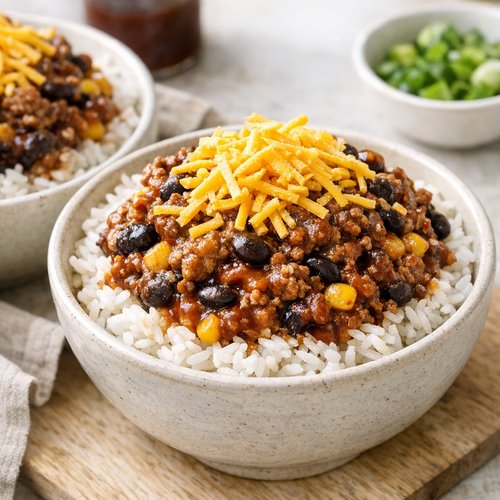
Step 7: Assemble Your Bowls
Place one cup of cooked rice in each serving bowl. Top each with one cup of the beef and bean mixture, then sprinkle about ¼ cup of shredded cheddar cheese on top. Finish with a small handful of sliced green onions. Serve immediately while everything is warm and the cheese is slightly melted from the heat of the sauce.
Tips and Tricks
- Use an 85/15 ground beef blend – This ratio gives you enough fat for flavor without an excess pool of grease. If you only have 80/20, it’s fine—just drain a bit more fat.
- Don’t skip rinsing the beans – This simple step removes sodium and creates a cleaner-tasting sauce. It genuinely matters.
- Make the sauce first in a small bowl – If you’re nervous about getting proportions right, whisk all your sauce ingredients together in a separate bowl before adding to the pan. This gives you a chance to verify the proportions and adjust before everything combines.
- Toast your rice for better flavor – If you have time, cook your rice in slightly salted water or use a rice cooker with a touch of butter. Better rice = better final dish.
- Taste as you go – Remember that molasses and vinegar are strong flavors. You can always add more salt or sugar, but you can’t take it out.
- Keep canned beans in your pantry always – This is the ingredient that makes this recipe work. Stock up when they’re on sale (usually around $0.50 per can) and you’ll always have a quick protein source on hand.
- Save your green onion tops – Store them in a jar of water in the refrigerator and they’ll stay fresh for a week. Use them for garnishing or chopping into omelets.
Expert’s Nutritional Insight
As a registered dietitian, I want to highlight what makes this dish nutritionally clever: the combination of ground beef with legumes is a complete protein containing all nine essential amino acids. But here’s what most people don’t realize—the beans significantly increase the fiber content, which slows digestion and keeps blood sugar stable. This means you’ll feel satisfied longer, making this an excellent choice for people managing their weight or dealing with afternoon energy crashes.
The molasses isn’t just for flavor—it contains manganese and iron, minerals many people under-consume. The apple cider vinegar has been shown in some research to support healthy digestion and may help with satiety. This isn’t a health food fad; this is real nutrition science expressed through delicious, affordable ingredients that people actually enjoy eating.
Make-Ahead and Meal Prep Guide
Prep the night before: Mince your garlic, open and rinse your cans of beans, and combine all your dry spices in a small bowl. Store everything in the refrigerator. When you get home, everything comes together in about 15 minutes instead of 20.
Double the recipe for freezing: I often make double batches on Sunday afternoons. The beef and bean mixture (without the rice topping) freezes beautifully for up to three months. Freeze it in individual portions in freezer bags, and you can reheat one serving in the microwave in about three minutes when life gets hectic.
Cook rice in bulk: Making four cups of rice takes the same effort as making one. Cook a big batch on Sunday and store it in the refrigerator in an airtight container. It reheats perfectly in the microwave with just a splash of water, and you’ll have it ready for multiple meals throughout the week.
Common Mistakes to Avoid
- Overcooking the garlic – I mentioned this, but it’s worth repeating because it’s the most common mistake. Start tasting your sauce at the five-minute mark instead of automatically cooking for seven minutes.
- Not draining the beans thoroughly – Excess liquid makes a thin sauce instead of a glossy, clingy one. Take the extra minute to drain and rinse properly.
- Skipping the molasses – I know it seems like an unusual ingredient, but it’s the secret weapon that makes this taste homemade instead of like a canned sauce. Brown sugar alone won’t give you the same depth.
- Adding all the salt at once – Different brands of tomato sauce and beans have varying sodium levels. Taste before adding salt. You can always add more, but you can’t remove it.
Can I Store BBQ Ground Beef and Bean Bowl?
Absolutely. Store the beef and bean mixture in an airtight container in the refrigerator for up to 4 days. The flavors actually deepen on day two or three, so it makes excellent leftovers. When you’re ready to eat it, reheat gently over medium heat on the stovetop with a splash of water if needed, or microwave it in a bowl covered with a damp paper towel for 2 to 3 minutes.
For longer storage, freeze the beef and bean mixture (without rice or toppings) in freezer bags or containers for up to 3 months. Thaw overnight in the refrigerator if you have time, or reheat directly from frozen on the stovetop (it takes about 10 minutes over medium heat). Keep the rice and cheese separate and add fresh toppings when serving.
The rice and cheese should be prepared fresh for the best texture, though leftover rice stores well and reheats nicely.
Nutrition Information
According to USDA nutritional data, one serving (1 cup rice with 1 cup beef and bean mixture, topped with cheese and garnish) contains approximately 485 calories, 18 grams of protein, 42 grams of carbohydrates, 12 grams of fiber, 8 grams of healthy fat, and 6 grams of saturated fat. The sodium content is approximately 620 milligrams, which is reasonable for a complete meal.
What I love about this nutritional profile is the fiber-to-calorie ratio. The beans contribute most of that fiber while keeping calories moderate, making this an excellent choice if you’re trying to eat in a way that supports long-term health without restriction.
What Can I Serve With BBQ Ground Beef and Bean Bowl?
This dish is satisfying on its own, but here are some complementary sides that round out the meal without breaking your budget. Consider pairing it with a three-bean salad for extra vegetables and fiber, or add a simple side salad for freshness and additional nutrients.
- Coleslaw with a simple vinegar dressing – The crunch and acidity balance the rich, savory beef bowl perfectly. Buy a bag of shredded cabbage, toss with a bit of vinegar, sugar, and salt.
- Steamed or roasted broccoli – A simple vegetable adds nutrition without complicating your meal. Toss with a tiny bit of oil and salt.
- Corn on the cob or cornbread – There’s something about corn that pairs beautifully with barbecue flavors. If you’re buying fresh, wait for end-of-season sales.
- Cucumber slices with ranch seasoning – Cool and refreshing against the warm, savory bowl. Use plain yogurt mixed with a bit of ranch powder for a budget-friendly dip.
- Sweet potato wedges – Bake them alongside your rice for a meal that’s even more nutrient-dense.
Seasonal Variations
Spring: Add a handful of fresh spinach to the finished sauce and let it wilt in. The earthiness complements the barbecue flavors beautifully and increases your vegetable intake.
Summer: Serve over lettuce wraps instead of rice for a lighter, cooler version. Top with corn kernels and fresh cilantro if you have them.
Fall: Mix in some cooked sweet potato or pumpkin puree to deepen the flavors and add natural sweetness. Use butternut squash instead of rice for something different.
Winter: Serve over mashed potatoes instead of rice, or stuff the mixture into baked sweet potatoes for a hearty, warming meal.
Substitutes and Ingredient Swaps
- Turkey or chicken ground meat instead of beef – Use the same amount. Ground turkey is often less expensive than beef at certain times of year. Ground chicken is leaner, so watch for dryness and add a splash of water if needed during simmering.
- Different bean combinations – Pinto beans, navy beans, or chickpeas work beautifully. Stick with two cans total for consistency.
- Honey instead of molasses – You’ll use slightly less (about 1½ tablespoons) as it’s sweeter. The depth won’t be quite the same, but it works in a pinch.
- Regular paprika instead of smoked – You’ll lose the smoky depth, but you can compensate by adding ¼ teaspoon liquid smoke if you have it.
- Balsamic or red wine vinegar instead of apple cider – Use slightly less (about 1½ tablespoons) as they’re more intense. Each brings different flavor notes.
- Skip the fresh green onions – Use dried chives, fresh cilantro, or simply omit. The dish is delicious without garnish.
- Monterey Jack or pepper jack cheese instead of cheddar – These add different flavor notes. Skip the cheddar entirely if you’re dairy-free.
- Cauliflower rice or regular rice alternatives – A serving of cauliflower rice reduces carbohydrates if that’s a concern for your family.
Bbq Beef Mince Recipe
Ingredients
Method
- Pour your tablespoon of oil into a large skillet and set it over medium heat. Once the oil shimmers slightly—you'll see it move easily across the pan—add your minced garlic. Let it cook for about one full minute, stirring occasionally. You're listening for a gentle sizzle and looking for the garlic to turn from raw white to pale golden. This is crucial: don't rush this step or let the garlic brown, because burnt garlic tastes acrid and bitter.

- Add the ground beef to the pan with the garlic and increase the heat slightly to medium-high. Break it up with a wooden spoon as it cooks, reaching into the corners of the pan and making sure no large chunks remain. You want it to brown evenly, which takes about 6 to 8 minutes. When the beef is completely cooked through with no pink remaining, you'll notice the pan looks a bit greasy if you used a higher-fat ground beef. This is fine—don't panic. If you see a visible pool of grease, carefully tilt the pan and spoon off the excess fat into a container (save it for cooking vegetables, or discard it).

- While the beef is cooking, take both cans of beans to your sink. Open them, pour the liquid into your sink, and rinse each can thoroughly under cool running water. Spend about a minute rinsing; this step removes excess sodium and the starchy liquid that can make your sauce cloudy. Now add the drained beans to the cooked beef and stir everything together to combine. The beans should be slightly warm from the pan.

- This is where the magic happens. To the beef and beans, add the tomato sauce, tomato paste, apple cider vinegar, brown sugar, molasses, Dijon mustard, Worcestershire sauce, smoked paprika, garlic powder, onion powder, and a generous crack or two of fresh black pepper. Don't add salt yet—we'll taste at the end. Stir everything together thoroughly, making sure the tomato paste and molasses are fully incorporated and there are no lumps. The mixture should look deep reddish-brown and smell amazing.
- Increase the heat to medium-high and let the mixture come to a simmer. You'll see small bubbles breaking the surface consistently. Once it reaches a simmer, reduce the heat back to medium and let it cook for 5 to 7 minutes, stirring often. You're not looking for rapid boiling; you want a gentle, consistent simmer where the sauce thickens slightly and the flavors deepen. The longer it simmers, the more the molasses and vinegar flavors develop. Taste it after five minutes and decide if you want to let it go longer.

- Remove the pan from heat and taste a spoonful carefully (blow on it first—it's hot). Does it need salt? I typically add about ½ teaspoon, but your amount might differ based on the sodium in your beef and beans. Stir the salt in and taste again. The sauce should taste tangy, slightly sweet, and savory all at once—no single flavor should dominate.

- Place one cup of cooked rice in each serving bowl. Top each with one cup of the beef and bean mixture, then sprinkle about ¼ cup of shredded cheddar cheese on top. Finish with a small handful of sliced green onions. Serve immediately while everything is warm and the cheese is slightly melted from the heat of the sauce.

Notes
FAQs
Can I make this in a slow cooker?
Absolutely. Brown the ground beef and garlic in a skillet first, then transfer everything to a slow cooker along with the beans and all sauce ingredients. Cook on low for 4 to 6 hours or on high for 2 to 3 hours. The slow cooker allows more time for flavors to develop, so you might find it even more delicious. Just remember that slow cooking concentrates flavors, so start with less salt and add more at the end.
What if I don’t have molasses?
You can substitute with an equal amount of honey or use three tablespoons of brown sugar instead. The depth won’t be identical, but it will still taste delicious. I don’t recommend using only sugar though, because the molasses brings complexity that plain sugar can’t replicate.
Is this recipe spicy?
No, it’s not particularly spicy. The ⅛ teaspoon of cayenne pepper just hints at heat. If your family prefers no heat at all, omit it. If you want more spice, add ¼ teaspoon or use fresh jalapeños or hot sauce. This is an excellent canvas for heat lovers to customize.
Can I freeze individual portions for my kids?
Yes. Let the beef and bean mixture cool completely, then divide it into freezer bags or small containers, leaving the rice and cheese separate. You can freeze up to three portions at a time. Thaw in the refrigerator overnight or reheat directly from frozen in a microwave-safe dish covered with a damp paper towel for about 4 to 5 minutes. Add fresh rice and cheese when serving.
What if the sauce is too thin after cooking?
Let it simmer an extra 5 to 10 minutes to reduce and thicken. If you’re in a hurry, make a slurry by mixing one tablespoon of cornstarch with two tablespoons of cold water, stir it into the sauce, and let it simmer for 2 to 3 minutes. The sauce will thicken noticeably. Alternatively, you didn’t cook it long enough—longer simmering time naturally reduces liquid and thickens the sauce.
More Recipes You’ll Love
- Baked Beans Recipe on the Stovetop – A classic side that stretches your budget and pairs beautifully with barbecue flavors
- Grillable Veggie Burger – Another bean-based budget meal that’s perfect for meatless Mondays
- Baked Chimichangas Recipe – A different way to use ground beef and beans with similar flavor satisfaction
- 5 Minutes Easy Vegan Ramen – A quick, affordable meal when you need something completely different
- This Easy Chicken Dinner – Worth adding to your recipe collection.
- My Weeknight Chicken Recipe – Worth adding to your recipe collection.
- My Favorite Beef Dish – Worth adding to your recipe collection.
I hope you and your family enjoy this barbecue ground beef and bean bowl as much as mine does. It’s been a staple in our home for years, and I love that it represents everything I believe about affordable, wholesome eating—that you don’t need expensive ingredients or complicated techniques to create meals that nourish your family and bring everyone to the table. This recipe has fed us through tight budgets, busy seasons, and everything in between. If you make it, I’d absolutely love to hear about it. Don’t forget to mention @affordablefoodideas if you try this recipe!