This post contains affiliate links. As an Amazon Associate I earn from qualifying purchases.
There’s something magical about a dish that tastes restaurant-quality yet costs just a few dollars to make. Beef picadillo—that stunning Cuban-inspired one-pan wonder—does exactly that. I love serving it over fluffy white rice for a complete meal, or tucking it into warm tortillas for something more casual. If you’re looking for other affordable ways to use ground beef, you might also enjoy exploring baked chimichangas, which share that same satisfying, budget-friendly spirit.
A Kitchen Memory That Started With My Abuela’s Stovetop
I grew up watching my grandmother work magic in her small kitchen in rural New Hampshire. Money was tight, but her table was always abundant with flavor. I remember standing on a step stool next to her cast-iron skillet, watching her transform a pound of ground beef, some pantry staples, and what felt like pure love into something my whole family gathered around. That’s when I first tasted picadillo—though she never called it that. She just called it “dinner.”
Years later, after becoming a registered dietitian, I realized what she’d been doing all along: creating nutrient-dense, satisfying meals without breaking the bank. Picadillo taught me that Spanish and Latin American cuisine doesn’t require expensive imports or complicated techniques. It requires intention, a few key seasonings, and the understanding that whole families can eat well on a realistic budget.
This recipe is my modern love letter to those kitchen afternoons—and my commitment to showing you that healthy, delicious meals are absolutely within reach.
What Is Beef Picadillo, Really?
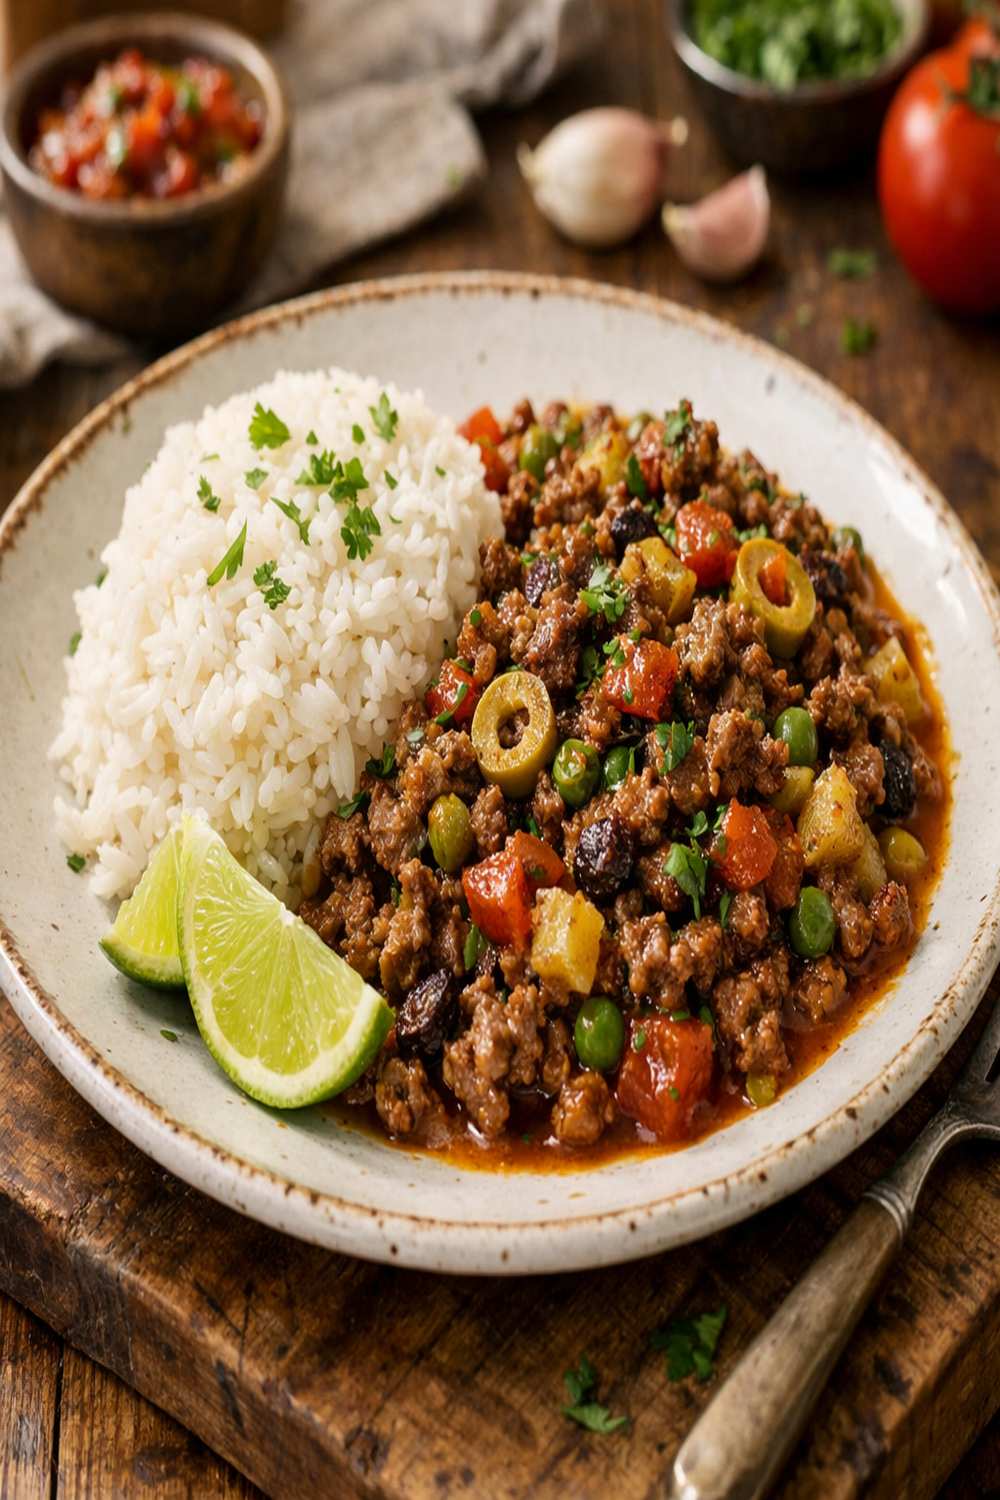
Beef picadillo is a classic dish with deep roots in Spanish and Cuban cuisine, though variations appear throughout Latin America and even the Philippines. At its heart, it’s ground beef cooked with aromatic vegetables, warm spices, and a balance of savory, slightly sweet, and briny flavors from olives and a touch of tomato sauce.
What makes picadillo special—and what captured my attention as a nutrition professional—is how it delivers complete protein, vegetables, and complex flavor in a single, economical pan. It’s traditionally served over rice, but it’s equally at home in empanadas, tacos, or even stuffed peppers. The beauty lies in its flexibility and its ability to satisfy both your palate and your wallet.
The name itself comes from the Spanish verb “picar,” meaning to mince or chop. That tells you everything: this is a dish built on finely combined ingredients where every element matters.
Why You’ll Love This Beef Picadillo Recipe
- Ready in under 30 minutes – This is a genuine weeknight champion. From stovetop to table takes roughly 25-30 minutes, making it perfect for busy families or anyone cooking solo after work.
- One skillet, minimal cleanup – Everything happens in one pan. No separate pots, no double dishes. That’s the kind of practical efficiency I built my kitchen around.
- Budget-conscious without sacrificing nutrition – Ground beef is one of the most affordable proteins available. Paired with pantry staples and affordable seasonings, this meal costs roughly $1.50-2.00 per serving while delivering iron, B vitamins, and protein your body actually needs.
- Naturally gluten-free and adaptable – Whether you’re managing dietary restrictions or just looking for flexibility, picadillo works. It’s naturally free of gluten, and the base works beautifully with dairy-free or low-carb approaches.
- Teaches fundamental cooking skills – From sautéing aromatics to building flavor layers to managing liquid reduction, this recipe covers the foundations that make you a confident home cook.
- Family-approved and restaurant-quality tasting – Kids, skeptical partners, aging parents—I’ve served this to them all. The balance of flavors feels elevated, but the accessibility remains genuine.
The Ingredients
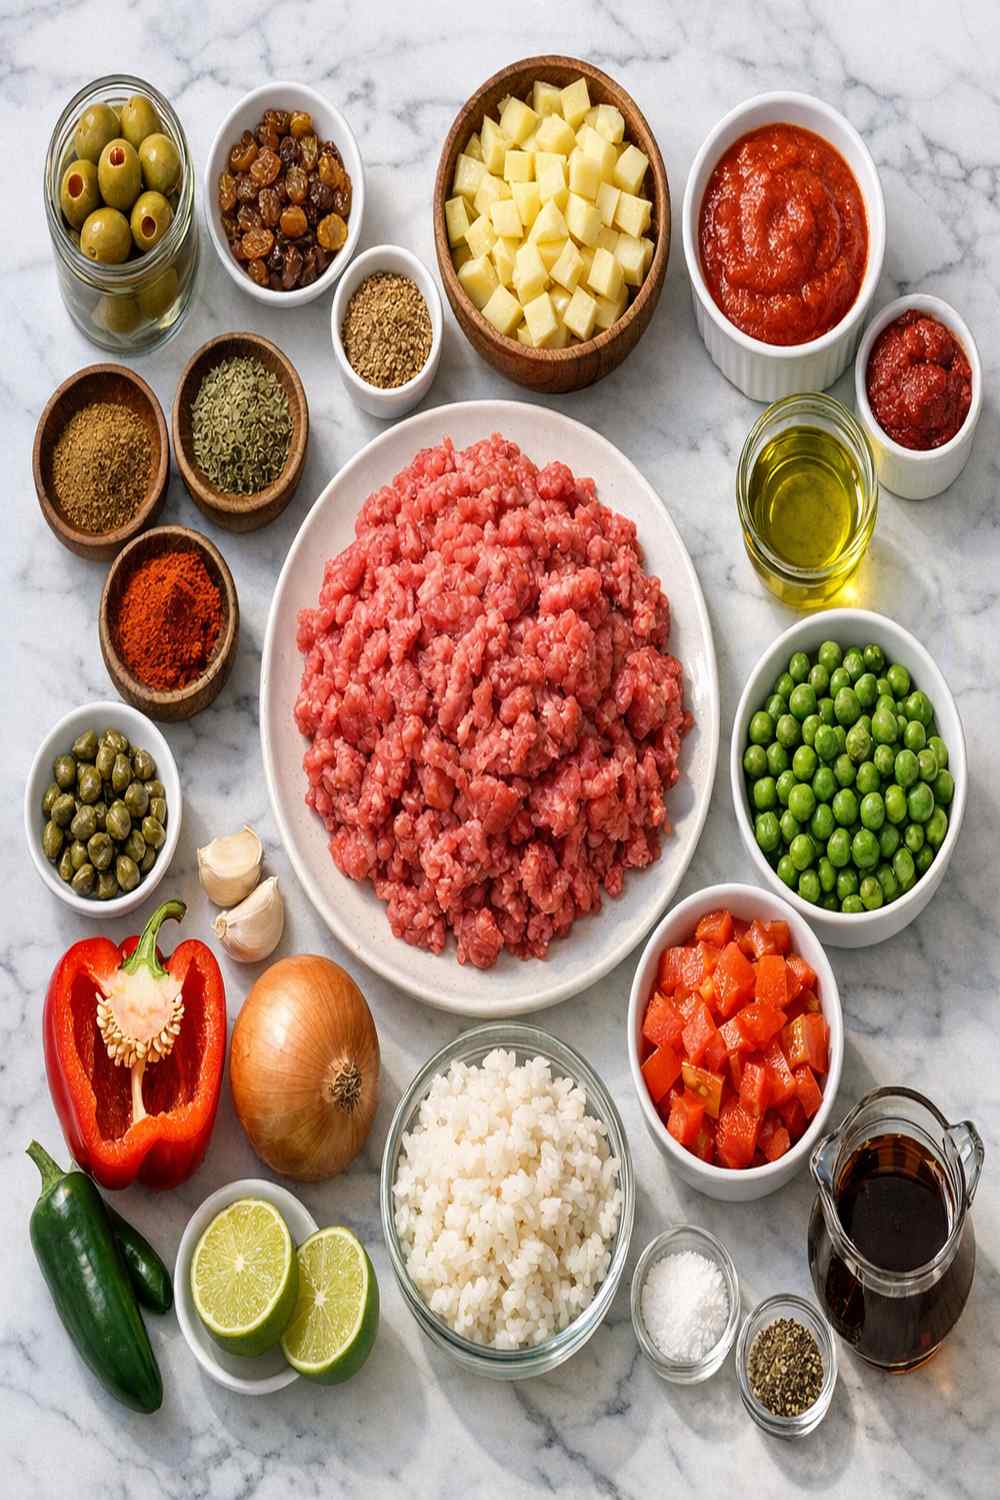
One of my core beliefs as a dietitian is that you should recognize and understand every ingredient on your list. Below, I’ve organized these components so you know exactly what you’re buying and where budget-friendly swaps exist. This recipe makes approximately 4 servings as a main dish, or 6 servings if stretched with rice.
- 2 tablespoons fresh cilantro, roughly chopped (optional but recommended—brightens everything)
- 3 garlic cloves, minced (fresh garlic adds authentic depth that powder cannot replicate)
- 1 teaspoon fresh lime juice (bottled works; fresh is ideal)
- 1 cup water (or low-sodium beef broth for deeper flavor)
- ¼ cup tomato sauce (canned is fine; no fresh tomato required)
- 1 medium bell pepper, chopped (about 150 grams—red or green both work; choose whatever’s on sale)
- 1 pound lean ground beef (93/7 ratio preferred, but 80/20 works fine and costs slightly less)
- 1 teaspoon dried oregano (Mexican or Spanish oregano preferred, but any dried oregano functions well)
- 1 teaspoon sazón seasoning with culantro and achiote (this is the secret ingredient—find it in any grocery store’s Latin section for under $3)
- ½ teaspoon ground black pepper (freshly ground is superior, but pre-ground is perfectly acceptable)
- 1 tablespoon neutral cooking oil (vegetable or canola works beautifully—I keep these on hand always)
- 1 teaspoon adobo seasoning (this Latin staple costs $2-3 per container and lasts months—essential pantry item)
- 1 medium red onion, chopped (about 150 grams total—regular yellow onions save 20-30 cents if budget is tight)
- 1 tablespoon pimiento-stuffed green olives, sliced (these add the signature briny-sweet note)
Expert’s Nutritional Insight
I want to highlight something important here: the olives in this recipe aren’t just flavor. They’re a source of monounsaturated fat, which supports heart health and helps your body absorb the fat-soluble vitamins in the beef. According to USDA data, one tablespoon of pimiento-stuffed olives contains roughly 50 calories and 4 grams of fat—mostly the kind your cardiovascular system appreciates. Combined with the lycopene in tomato sauce and the sulfur compounds in garlic and onions, this dish is genuinely anti-inflammatory.
How to Make Beef Picadillo?
I’m going to walk you through this step-by-step, the way I’d explain it if you were standing next to me in the kitchen. Pay attention to the sensory cues—when something smells fragrant, when it looks golden, when the sizzle changes. Your senses are more reliable than any timer.
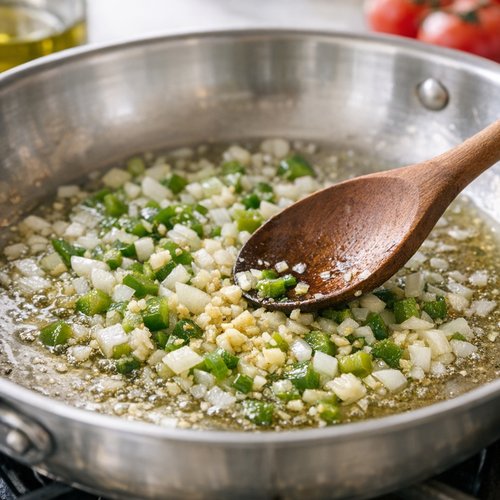
Step 1: Warm Your Oil and Sauté the Aromatics
Pour your tablespoon of oil into a large skillet (10-12 inches is ideal) and place it over medium heat. Let it warm for about 1 minute—you want it hot enough that when you add your vegetables, they sizzle immediately, but not so hot that anything smokes. Once you see the oil shimmer and move easily across the pan’s surface, you’re ready.
Add your chopped onion and bell pepper. Stir them around for about 30 seconds to coat them in oil, then let them sit for roughly 2 minutes. You’ll notice the onion begins to turn translucent at the edges. This is the moment to add your minced garlic. Stir everything together and continue cooking for another 3-4 minutes, stirring occasionally. You’re looking for soft, fragrant vegetables that have released their natural oils into the pan. The kitchen should smell amazing—that’s your sign you’re on track.
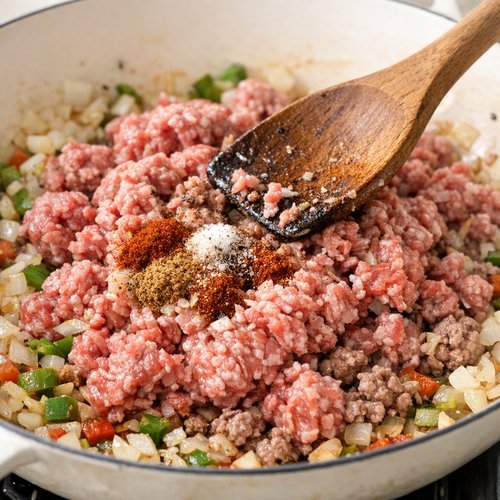
Step 2: Brown the Ground Beef and Layer in Seasonings
Increase your heat to medium-high. Add your pound of ground beef directly to the pan with the vegetables. Using a wooden spoon or spatula, break the meat into smaller pieces as it cooks. Don’t stir constantly—let it sit for 1-2 minutes between stirs so it develops color and flavor through contact with the hot pan. This browning process takes about 6-8 minutes total.
You’ll know the beef is ready when no pink remains visible and the meat has released its liquid into the pan. Once you reach that point, sprinkle in your adobo seasoning, black pepper, oregano, and sazón. Stir everything together thoroughly, making sure every piece of meat gets coated with the spice blend. The sazón will add a slight golden hue and a savory depth you can’t replicate any other way.
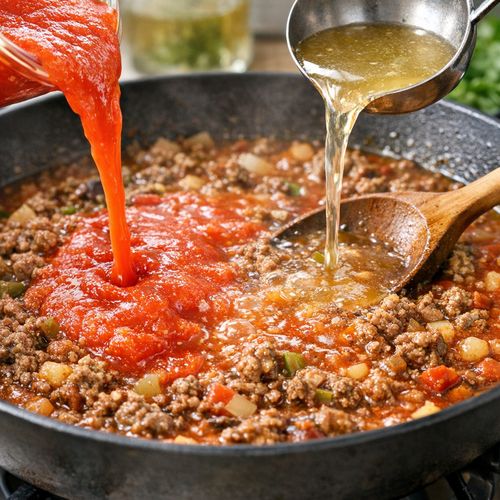
Step 3: Build the Sauce and Simmer to Perfection
Pour in your tomato sauce and water (or broth, if using). Stir to combine everything evenly. Reduce the heat to medium-low and let this simmer, uncovered, for 10-15 minutes. During this time, the liquid will gradually reduce and thicken, concentrating all the flavors together. Stir occasionally—not constantly, just every 2-3 minutes—to prevent sticking.
Watch for the point when the mixture looks noticeably thicker and the liquid no longer pools at the bottom of the pan. When you drag your spoon through the mixture, it should leave a brief trail before closing back up. This is your sign that you’ve achieved the right consistency. If it seems too thin after 15 minutes, let it cook another 2-3 minutes.
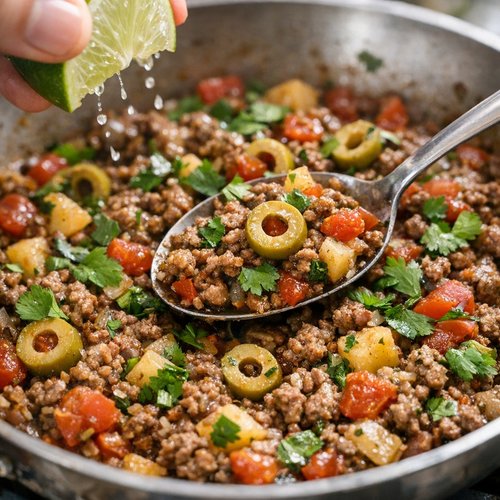
Step 4: Add the Finishing Elements and Season to Taste
Stir in your sliced olives and fresh lime juice. Add your cilantro if using. Taste a small spoonful carefully. Does it need more salt? More brightness? This is your moment to adjust. Some olives are saltier than others, so you may not need additional salt. If it tastes flat, a pinch of additional black pepper or a squeeze more lime can wake it up immediately.
Tips and Tricks From My Kitchen
- Use a wooden spoon, not metal – It won’t scrape your pan’s surface, and it won’t conduct heat the way metal does. I’ve used the same wooden spoon for 15 years.
- Don’t skip the sazón – I know it’s an unfamiliar ingredient to some home cooks, but it’s genuinely affordable and worth seeking out. The culantro and achiote create an authentic flavor profile that no substitute quite captures. That said, if you truly cannot find it, an extra ½ teaspoon of adobo works as a backup.
- Taste as you go – This is professional cooking 101. You’re adjusting seasoning throughout, not fixing it at the end. Each time you add something new, taste it.
- Let your meat brown properly – Resist the urge to stir constantly in step 2. The Maillard reaction (that browning magic) happens through direct contact with heat. Let it sit, develop flavor, then stir.
- Fresh cilantro makes a genuine difference – If your budget allows it, grab fresh cilantro. That herbaceous brightness completely elevates the final dish. However, if it’s $2.99 and stretched beyond your budget, dried oregano already provides herbal notes, so omit it without guilt.
- Double the recipe easily – This scales beautifully. I frequently make a double batch, freeze half, and have dinner ready another night. Follow the same timing; just use a larger skillet and add a couple extra minutes to the simmering time.
Make-Ahead and Meal Prep Guide
As a registered dietitian, I know that meal prep isn’t optional—it’s the difference between eating well and defaulting to takeout when you’re exhausted. Here’s how I work picadillo into my weekly planning:
Prep the Vegetables in Advance: On Sunday, chop your onion, bell pepper, and mince your garlic. Store them in a glass container in the refrigerator for up to 4 days. When you’re ready to cook on Tuesday or Thursday, you’re starting with pre-prepped components, cutting your active cooking time in half.
Make the Full Dish and Store Properly: Cook the entire recipe and let it cool to room temperature. Transfer to an airtight container and refrigerate for up to 4 days. When you’re ready to eat it, reheat gently on the stovetop over medium-low heat, adding a splash of water if it’s thickened too much.
Freeze for Later: Picadillo freezes beautifully. Portion it into individual containers or one large container, and freeze for up to 3 months. Thaw overnight in the refrigerator, then reheat on the stovetop or microwave until warmed through.
Build Customizable Meal Prep Boxes: I often cook the picadillo on Sunday and store it separately from rice. That way, clients and family members can assemble their own meal components based on preferences—rice for some, cauliflower rice for others, lettuce wraps for another person. Everyone eats the same nutritious base with their preferred vehicle.
Common Mistakes to Avoid
After teaching cooking classes and working with countless home cooks, I’ve noticed patterns in where people stumble. Here’s what to watch for:
- Skipping the sazón entirely or substituting it with cumin alone – Cumin is wonderful, but it’s not the same. Sazón brings color, achiote earthiness, and culantro brightness that cumin cannot replicate. If you cannot find sazón, order it online for $3. It’s worth it and lasts forever.
- Cooking on too high heat the entire time – This burns the garlic and onions before they soften properly. Medium heat for sautéing, medium-low for simmering. Patience creates flavor; rushing creates burnt bitterness.
- Crowding the pan during browning – If your skillet is too small, add the beef in two batches. Crowding drops the temperature and causes steaming instead of browning. You want that golden crust.
- Not tasting before serving – Everyone’s salt sensitivity differs. Someone using lower-sodium broth needs different seasoning than someone using regular water. Taste it. Adjust it. It takes 10 seconds and makes all the difference.
Can I Store Beef Picadillo?
Absolutely, and I encourage it. This dish actually improves after a day or two—the flavors meld and deepen, which is why I love meal prepping it.
Refrigerator storage: Transfer cooled picadillo to an airtight container and store for up to 4 days. When reheating, use the stovetop over medium-low heat with a splash of water if needed, or microwave in a covered container, stirring halfway through.
Freezer storage: This recipe freezes beautifully for up to 3 months. I recommend portioning it before freezing—individual containers or portions are far easier to thaw than one large block. Thaw overnight in the refrigerator, then reheat as described above.
What about cooked rice separately? Store rice in an airtight container for up to 4 days in the refrigerator. When you’re ready to eat, reheat gently with a splash of water to restore moisture.
Nutrition Information
This recipe makes approximately 4 generous servings (or 6 servings if stretched with rice). Per serving (picadillo only, without rice): approximately 240 calories, 15 grams protein, 16 grams fat, and 6 grams carbohydrates. According to USDA nutrition data, one serving provides roughly 20% of your daily iron need (thanks to the ground beef), significant B vitamins for energy metabolism, and the antioxidant lycopene from tomato sauce.
The olives add sodium—roughly 200 mg per serving—which many people assume is problematic. However, sodium isn’t inherently harmful; it’s excess sodium combined with low potassium that concerns health professionals. This dish includes potassium from the tomato sauce and onion, creating better nutritional balance.
If sodium is a personal concern, you can reduce olives to ½ tablespoon or use unsalted green olives if you find them. The dish remains delicious with less brine.
What Can I Serve With Beef Picadillo?
I’ve served picadillo in more ways than I initially imagined possible, and each presentation works beautifully. Here are my favorites:
- Over fluffy white rice – This is the traditional approach. Learn how to cook white rice perfectly here. The mild, tender rice balances the bold, complex picadillo flavors beautifully. One serving of picadillo plus ½ cup cooked rice creates a complete, satisfying meal.
- Nestled in warm flour tortillas – Warm 6-8 flour tortillas over a gas flame or in a dry skillet. Serve picadillo alongside with diced onion, cilantro, and a lime wedge. It’s casual, interactive, and uses minimal additional ingredients.
- Inside empanadas or hand pies – This is where picadillo truly shines. Using picadillo as the filling for baked chimichangas creates an elegant appetizer or main dish. The thick, concentrated filling holds beautifully in pastry.
- Stuffed into roasted peppers or tomatoes – Cut bell peppers or large tomatoes in half, remove seeds, and fill with picadillo. Bake at 375°F for 20 minutes. It’s restaurant-quality plating at home prices.
- Over cauliflower rice for lower-carb versions – The bold flavors don’t diminish when you change the base. Picadillo over cauliflower rice gives you the same satisfaction with fewer carbohydrates.
- Alongside beans and additional vegetables – A bowl of picadillo, some homemade baked beans, and a simple green salad creates nutritional completeness and visual variety on the plate.
Substitutes and Variations
- Ground turkey instead of beef – This reduces calories and fat while maintaining protein. The final dish is noticeably lighter but equally delicious. Use the same weight and follow identical timing.
- Lean ground pork as an alternative – Pork picadillo is common in Filipino cuisine. It has a slightly different flavor profile but works beautifully. Timing remains the same.
- Regular olives without pimiento – If pimiento-stuffed olives are unavailable, any green or Castelvetrano olives work. You may want to add a tiny pinch of sugar (¼ teaspoon) to replicate the slight sweetness the pimiento provides.
- Fresh lime juice versus bottled – Fresh is superior, but bottled works. If using bottled, start with ¾ teaspoon and taste before adding more, as some brands taste overly acidic.
- Cilantro swap – If you carry the cilantro-soap gene (yes, it’s real and genetic), use fresh parsley instead. It provides freshness without the genetic flavor-altering compounds.
- Dried oregano variations – Mexican oregano offers more citrus notes; Spanish oregano is earthier. Both work identically in terms of measurement. Choose based on what’s available.
- Adobo seasoning alternatives – If you cannot find adobo, combine ½ teaspoon cumin, ¼ teaspoon garlic powder, ¼ teaspoon onion powder, and ¼ teaspoon paprika. It’s not identical but captures similar warmth.
- Beef broth instead of water – This adds deeper flavor at no additional cost if you already have broth on hand. I keep low-sodium beef broth in my pantry always.
Seasonal Variations
I’m a firm believer that seasonal ingredients shouldn’t dictate whether you can make a recipe you love. That said, here are thoughtful ways to adapt picadillo through the seasons:
Summer Version: Add diced fresh tomato (1 cup) in place of half the tomato sauce. Use fresh lime if you have it from farmers markets. The dish becomes brighter and feels lighter despite being equally nourishing. Serve over chilled rice for a room-temperature option on hot evenings.
Fall/Winter Version: Add ¼ cup diced dried fruit—raisins, diced apricots, or even chopped dates—during the simmering stage. This echoes the slightly sweet profile while making the dish feel more warming. The dried fruit plumps up and adds textural interest.
Spring Version: After cooking, stir in fresh spring vegetables—peas, diced zucchini, or minced green beans—during the last 3 minutes of simmering. They maintain some structure and brightness, making the dish feel seasonal without changing its core identity.
Beef Picadillo Recipe
Ingredients
Method
- Pour your tablespoon of oil into a large skillet (10-12 inches is ideal) and place it over medium heat. Let it warm for about 1 minute—you want it hot enough that when you add your vegetables, they sizzle immediately, but not so hot that anything smokes. Once you see the oil shimmer and move easily across the pan's surface, you're ready. Add your chopped onion and bell pepper. Stir them around for about 30 seconds to coat them in oil, then let them sit for roughly 2 minutes. You'll notice the onion begins to turn translucent at the edges. This is the moment to add your minced garlic. Stir everything together and continue cooking for another 3-4 minutes, stirring occasionally. You're looking for soft, fragrant vegetables that have released their natural oils into the pan. The kitchen should smell amazing—that's your sign you're on track.

- Increase your heat to medium-high. Add your pound of ground beef directly to the pan with the vegetables. Using a wooden spoon or spatula, break the meat into smaller pieces as it cooks. Don't stir constantly—let it sit for 1-2 minutes between stirs so it develops color and flavor through contact with the hot pan. This browning process takes about 6-8 minutes total. You'll know the beef is ready when no pink remains visible and the meat has released its liquid into the pan. Once you reach that point, sprinkle in your adobo seasoning, black pepper, oregano, and sazón. Stir everything together thoroughly, making sure every piece of meat gets coated with the spice blend. The sazón will add a slight golden hue and a savory depth you can't replicate any other way.

- Pour in your tomato sauce and water (or broth, if using). Stir to combine everything evenly. Reduce the heat to medium-low and let this simmer, uncovered, for 10-15 minutes. During this time, the liquid will gradually reduce and thicken, concentrating all the flavors together. Stir occasionally—not constantly, just every 2-3 minutes—to prevent sticking. Watch for the point when the mixture looks noticeably thicker and the liquid no longer pools at the bottom of the pan. When you drag your spoon through the mixture, it should leave a brief trail before closing back up. This is your sign that you've achieved the right consistency. If it seems too thin after 15 minutes, let it cook another 2-3 minutes.

- Stir in your sliced olives and fresh lime juice. Add your cilantro if using. Taste a small spoonful carefully. Does it need more salt? More brightness? This is your moment to adjust. Some olives are saltier than others, so you may not need additional salt. If it tastes flat, a pinch of additional black pepper or a squeeze more lime can wake it up immediately.

Notes
FAQs
Can I make this without sazón seasoning?
You can, but I wouldn’t recommend it without a solid substitute. Sazón is genuinely important to authentic flavor. However, if it’s absolutely unavailable, combine ¾ teaspoon cumin, ¼ teaspoon garlic powder, ¼ teaspoon smoked paprika, and ¼ teaspoon ground coriander. It won’t be identical, but it captures some of the warmth. Better yet: order sazón online. It’s $3, ships quickly, and transforms your pantry.
Is picadillo spicy, and how can I adjust heat level?
This recipe as written is not spicy—it’s savory with depth. If you enjoy heat, add ¼ teaspoon cayenne pepper or 1-2 diced jalapeños during the sautéing stage. If you’re cooking for people sensitive to any heat, the recipe works perfectly as written with zero spice.
What if I don’t have fresh garlic on hand?
Fresh garlic is superior, but ½ teaspoon garlic powder works in a pinch. Add it with your other seasonings in step 2 rather than sautéing it first. The dish will be slightly less nuanced but still delicious. Fresh garlic, however, truly is worth purchasing.
Can I double this recipe, and does the cooking time change?
Absolutely double it. Use a larger skillet (14 inches if possible) to avoid crowding. The browning process might take an extra 2-3 minutes with double the beef, and the simmering might take an additional 3-5 minutes to reach proper thickness. But everything follows the same logic and sensory cues—watch for color, aroma, and consistency rather than relying strictly on time.
My picadillo seems too thick or too thin—how do I fix it?
Too thin: Continue simmering uncovered for another 5-10 minutes. The liquid will continue reducing and concentrating. Too thick: Stir in 2-3 tablespoons water or broth and simmer for another 2-3 minutes. The consistency should resemble wet ground beef that holds together, not a soup and not a paste.
More Recipes You’ll Love
- How to Cook White Rice – The perfect companion to picadillo, executed with precision and respect for simplicity.
- Baked Chimichangas Recipe – Transform leftover picadillo into these crispy-baked hand pies that feel indulgent but remain budget-friendly.
- Baked Beans Recipe on the Stovetop – A classic side dish that rounds out your picadillo plate with additional protein and fiber.
- 5 Minutes Easy Vegan Ramen – When you need something completely different but equally quick and satisfying.
- This Easy Chicken Dinner – Worth adding to your recipe collection.
- This Easy Cabbage Recipe – Worth adding to your recipe collection.
A Final Thought
I started with a memory of my grandmother’s kitchen, and I want to end by acknowledging what you’re doing right now: choosing to cook real food at home. That choice ripples outward in ways you might not immediately see. You’re teaching yourself skills that compound over time. You’re showing family members that wholesome meals don’t require expensive restaurants or processed shortcuts. You’re building confidence in your own kitchen.
Picadillo is humble enough to be genuinely accessible and special enough to feel elevated. That duality—affordable yet impressive, quick yet flavorful—is exactly the kind of cooking I’ve devoted my career to celebrating and teaching.
Make this recipe. Adjust it to your tastes. Double it and freeze half. Serve it over rice one night and in tortillas the next. But most importantly, enjoy the process and the meal. Don’t forget to mention @affordablefoodideas if you try this recipe—I’d genuinely love to hear how it turns out in your kitchen.
META DESCRIPTION: Authentic beef picadillo recipe ready in 30 minutes. Budget-friendly Cuban classic with ground beef, olives, and warm spices. Family-approved and freezer-friendly. beef-picadillo-recipe-affordable