This post contains affiliate links. As an Amazon Associate I earn from qualifying purchases.
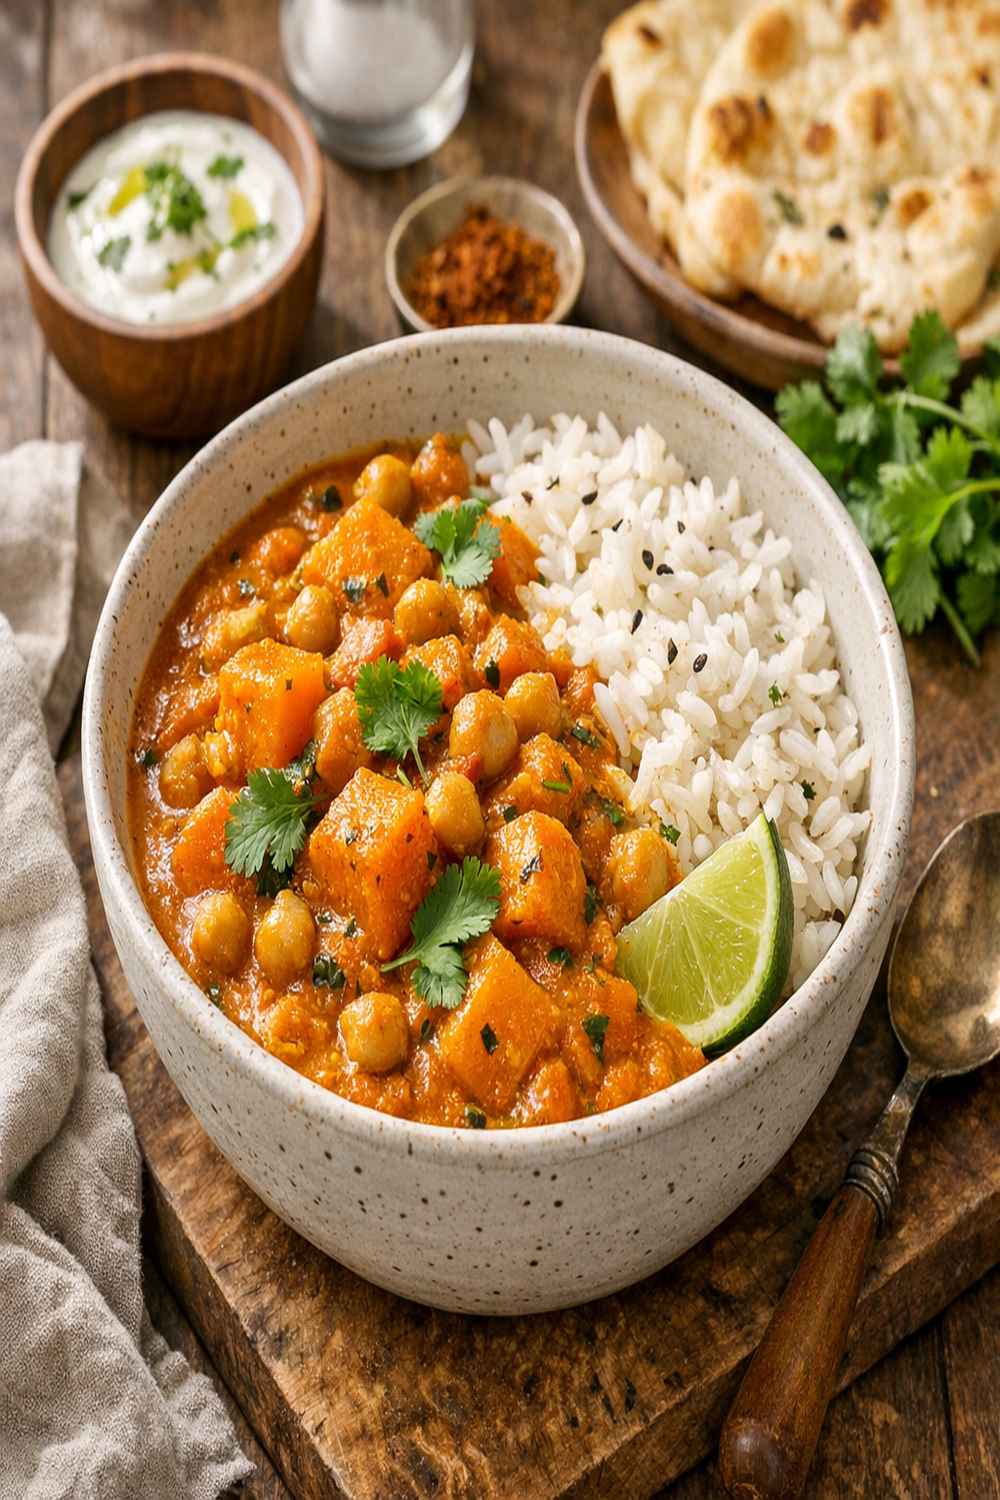
This dish looks and tastes like something that costs $40 at a trendy restaurant in Boston. The vibrant golden color, the creamy coconut base, the tender butternut squash—it all screams indulgence. Here’s the best part: I make this entire meal for under $10, and honestly, mine tastes better because I control every single ingredient.
If you’re looking for more affordable plant-based meals that don’t feel like compromises, check out my Sweet Potato Chickpea Buddha Bowl, which uses a similar budget-friendly approach to creating restaurant-quality meals at home.
Restaurant-Quality Butternut Curry for Under $10 (No Shortcuts on Flavor)
I grew up in a small town where my family didn’t have much money, but we always had a full table at dinner. My mom taught me that magic happens when you start with real ingredients and take your time. She’d make curries in our old Dutch oven—nothing fancy, just patience and pantry staples—and our neighbors would ask for the recipe thinking it must be complicated.
That’s the philosophy I bring to my work as a registered dietitian today. I’ve spent years helping families in the Waltham area understand that eating well doesn’t require a second mortgage. This butternut curry recipe is exactly that: simple ingredients you can find at any grocery store, combined in a way that feels luxurious and tastes incredible.
When my clients taste this, they’re always surprised it costs so little. When they see the nutrition facts—loaded with fiber, potassium, and plant-based protein—they’re even more surprised. Let me walk you through how to make it.
The Real Cost Breakdown
I price-checked this recipe at three different stores near my home (standard New England grocery chains), and the average total came to $9.87 for four generous servings. That’s about $2.47 per serving. A single bowl of curry at a local restaurant runs $14-18.
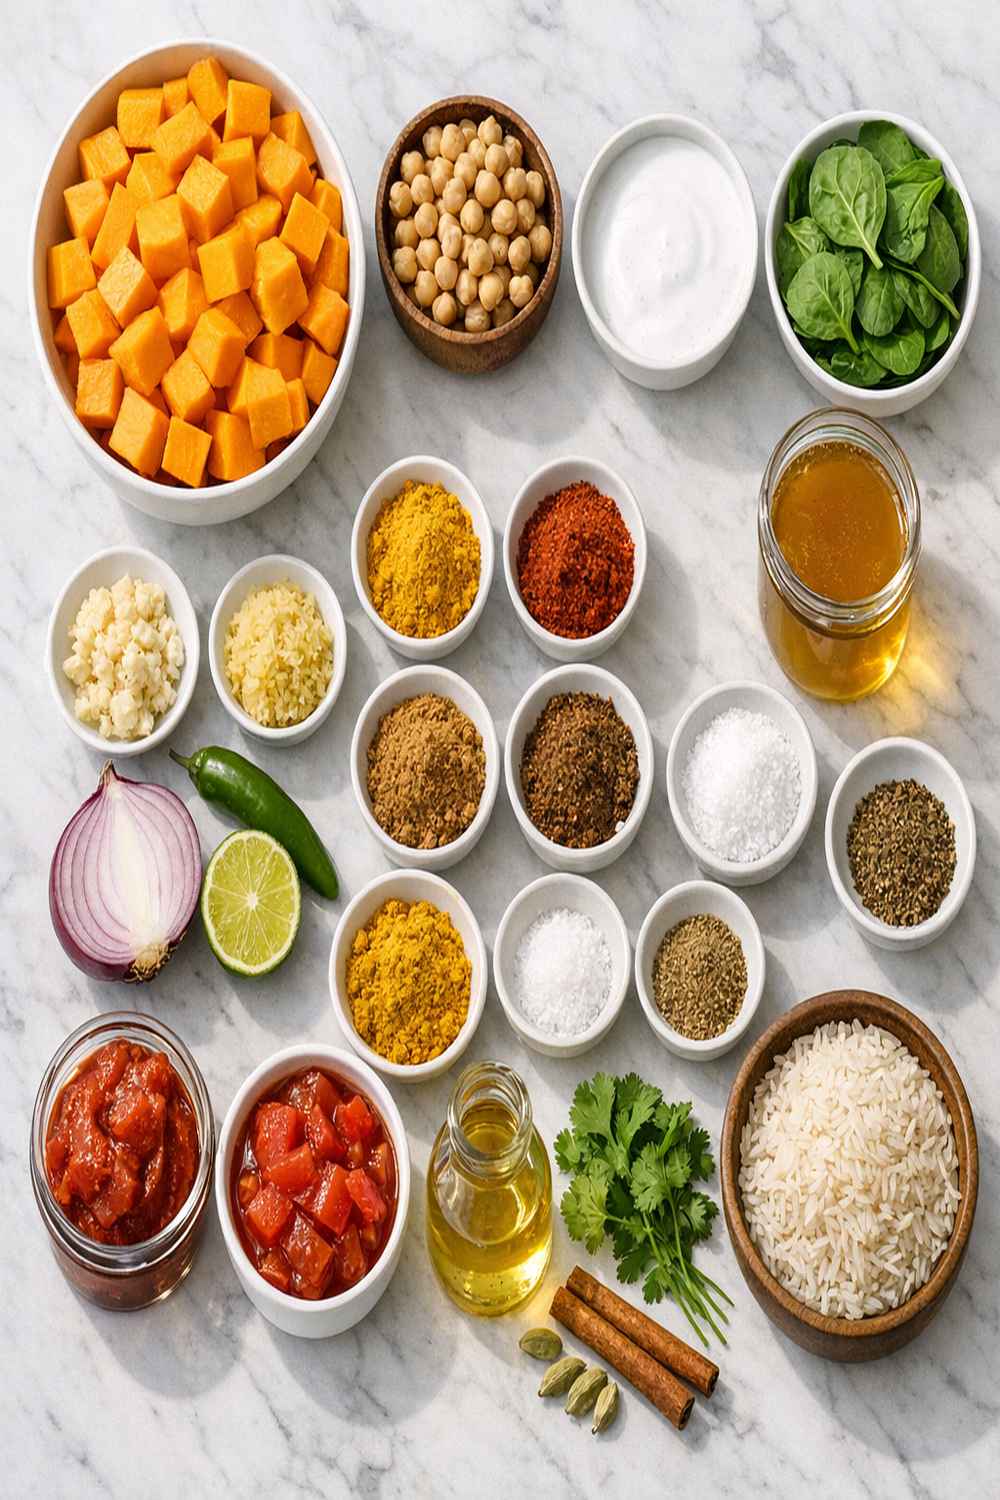
- Butternut squash (2.5 pounds) – $2.50 (buy in fall for cheapest prices, September through November; frozen cubed is $3.50 and saves 15 minutes of prep)
- Canned chickpeas (2 cans) – $1.20 ($0.60 per can at bulk discount)
- Coconut milk (1 can, 13.5 oz) – $1.80 (store brand, not premium Thai brand)
- Red curry paste (5 tablespoons) – $1.50 (one jar serves 6+ recipes)
- Onion (1 large) – $0.35
- Carrots (2 medium) – $0.40
- Fresh ginger (2-inch piece) – $0.50 (bought from bulk bin)
- Garlic (4 cloves) – $0.15
- Baby spinach or kale (4 cups) – $1.50
- Vegetable broth (1 cup, from carton) – $0.25
- Coconut oil or neutral oil (1.5 tablespoons) – $0.20
- Soy sauce, lime juice, coconut sugar, fresh cilantro – $0.50 (items you likely have)
Total per batch: $9.87 for 4 servings = $2.47 per person
Smart Shopping Tips for This Recipe
- Buy butternut squash seasonally (September through December) – Prices drop 40-60% during fall harvest. I buy 3-4 at once, cube them, and freeze in gallon bags for $0.80 each instead of $2.50. Even better: many stores mark down imperfect squashes by 50%—they taste identical.
- Shop the international aisle for curry paste instead of specialty stores – One $4 jar of red curry paste makes 6+ pots of curry (you only use 5 tablespoons). Store brands at mainstream groceries are $2-3 cheaper than specialty shops and taste the same.
- Buy canned chickpeas in bulk when on sale, not individually – Watch for “stock up” sales at big-box stores where 4 cans sell for $1.60 instead of $0.75 each. I buy 12 cans when on sale and use them throughout the month for curries, salads, and Buddha bowls.
- Choose full-fat canned coconut milk from the regular grocery aisle, not specialty – The $1.50-2.00 store brand works beautifully. Avoid “lite” versions—you lose the creaminess that makes this special, and the savings aren’t worth it.
- Fresh ginger from the bulk produce bin beats pre-packaged – You pay $0.50/pound instead of $3.99 for a small package, and you only buy what you need.
The Ingredients
Every ingredient in this curry earns its place and its cost. There’s no fluff here—just real food that creates layers of flavor and genuine nutrition. I’ve included cost-conscious substitutions for each.
- 1 small handful fresh Thai basil leaves (optional; trade for regular basil and save $1)
- 4 garlic cloves, minced (fresher flavor than jarred garlic; costs pennies)
- White or brown rice for serving (optional; choose based on what you have on hand)
- 1 tablespoon fresh lime juice or rice vinegar (brightens the entire dish)
- 1-3 bird’s eye chili peppers, thinly sliced (optional; adds heat if you like spice)
- 1.5 tablespoons coconut sugar or pure maple syrup (balances spice with subtle sweetness)
- 2-inch piece fresh ginger, grated or finely minced (the signature warmth of this curry)
- 5 cups butternut squash, peeled and cut into 1-inch cubes (about 2.5 pounds; the star ingredient)
- 2 medium carrots, diced (about 1 cup; adds natural sweetness and texture)
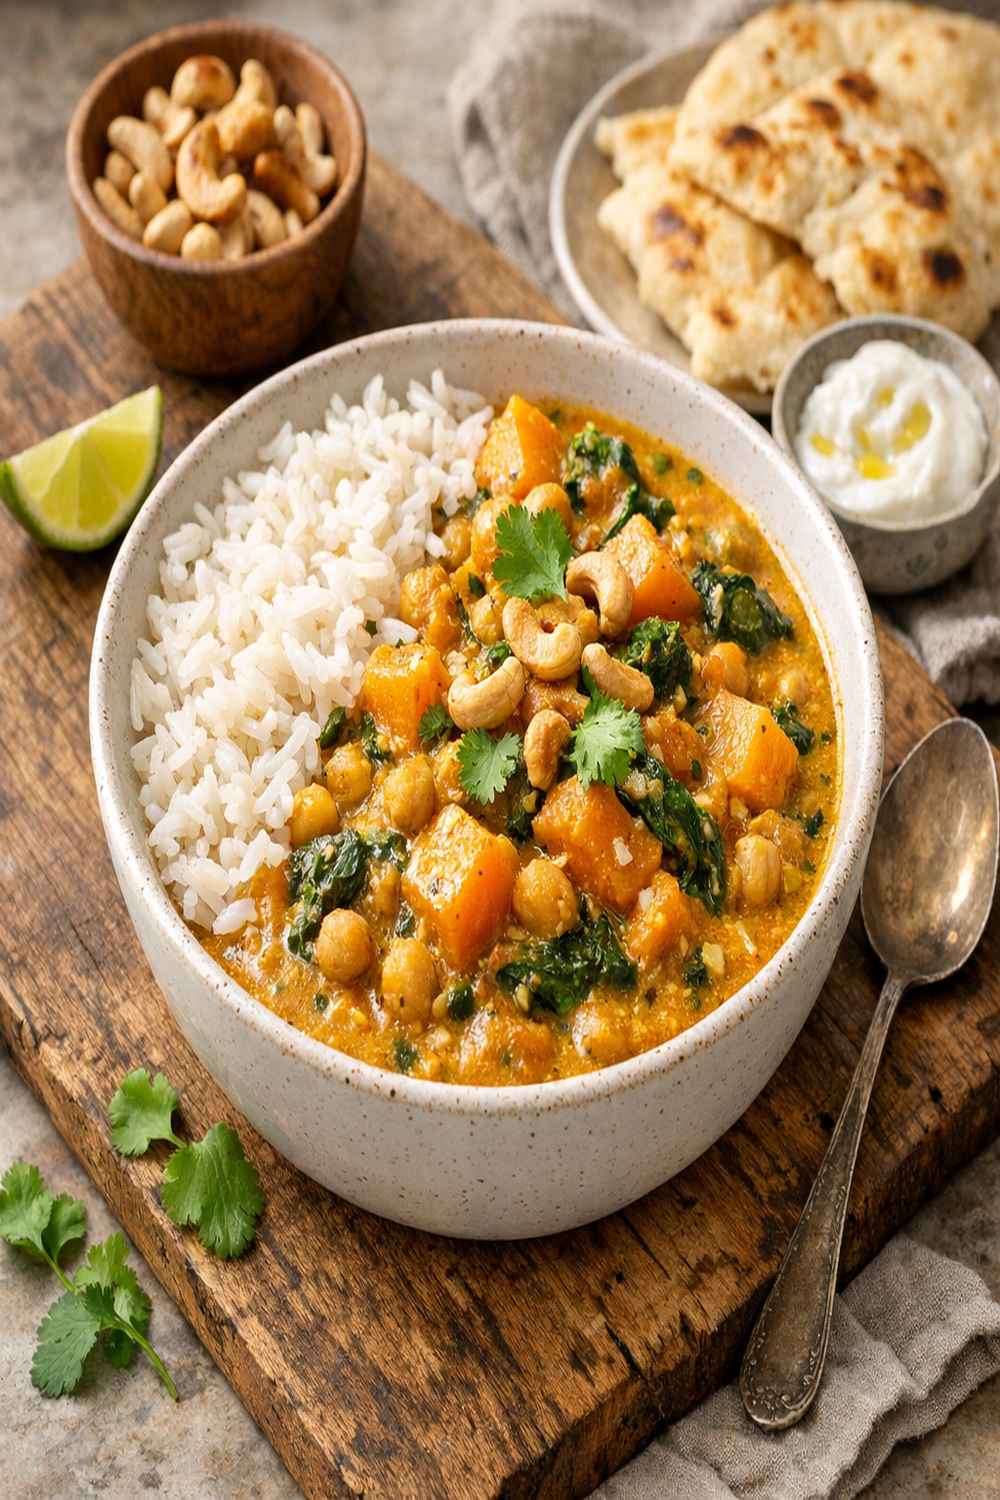
- 4 cups fresh baby spinach or kale (roughly 4 large handfuls; wilts down in seconds)
- 2.5 tablespoons reduced-sodium soy sauce (adds umami without extra salt)
- 1 tablespoon fresh cilantro, roughly chopped (adds freshness; or skip to save $0.50)
- 5 tablespoons red curry paste (gives the deep red color and complex spice)
- 1 can (13.5 ounces) full-fat canned coconut milk (creates the creamy, luxurious base)
- 2 cans (15 ounces each) chickpeas, rinsed and drained (adds protein and fiber; keeps you full)
- 1 cup low-sodium vegetable broth (stretches the coconut milk and adds savory depth)
- 1.5 tablespoons coconut oil or refined neutral oil (refined has a milder taste and costs less)
- 2 stalks fresh lemongrass, minced or grated (optional but recommended; adds citrusy depth)
- 1 large yellow onion, diced (about 1.5 cups; the base of everything good)
Serves 4 as a main course | Prep time: 20 minutes | Cook time: 35 minutes | Total time: 55 minutes
How to Make Butternut Curry Without Breaking the Bank
This recipe isn’t complicated, but it does benefit from a little attention and the right technique. I’ll walk you through exactly how I make it, with my best money-saving and time-saving tricks built right in.
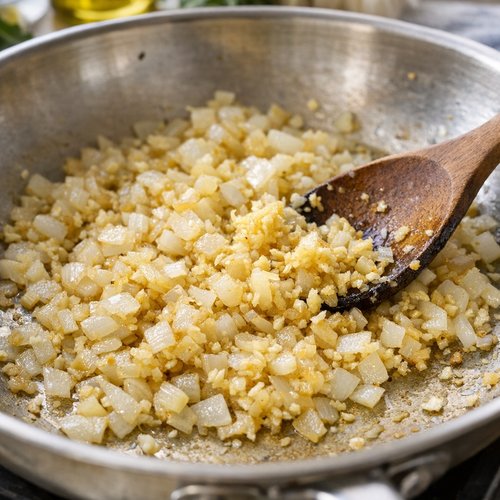
Step 1: Build Your Flavor Base With Aromatics
Set a large Dutch oven or heavy-bottomed saucepan over medium-high heat. Add your 1.5 tablespoons of coconut oil (or neutral oil—vegetable or canola work fine). Refined coconut oil costs less than unrefined and tastes just as good when you’re cooking with spices. Wait 30-45 seconds until the oil shimmers—that’s your signal it’s hot enough.
Add your diced onion and carrots along with a small pinch of kosher salt. This salt helps release the vegetables’ natural moisture, which actually cooks them faster and more evenly. Stir occasionally for 7-8 minutes until the vegetables soften and develop light brown spots. You’re not trying to caramelize heavily—just get them tender and slightly golden.
Money-saving tip: If you’ve got a yellow onion sitting in your pantry, use it. If you’ve got carrots from last week’s grocery trip, use those. Perfect vegetables are expensive; good vegetables in your kitchen are free.
Step 2: Wake Up the Curry Paste and Spices
Reduce the heat to medium. Add your minced garlic, grated ginger, and 5 tablespoons of red curry paste to the softened vegetables. Stir constantly for 2 full minutes. This step is crucial and costs you nothing except attention. You’re cooking the raw spices and the paste until they become fragrant and stop looking so raw.
If the mixture looks like it’s sticking or drying out (which happens if your pan isn’t heavy or if the heat is too high), add a tablespoon or two of water. This prevents the spices from burning and sticking to the bottom. I learned this from my mom, who never let good food burn on the bottom of a pot.
If you’re using the optional lemongrass and bird’s eye chilies, add them now. If you’re not using them, that’s absolutely fine—this curry tastes incredible either way. Fresh lemongrass and Thai chili peppers add complexity, but they’re not essential for the cost-conscious version.
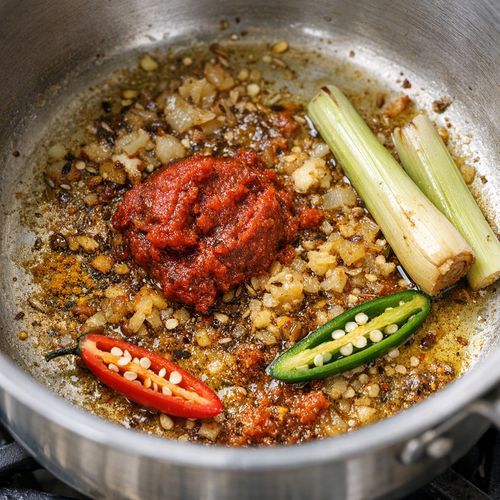
Step 3: Bloom the Curry in Coconut Milk
Pour just 2 tablespoons of your coconut milk into the curry paste mixture. Let it bubble for about 1 minute, stirring constantly and scraping the bottom of the pot. This blooming step helps the paste distribute evenly throughout the final curry and prevents clumps.
Now pour in your 1 cup of vegetable broth, again using a wooden spoon or spatula to scrape up all the brown, flavorful bits stuck to the bottom of the pan. This is called deglazing, and it’s where a ton of flavor comes from. Those browned bits cost nothing to capture but add restaurant-level depth.
Add the remaining coconut milk, stirring to combine. The curry should look creamy and golden now.
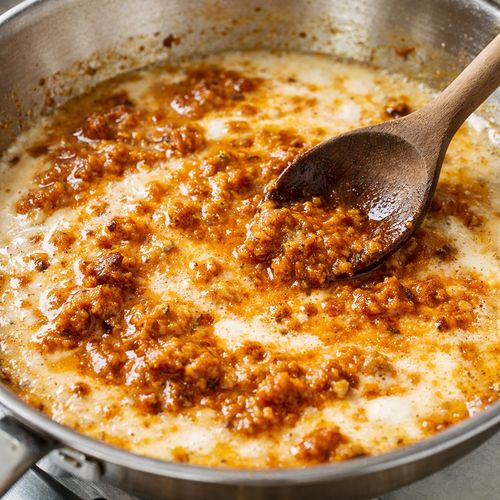
Step 4: Add the Butternut Squash and Bring to a Simmer
Add your cubed butternut squash (5 cups), along with 2.5 tablespoons soy sauce and 1.5 tablespoons coconut sugar. Use reduced-sodium soy sauce to keep sodium in check—your body gets enough salt from other places. If you don’t have coconut sugar, pure maple syrup works identically and costs about the same. Regular granulated sugar works too, though it dissolves less smoothly.
Stir everything to combine, then increase the heat to high and bring the mixture to a rolling boil. Once boiling, immediately reduce the heat to low or medium-low, where it maintains a rapid simmer. You want gentle bubbles breaking the surface, not an aggressive rolling boil that evaporates your liquid too quickly.
Simmer for 20 minutes, stirring occasionally, until the butternut squash is completely tender. You should be able to easily pierce a cube with a fork. Don’t skip this—undercooked squash tastes starchy and won’t blend properly.
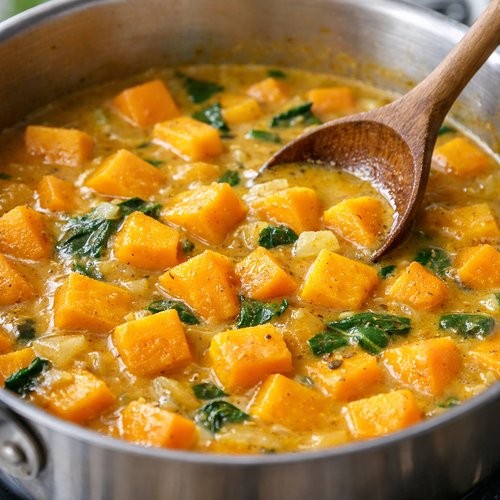
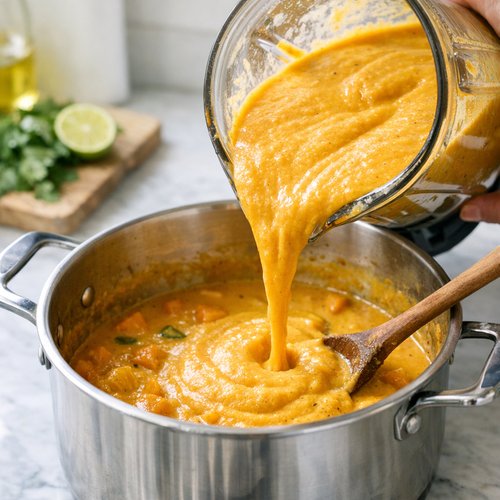
Step 5: Blend for Creamy Texture
Turn off the heat. Here’s where texture becomes important: I blend roughly half of the curry to create a thick, creamy sauce while leaving some squash chunks intact. This gives you both smoothness and texture, which is more interesting to eat than a completely puréed soup.
If you have an immersion blender, use it directly in the pot. Submerge it in the liquid, then blend for 30-45 seconds until roughly half the mixture looks puréed and creamy. You’ll see chunks of squash still floating—that’s exactly right.
If you don’t have an immersion blender, carefully ladle half the curry into a regular blender, blend until smooth (work in batches if needed—hot liquid can splash), then pour it back into the pot and stir.
Budget note: If you own neither blender, you can mash some of the squash with the back of a spoon against the side of the pot. It creates texture and thickness, though it won’t be quite as smooth.
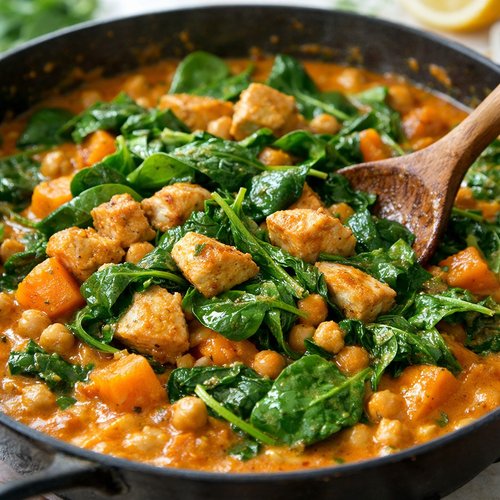
Step 6: Add Protein and Greens
Stir in your drained chickpeas (2 cans) and bring the curry back to a gentle simmer over medium heat. Let it bubble softly for 2-3 minutes so the chickpeas warm through and absorb some of the curry flavor.
Turn the heat off again, then stir in your 4 cups of fresh baby spinach or kale. Stir constantly for about 1 minute until the greens completely wilt. You don’t need to cook them—residual heat does the work. This keeps them bright green and nutritious instead of dull and overcooked.
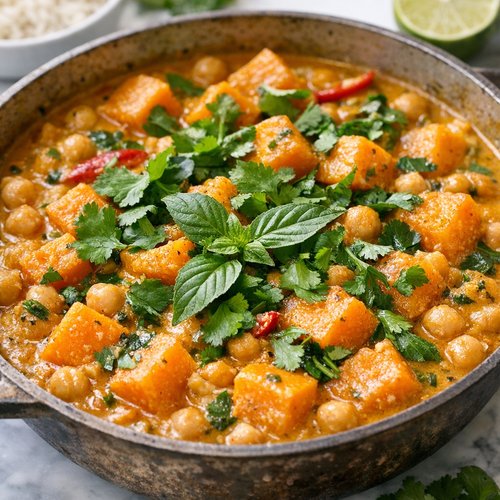
Step 7: Finish With Brightness and Herbs
Taste the curry. Add 1 tablespoon of lime juice or rice vinegar—this brightens everything and adds complexity that tastes expensive but costs $0.30. Taste again and add salt if needed. Most people find it’s perfectly seasoned already.
If you have fresh Thai basil or cilantro, tear the basil leaves to release their essential oils and add them along with roughly chopped cilantro. These herbs are optional—if you skip them, you still have a five-star curry. They add freshness, but fresh herbs aren’t essential to the budget.
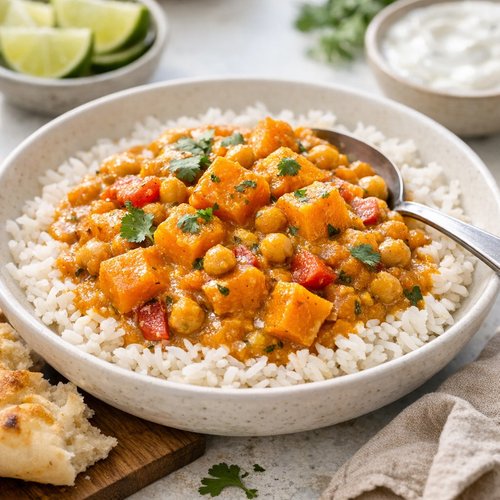
Step 8: Serve
Serve immediately over white or brown rice. If you don’t have rice, this curry is thick enough to eat with bread or even on its own. The recipe makes enough for 4 generous main-course servings with about 1.5 cups curry per person.
How to Stretch This Recipe Further
- Double the batch and freeze half – This curry freezes beautifully for up to 3 months. Make two pots on Sunday, freeze one, and you have a ready-made dinner on a night when cooking feels impossible. Thaw overnight in the fridge and reheat gently on the stovetop with a splash of vegetable broth.
- Serve it three different ways – Night one: over rice as a curry. Night two: in a bowl with roasted chickpeas on top instead of rice. Night three: stuffed into a whole-wheat wrap or pita with shredded cabbage. Three meals from one pot for different people with different preferences.
- Add extra vegetables to stretch it – Toss in diced sweet potato, bell peppers, or green beans during the last 10 minutes of simmering. Each vegetable stretches the recipe further and increases the nutrition without increasing the cost significantly.
- Make it a soup – Add 2-3 extra cups of vegetable broth to transform the curry into a lighter soup. Perfect for lunches and feels like more food for the same ingredient cost.
Budget Substitutions That Don’t Sacrifice Quality
- Fresh lemongrass -> 1 teaspoon lemongrass paste or the zest of 1 lemon: You lose some of the authentic Thai complexity, but the lemon zest adds brightness and costs $0. Lemongrass paste (from a tube) costs $3-4 for the tube and lasts for 8+ recipes, so the per-use cost is actually lower than fresh.
- Thai basil -> Fresh regular basil or mint: Flavor is slightly different but the effect is similar—you get fresh herb brightness. Regular basil costs half the price and is available year-round. Mint works too and adds an unexpected freshness.
- Bird’s eye chili peppers -> 1/2 teaspoon red pepper flakes: Same heat, same flavor profile, costs $0.05 instead of $0.75 and lasts for months in your pantry. Not as pretty visually, but identical in flavor.
- Fresh cilantro -> Skip it entirely: The curry is delicious without it. Cilantro is a luxury garnish, not a necessity. Your $9.87 total becomes $8.87 if you skip it, and nobody will notice.
- Coconut milk (full-fat canned) -> 1 cup heavy cream mixed with 1/2 cup vegetable broth: This actually costs MORE, so stick with canned coconut milk. But if you have cream on hand, it works beautifully and tastes even richer.
Can I Store Butternut Curry?
Yes, and this is where this recipe gets really practical. Refrigerated in an airtight container, this curry lasts 4-5 days. I always make mine on Sunday because it tastes even better on Tuesday as the flavors meld. Reheat gently on the stovetop with a splash of broth if it’s thickened too much.
Freezer storage: Up to 3 months. Let it cool completely, transfer to a freezer-safe container or gallon bag, label with the date, and freeze. Thaw overnight in the refrigerator and reheat gently. The texture remains silky and the flavor doesn’t degrade at all.
Pro tip from my dietitian perspective: I freeze this in individual portions using ice cube trays or small containers. On nights when my family is scattered with different schedules, everyone can reheat exactly what they need. It reduces food waste and makes healthy eating actually convenient.
Expert’s Nutritional Insight
As a registered dietitian, I want to highlight something important about this curry that goes beyond the price tag: the butternut squash-chickpea combination is nutritionally brilliant. Butternut squash provides vitamin A (important for immune function) and fiber, while chickpeas add plant-based protein and resistant starch. Together, they create a complete protein with all nine essential amino acids, which is rare in plant-based meals.
One serving provides approximately 12 grams of fiber and 8 grams of protein, keeping you satisfied for hours. The coconut milk provides medium-chain triglycerides, which some research suggests may support satiety and metabolic health. This isn’t expensive health food—it’s affordable food that happens to be genuinely nutritious.
Make-Ahead Guide for Meal Prep
I recommend prepping this curry on Sunday for the week ahead. Here’s my exact strategy:
Saturday evening: Peel and cube your butternut squash, store in an airtight container in the fridge (it won’t brown if submerged in a little water). Dice your onion and carrots, store separately. Mince your garlic and ginger, store together. This takes 20 minutes and makes cooking so much faster.
Sunday morning: Make the full batch following my recipe. Let it cool to room temperature (about 30 minutes), then divide into 4 containers for the week or freeze in two batches. If you’re serving it fresh on Sunday, keep it in the pot on low heat for up to 2 hours.
During the week: Reheat portions individually in the microwave (3-4 minutes in a covered bowl) or on the stovetop (5 minutes over medium heat). Cook your rice fresh each day or meal prep rice separately in batches.
Common Mistakes to Avoid
- Skipping the 2-minute sauté of curry paste and spices – This is where people rush. If you add the paste directly to the broth without cooking it first, it stays grainy and doesn’t distribute evenly. Those 2 minutes of patient stirring make the difference between average and restaurant-quality curry.
- Undercooked butternut squash – It needs the full 20 minutes to become tender. Undercooked squash tastes starchy and won’t blend smoothly. If you use frozen pre-cubed squash, reduce the cooking time to 15 minutes since it’s partially cooked already.
- Using lite canned coconut milk to save money – People do this thinking they’re being budget-conscious, but lite coconut milk has a watered-down texture and flavor. The full-fat version costs only $0.30 more per can and transforms the entire dish. Your $9.87 total becomes $10.17—it’s worth it.
- Overcooking the greens – Add spinach at the very end and stir for only 1 minute. Overcooked greens turn dark and lose nutrition. The residual heat from the hot curry wilts them perfectly without cooking them to death.
Seasonal Variations
Fall and Winter (September-February): This is peak butternut squash season. Prices are lowest and flavor is best. Make this recipe exactly as written and freeze extra.
Spring (March-May): Butternut squash gets expensive. Substitute with sweet potato (same nutrition, $0.50 cheaper), or use frozen pre-cubed butternut squash ($3.50 instead of $2.50 for fresh, but you save 15 minutes of prep). Add 2 cups of diced fresh spring vegetables like zucchini or sugar snap peas.
Summer (June-August): Use frozen butternut squash for best price and add summer vegetables like zucchini, bell peppers, or green beans. Consider serving it chilled alongside rice as a grain bowl instead of as a hot curry—the same flavors, different preparation, and lighter for hot weather.
Nutrition Information
Per serving (makes 4 servings):
- Calories: 285
- Protein: 8g
- Carbohydrates: 42g
- Dietary Fiber: 12g
- Fat: 9g (saturated fat: 6g)
- Sodium: 480mg (reduced-sodium soy sauce keeps this low)
The USDA considers a food “high in fiber” at 20% of the daily value per serving. This curry provides 48% of your daily fiber needs in a single bowl—that’s exceptional and means you’ll stay full for hours. The combination of chickpea protein, squash carbohydrates, and coconut fat creates a balanced meal that doesn’t leave you hungry two hours later.
For every dollar you spend on this meal, you’re getting nearly 300 calories of whole food nutrition plus 8 grams of protein. Compare that to a $5 processed lunch that leaves you hungry by 2 p.m., and the cost-per-nutrition ratio is actually astounding.
What Can I Serve With Butternut Curry?
This curry is beautiful on its own, but here are my favorite budget-friendly pairings:
- White or brown rice – The classic choice. White rice costs $0.30 per serving, brown rice $0.40. Both are perfect. Cook once and portion into containers for the week.
- Quinoa – Higher in protein than rice, same cost ($0.35 per serving). If you buy quinoa in bulk, it’s competitive with rice and adds complete protein to the meal.
- Simple cucumber salad – Slice cucumbers, toss with rice vinegar and a pinch of salt. Costs $0.50 and adds freshness that balances the rich curry. This would pair beautifully with my 6 Ingredient Vegan Tzatziki if you want to get fancy—the cooling sauce complements spicy curry perfectly.
- Whole wheat naan bread – Costs $1.50 per serving but turning the curry into bread-based scoops changes the entire eating experience. Good for special dinners, not regular weeknight meals.
- Roasted chickpea crumble on top – Toss extra chickpeas with curry powder and roast at 425°F for 20 minutes. Adds crunch and makes the meal feel special without extra cost.
- Ginger lemon water on the side – If you’re serving the curry spicy, a cold glass of my Ginger Lemon Water cleanses the palate beautifully and aids digestion.

Butternut Curry Recipe
Ingredients
Method
- Set a large Dutch oven or heavy-bottomed saucepan over medium-high heat. Add your 1.5 tablespoons of coconut oil (or neutral oil—vegetable or canola work fine). Refined coconut oil costs less than unrefined and tastes just as good when you're cooking with spices. Wait 30-45 seconds until the oil shimmers—that's your signal it's hot enough. Add your diced onion and carrots along with a small pinch of kosher salt. This salt helps release the vegetables' natural moisture, which actually cooks them faster and more evenly. Stir occasionally for 7-8 minutes until the vegetables soften and develop light brown spots. You're not trying to caramelize heavily—just get them tender and slightly golden. Money-saving tip: If you've got a yellow onion sitting in your pantry, use it. If you've got carrots from last week's grocery trip, use those. Perfect vegetables are expensive; good vegetables in your kitchen are free.
- Reduce the heat to medium. Add your minced garlic, grated ginger, and 5 tablespoons of red curry paste to the softened vegetables. Stir constantly for 2 full minutes. This step is crucial and costs you nothing except attention. You're cooking the raw spices and the paste until they become fragrant and stop looking so raw. If the mixture looks like it's sticking or drying out (which happens if your pan isn't heavy or if the heat is too high), add a tablespoon or two of water. This prevents the spices from burning and sticking to the bottom. I learned this from my mom, who never let good food burn on the bottom of a pot. If you're using the optional lemongrass and bird's eye chilies, add them now. If you're not using them, that's absolutely fine—this curry tastes incredible either way. Fresh lemongrass and Thai chili peppers add complexity, but they're not essential for the cost-conscious version.
- Pour just 2 tablespoons of your coconut milk into the curry paste mixture. Let it bubble for about 1 minute, stirring constantly and scraping the bottom of the pot. This blooming step helps the paste distribute evenly throughout the final curry and prevents clumps. Now pour in your 1 cup of vegetable broth, again using a wooden spoon or spatula to scrape up all the brown, flavorful bits stuck to the bottom of the pan. This is called deglazing, and it's where a ton of flavor comes from. Those browned bits cost nothing to capture but add restaurant-level depth. Add the remaining coconut milk, stirring to combine. The curry should look creamy and golden now.
- Add your cubed butternut squash (5 cups), along with 2.5 tablespoons soy sauce and 1.5 tablespoons coconut sugar. Use reduced-sodium soy sauce to keep sodium in check—your body gets enough salt from other places. If you don't have coconut sugar, pure maple syrup works identically and costs about the same. Regular granulated sugar works too, though it dissolves less smoothly. Stir everything to combine, then increase the heat to high and bring the mixture to a rolling boil. Once boiling, immediately reduce the heat to low or medium-low, where it maintains a rapid simmer. You want gentle bubbles breaking the surface, not an aggressive rolling boil that evaporates your liquid too quickly. Simmer for 20 minutes, stirring occasionally, until the butternut squash is completely tender. You should be able to easily pierce a cube with a fork. Don't skip this—undercooked squash tastes starchy and won't blend properly.
- Turn off the heat. Here's where texture becomes important: I blend roughly half of the curry to create a thick, creamy sauce while leaving some squash chunks intact. This gives you both smoothness and texture, which is more interesting to eat than a completely puréed soup. If you have an immersion blender, use it directly in the pot. Submerge it in the liquid, then blend for 30-45 seconds until roughly half the mixture looks puréed and creamy. You'll see chunks of squash still floating—that's exactly right. If you don't have an immersion blender, carefully ladle half the curry into a regular blender, blend until smooth (work in batches if needed—hot liquid can splash), then pour it back into the pot and stir. Budget note: If you own neither blender, you can mash some of the squash with the back of a spoon against the side of the pot. It creates texture and thickness, though it won't be quite as smooth.
- Stir in your drained chickpeas (2 cans) and bring the curry back to a gentle simmer over medium heat. Let it bubble softly for 2-3 minutes so the chickpeas warm through and absorb some of the curry flavor. Turn the heat off again, then stir in your 4 cups of fresh baby spinach or kale. Stir constantly for about 1 minute until the greens completely wilt. You don't need to cook them—residual heat does the work. This keeps them bright green and nutritious instead of dull and overcooked.
- Taste the curry. Add 1 tablespoon of lime juice or rice vinegar—this brightens everything and adds complexity that tastes expensive but costs $0.30. Taste again and add salt if needed. Most people find it's perfectly seasoned already. If you have fresh Thai basil or cilantro, tear the basil leaves to release their essential oils and add them along with roughly chopped cilantro. These herbs are optional—if you skip them, you still have a five-star curry. They add freshness, but fresh herbs aren't essential to the budget.
- Serve immediately over white or brown rice. If you don't have rice, this curry is thick enough to eat with bread or even on its own. The recipe makes enough for 4 generous main-course servings with about 1.5 cups curry per person.
Notes
FAQs
Can I make this curry without coconut milk?
Yes. Use 1.5 cups heavy cream or half-and-half mixed with 1 cup vegetable broth instead of canned coconut milk. The curry will be creamier and taste slightly different (more European than Thai), but it’s delicious. Cost is roughly the same. You could also use cashew cream made by blending soaked cashews with water—it’s cheaper if you buy cashews in bulk ($6/pound) and makes a smaller amount ($0.50 per serving instead of $0.80).
What if I don’t have an immersion blender?
A regular blender works perfectly. Carefully ladle half the hot curry into the blender (cover loosely with a towel to avoid burns from steam), blend until smooth, and pour back into the pot. If you have neither, mash the squash vigorously against the side of the pot with a wooden spoon. The curry won’t be as silky, but the flavor is unchanged and the texture is still good.
Can I make this vegan/dairy-free?
It already is vegan and dairy-free as written. The coconut milk provides the creamy richness, and chickpeas provide the protein. No changes needed—it’s naturally plant-based.
How much does this recipe cost if I buy everything organic?
Organic butternut squash costs 2-3x more ($7-8 instead of $2.50), organic chickpeas cost roughly the same, and organic coconut milk is $3.50 instead of $1.80. Your total would be around $18-20 for 4 servings instead of $9.87. If organic is important to you, I’d recommend prioritizing organic carrots and onions (which absorb more pesticides) and buying regular everything else. That gets you to about $12-13 total, closer to $3.25 per serving.
Can I use regular (non-Thai) curry paste?
Red curry paste is pretty standard, but yes, you could use yellow curry paste (milder, slightly different flavor), madras curry powder (drier texture, less creamy), or even garam masala (totally different flavor profile but still delicious). The texture will change slightly but the concept works. Red curry paste is what I recommend because it’s the most widely available, most affordable, and creates the best texture in this specific recipe.
Is this recipe spicy?
The base recipe (without bird’s eye chili peppers) is aromatic and warm but not spicy—most people and kids eat it comfortably. Red curry paste has some heat but it’s mild. If you add the optional 1-3 bird’s eye chili peppers, you’re adding serious heat. Start with half a pepper, taste, and add more if you want. You can’t un-add chili peppers.
More Budget-Friendly Recipes
- this cozy soup – If you love this curry but want a lighter, brothier version, this soup uses the same base ingredients and costs equally little.
- Awesome Sauce Recipe – A versatile, budget-friendly sauce that works with curries, grain bowls, and roasted vegetables.
You just made a meal that tastes like it costs $40 at a restaurant for under $10. That’s not just budget-friendly—that’s actually smart cooking. This is the kind of meal I ate growing up, the kind I cook for my family now, and the kind I recommend to every person who walks into my office wondering how to eat well without spending a fortune.
Butternut curry hits that sweet spot where affordable food becomes genuinely delicious food. It’s real ingredients, real technique, and real results. Make it this week, make it next month, and make it three times in November when butternut squash is $1.50 and you can fill your freezer. Your body will thank you, and so will your bank account.
Don’t forget to mention @affordablefoodideas if you try this recipe—I’d love to see your beautiful curry bowls!