This post contains affiliate links. As an Amazon Associate I earn from qualifying purchases.
The classic cabbage and ground beef combination is delicious, but let me be honest—most versions I’ve seen are heavy, oversalted, and leave you feeling sluggish an hour later. After years of working with families who needed real nutrition without the expense, I realized this dish didn’t need to be reinvented; it just needed intention. Here’s how I kept everything you love about this comforting meal and removed what your body doesn’t actually need. The result? A skillet dinner that tastes like you spent hours cooking, costs pennies per serving, and makes you feel genuinely nourished. If you’re looking for other affordable weeknight solutions, check out my affordable salad recipes too.
Budget-Friendly Cabbage and Ground Beef Skillet That Tastes Restaurant-Quality
I grew up in a small town outside Boston where my mother made variations of this dish constantly. Money was tight, but she understood something crucial: the most nourishing meals came from simple ingredients treated with respect. She’d caramelize onions slowly, add ground beef, then build flavor with whatever spices she had on hand. What struck me then—and stays with me now as a registered dietitian—was that she never apologized for serving affordable food. She served it with pride because it was made with care.
Years later, when I started working with clients trying to eat healthier on real budgets, this dish kept coming up. People loved it but felt guilty—like comfort food couldn’t also be nourishing. That’s when I decided to approach it the way my mother did: with intention, not restriction. I added more vegetables for volume and nutrients, reduced sodium, and built layers of flavor so every bite satisfies. This version costs about $1.20 per serving and delivers actual nutrition you can feel.
What Changed and Why It’s Better
Let me show you exactly how this version differs from the traditional heavy skillet, and why each change matters for both your health and your wallet:
- Added shredded raw cabbage and carrots (instead of minimal vegetables): You’re tripling the volume of nutrients without tripling the cost. Raw vegetables add fiber for digestive health and vitamins that survive the brief cooking time, plus they keep the dish lighter and more satisfying.
- Switched to cumin, baharat, and coriander (instead of just salt and heavy seasonings): These warm spices cost pennies and deliver polyphenols—powerful compounds that reduce inflammation in your body. They make you feel satisfied with less sodium.
- Used lean ground beef and included the draining step (instead of fatty ground beef): You’re reducing saturated fat by up to 40% while keeping that savory beef flavor intact. This means better cholesterol profiles and steadier energy.
- Added a finishing touch of white wine vinegar (instead of relying only on salt): Acid brightens every flavor and reduces bloating from high sodium. It’s a technique restaurants use to make food taste expensive.
The Nutritional Wins in This Recipe
I want to be clear about what’s actually happening nutritionally when you eat this meal. According to USDA data, one serving of this skillet provides approximately 280 calories with 28 grams of protein, making it a genuinely satiating dinner that won’t leave you hungry two hours later. But the real wins go deeper.
- Fiber content (5+ grams per serving): The cabbage and carrots provide soluble and insoluble fiber, which research shows supports stable blood sugar and feeds beneficial gut bacteria. Most Americans eat half the fiber they need; this dish moves the needle.
- Curcuminoids and volatile oils from warming spices: Cumin and coriander contain compounds that support liver detoxification and reduce post-meal inflammation. You’ll notice steadier energy without the crash.
- Bioavailable iron from grass-fed ground beef: The heme iron in beef is absorbed 3 times better than iron from plants. This matters especially if you’re managing energy levels or menstrual health.
- Sulfur compounds from cruciferous cabbage: Research published in the American Journal of Clinical Nutrition links cruciferous vegetables to reduced cancer risk and improved estrogen metabolism.
- Lycopene and beta-carotene from carrots: These fat-soluble vitamins need fat (from the beef and olive oil) to absorb properly, making this combination nutritionally brilliant.
The Ingredients—Every Choice Explained
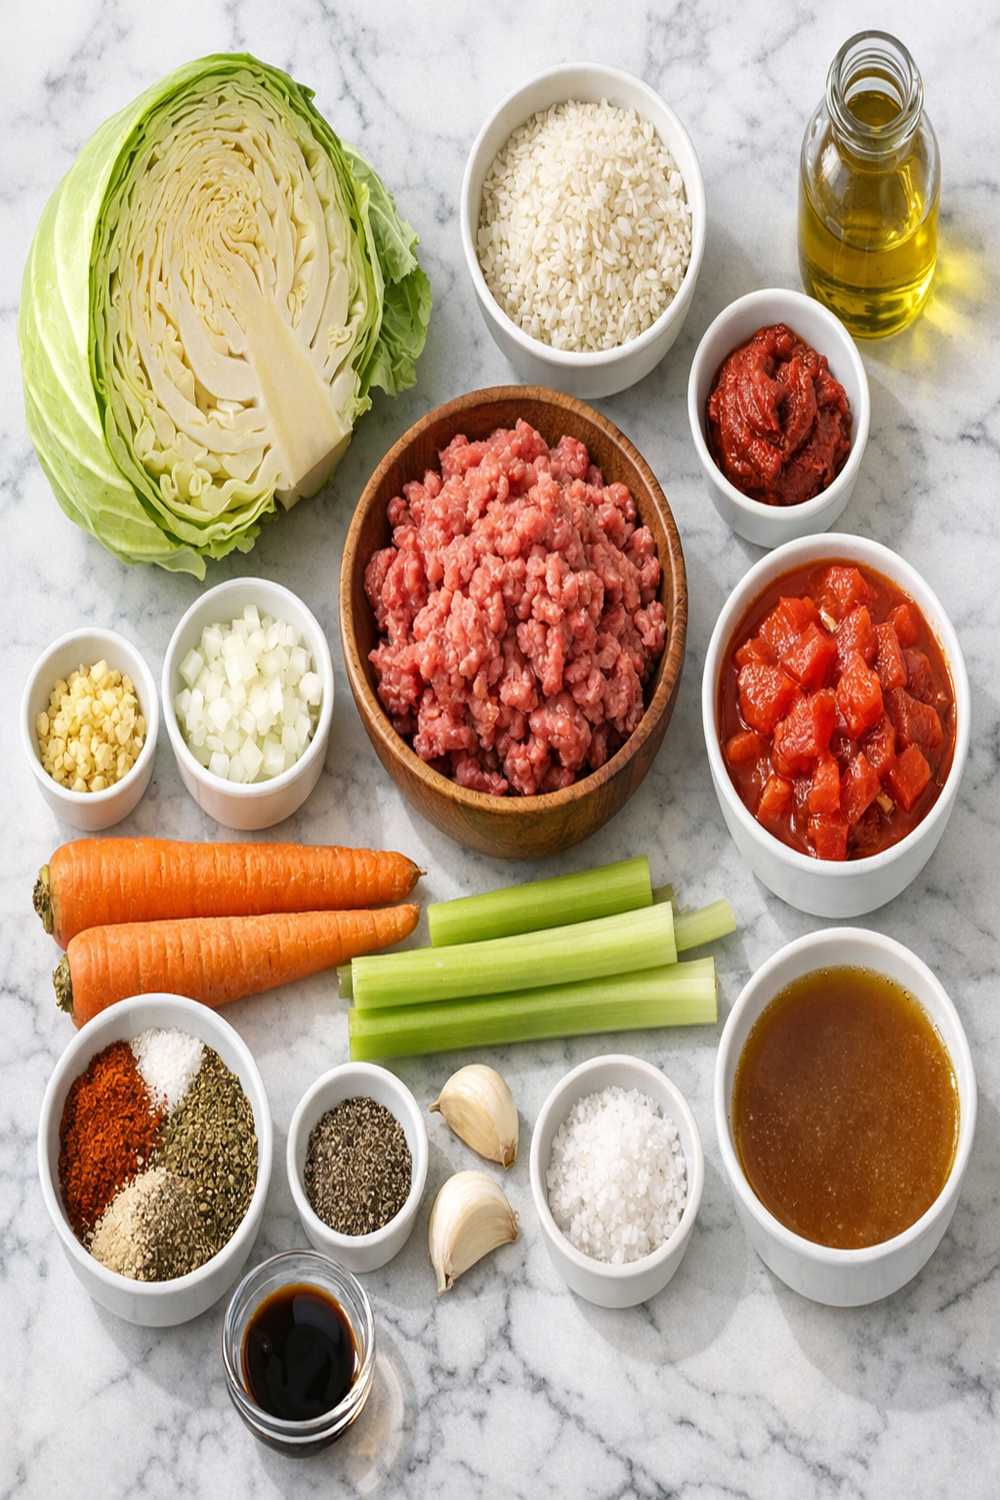
I’m going to list these in the order you’ll actually use them, and I’ll explain why each ingredient earned its spot in this recipe. These aren’t random choices; they’re intentional additions that build flavor and nutrition without inflating your grocery bill.
- 2 scallions, trimmed and chopped (both white and green parts; scallions add onion flavor with less sulfur compounds, so your breath stays fresher)
- ½ teaspoon ground coriander (pairs with cumin to create complexity; these two spices together support digestion better than either alone)
- 4 tablespoons extra virgin olive oil, divided (2 tablespoons for sautéing protein, 2 for vegetables; this amount prevents sticking while keeping fat reasonable)
- Freshly ground black pepper to taste (freshly ground pepper delivers volatile oils table pepper has lost; buy a small grinder if you don’t have one)
- ½ teaspoon baharat (a Middle Eastern blend that’s become more accessible and costs less than buying individual spices; it adds warmth without heat)
- 1 large yellow onion (the base for all savory dishes; yellow onions are cheaper than sweet varieties and caramelize beautifully)
- ¼ teaspoon paprika (adds color and mild sweetness; non-smoked varieties are budget-friendly)
- 1 small head green cabbage, cored and shredded (one of the cheapest vegetables year-round; shredding increases surface area for caramelization and easier eating)
- 3 tablespoons fresh parsley, chopped (chlorophyll is a natural deodorant; parsley also contains compounds that support liver health)
- 2 garlic cloves, minced (garlic contains allicin, a compound that activates in your body as a natural antibacterial; minced releases more of this beneficial compound than sliced)
- 1 teaspoon white wine vinegar (a finishing acid that brings brightness; cheaper than balsamic and cleaner tasting in this application)
- 1 pound lean ground beef (90% lean or better; you’re paying for quality protein that won’t weigh you down; look for sales and freeze)
- 3 medium carrots, shredded (shredding speeds cooking and adds texture; buy carrots in bulk loose bins instead of pre-packaged to save 30%)
- Kosher salt to taste (flakes dissolve evenly; you’ll use less than table salt because of larger granules, so a box lasts longer)
- 1 teaspoon cumin, divided (an affordable spice with proven anti-inflammatory properties; half goes with the meat, half with vegetables for consistent flavor throughout)
How to Make Healthy Cabbage and Ground Beef Recipe Without Feeling Like You’re Missing Out
I’m going to walk you through this step by step, exactly the way I make it at home. The goal is a skillet that delivers restaurant-quality caramelization while keeping everything simple enough for a busy weeknight. Pay attention to the order and timing—these matter for flavor development.
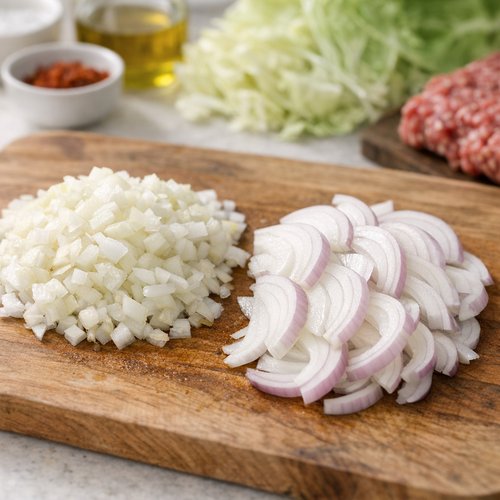
Step 1: Prepare Your Onion and Build the Base
Start by peeling your yellow onion and cutting it in half. Take one half and finely chop it—these pieces should be ¼ inch or smaller so they soften into the beef and disappear, building flavor rather than adding texture. Set this aside on your cutting board. Take the remaining half and thinly slice it into half-moons. These slices will caramelize later and add visible texture to the finished dish. Keeping them separate gives you two different textural outcomes from one onion, which is smart cooking.
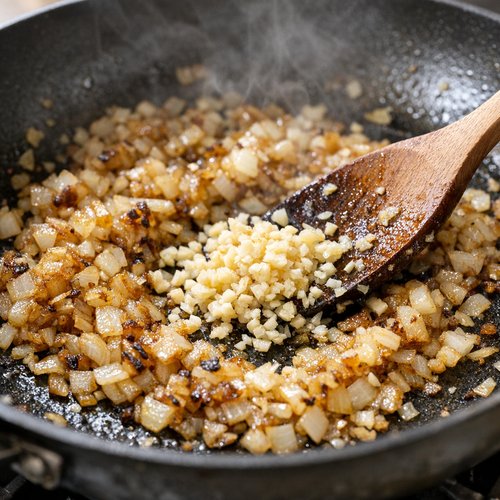
Step 2: Heat Your Pan and Sauté the Chopped Onion
Place a large, heavy skillet with a lid over medium-high heat. Add 2 tablespoons of extra virgin olive oil—you want it to shimmer (look like water with a sheen of oil on top) but not smoke. This takes about 60 seconds. Once it’s ready, add your chopped onion and stir occasionally for about 3 to 5 minutes. You’re looking for softness and a light golden color, but not browning. If it’s browning, your heat is too high; turn it down. You’ll know it’s ready when the onion smells intensely sweet and fragrant—that’s the natural sugars beginning to caramelize.
At the 4-minute mark, add your 2 minced garlic cloves and stir constantly for exactly 30 seconds. This prevents garlic from scorching, which creates bitterness. You want just enough heat to release garlic’s beneficial compounds without destroying its delicate flavor.
Step 3: Brown Your Ground Beef and Build Flavor
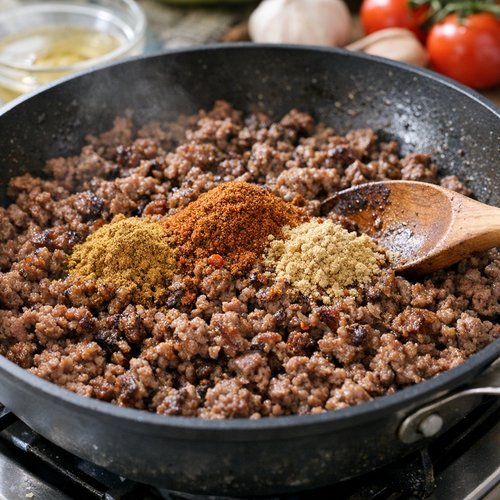
Increase heat to medium-high and add your pound of lean ground beef directly to the pan with the onion and garlic. Using a wooden spoon, break the beef into small, uniform pieces as it cooks. This matters—smaller pieces brown faster and more evenly, developing the flavorful browned exterior that makes this dish taste intentional. Stir occasionally (every minute or so) and let it cook undisturbed between stirs. This gives the beef contact with the hot pan. Cook for 7 to 10 minutes until no pink remains and the beef has developed a rich brown color.
Here’s the professional tip I share with clients: don’t drain your beef immediately. Let it rest in the pan for 1 minute so the juices redistribute. This keeps the meat tender rather than dried out. Then, tilt the pan and spoon away excess fat into a small bowl (save it for cooking tomorrow—it’s flavor gold). Now season everything in the pan with ½ teaspoon of cumin, the baharat, coriander, paprika, and a generous pinch each of kosher salt and black pepper. Stir well to coat all the meat. Transfer everything to a clean plate and set aside.
Step 4: Sauté the Vegetables and Build Sweetness
Return your skillet to the stove and add the remaining 2 tablespoons of olive oil over medium-high heat. Once it shimmers, add your sliced onion, shredded cabbage, shredded carrots, and the remaining ½ teaspoon of cumin. Toss everything to coat thoroughly with oil. This prevents sticking and ensures even cooking. Season generously with kosher salt and black pepper.
This step is crucial: cover the pan immediately and let it sit undisturbed for 3 to 5 minutes. The heat and steam trapped inside will cause the cabbage to release its natural moisture, which becomes a light braise. The vegetables soften dramatically in this time, and the carryover heat begins caramelization. You’ll smell sweet, sulfurous aromas—that’s exactly right.

Step 5: Finish Cooking and Develop the Final Flavor
Uncover the pan carefully (watch for steam). Now continue cooking without the lid, stirring occasionally, for about 15 minutes. You’re looking for the vegetables to become tender and for the cabbage to develop brown, caramelized spots—this is called the Maillard reaction, and it’s what makes simple food taste delicious. The cabbage should be soft enough to break apart with your spoon but still maintain its shape.
The vegetables will initially release liquid (which cooks off), then begin to concentrate and brown. When you see golden spots on the cabbage and the volume has reduced by about 40%, you’re there. This happens gradually, so check every 3 to 4 minutes by lifting the lid and looking at the pan’s color.

Step 6: Reunite and Finish
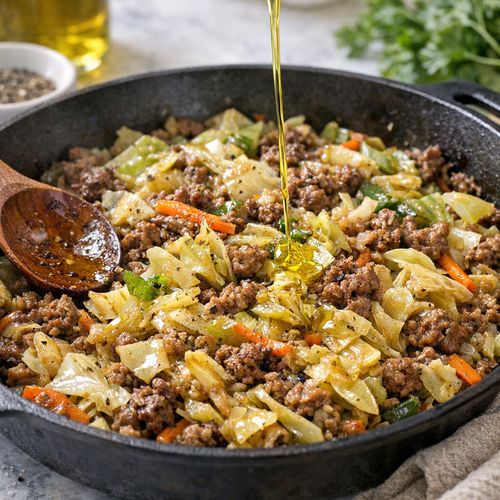
Return your cooked beef mixture to the pan with the vegetables and toss everything together thoroughly. Cook for 1 to 2 minutes, just until the beef is warmed through and everything is combined. Remove from heat and stir in your 1 teaspoon of white wine vinegar, chopped scallions, and fresh parsley. Taste the dish and season with a bit more salt or pepper if needed. If you love olive oil, add a final small drizzle here—it brings a bright, fresh finish that elevates everything.
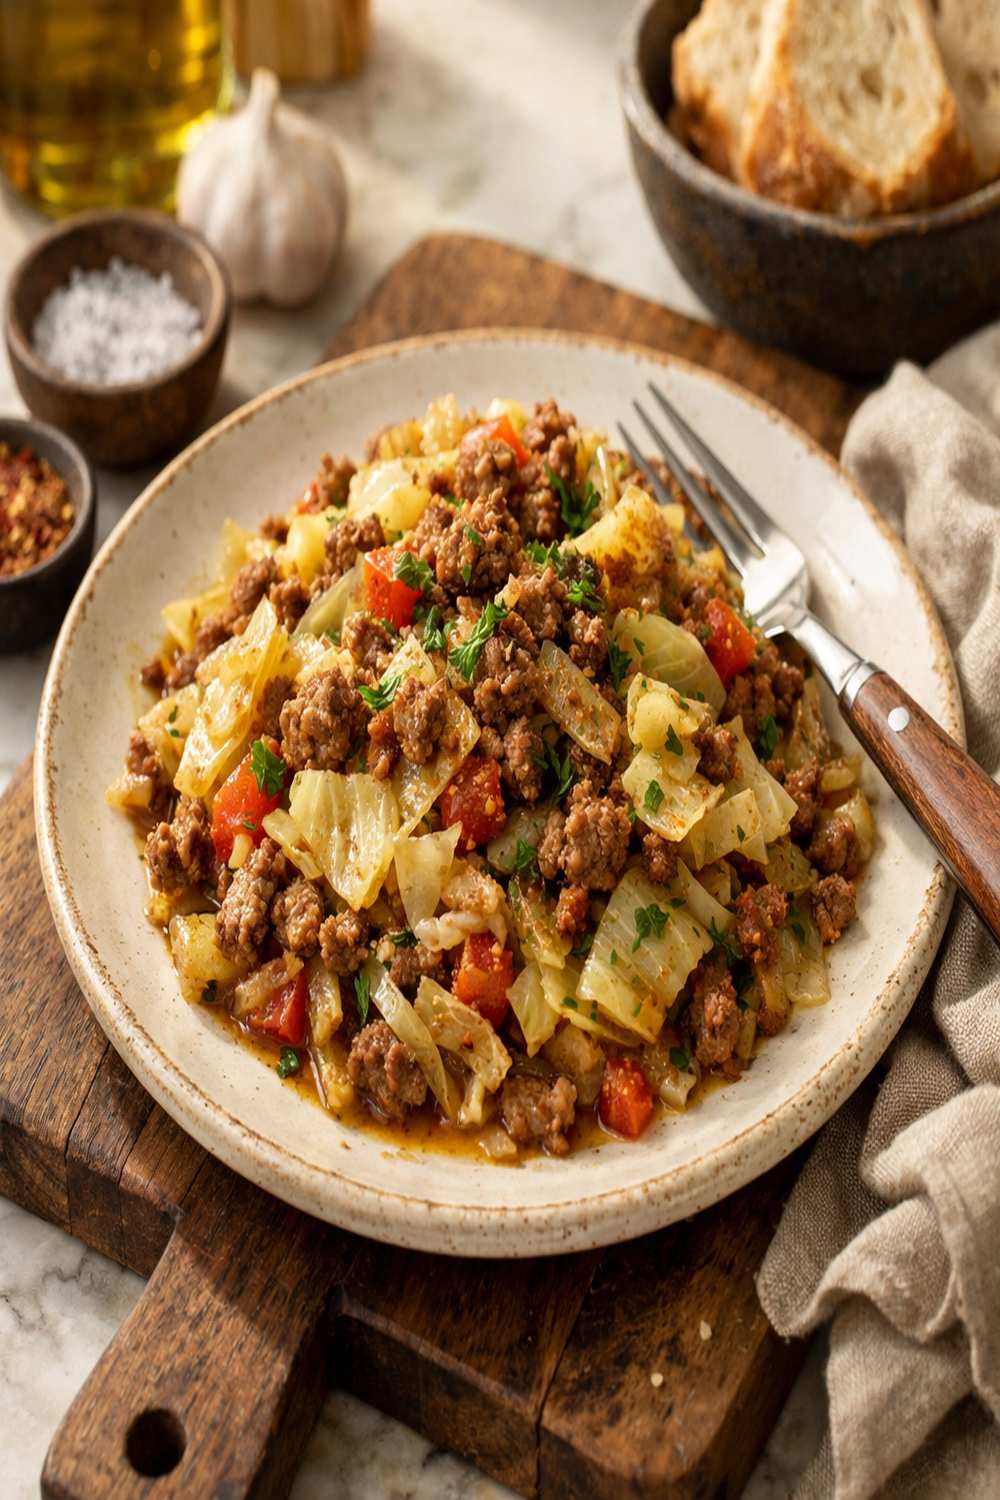
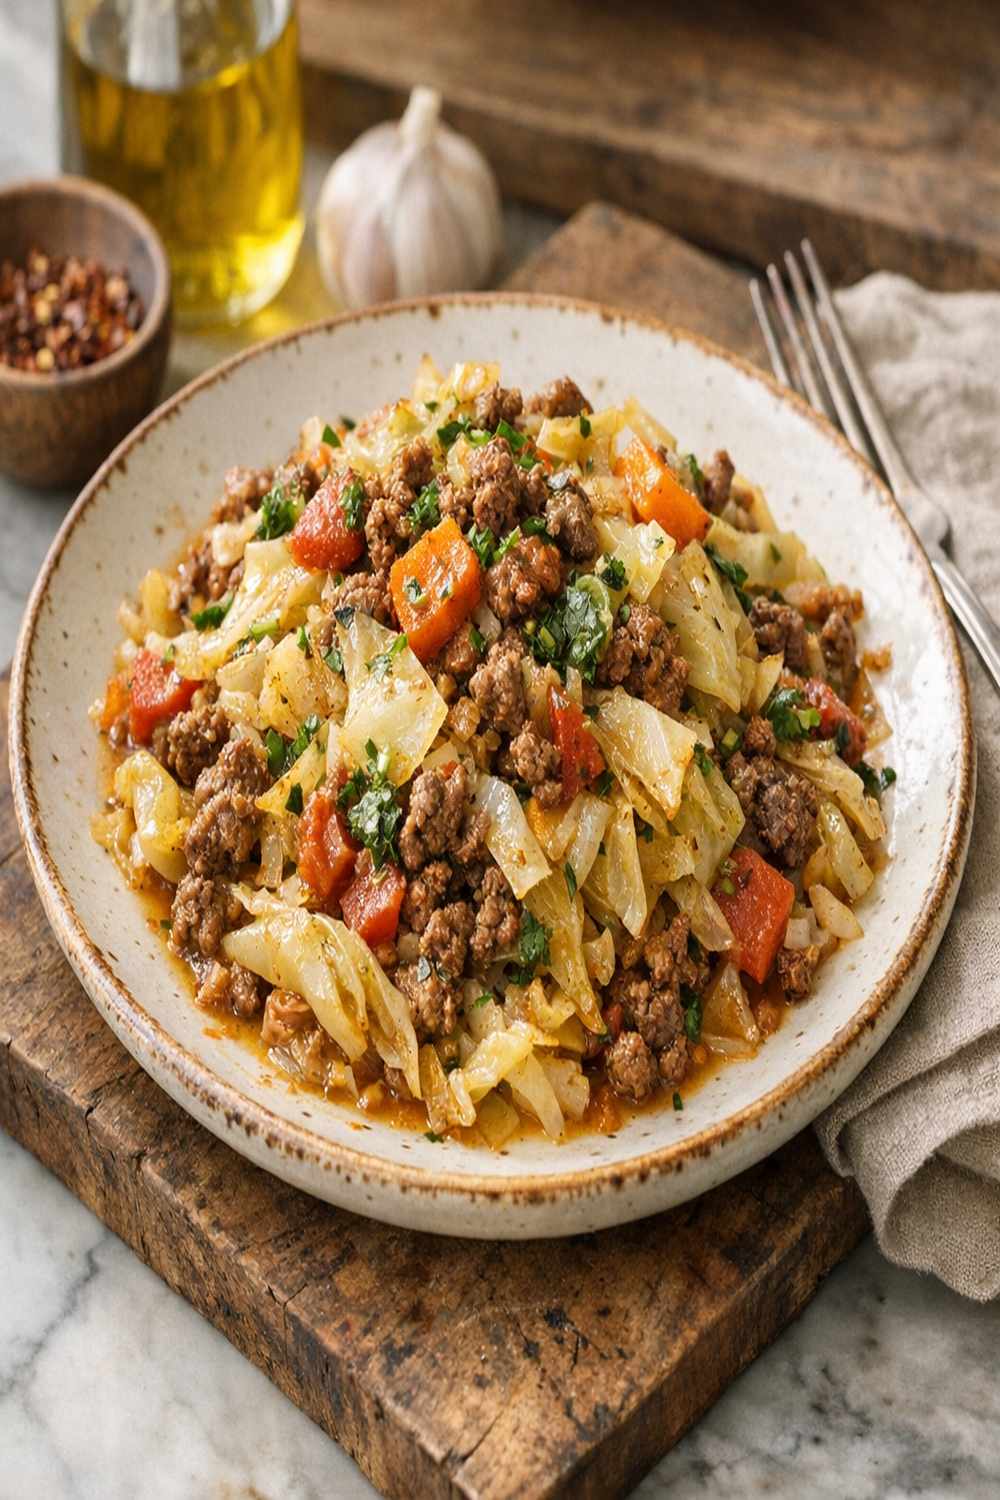
Serve warm, and watch how people respond. This isn’t fancy food, but it’s the kind of food that makes people happy because it tastes honest and nourishing.
Expert’s Nutritional Tip: How to Maximize Iron Absorption
As a dietitian, one question I field constantly is about energy levels and fatigue. Often the answer relates to iron absorption. Here’s what most people don’t know: the heme iron in your ground beef is absorbed better when you eat it with vitamin C. The parsley in this recipe provides some vitamin C, but here’s the pro move—if you’re struggling with energy, serve this with a side of something vitamin C-rich like bell peppers or a simple tomato-based sauce. The acid and vitamin C create an environment in your digestive system where iron absorption increases dramatically. This is why traditional cuisines pair meat with acidic vegetables. It’s not accidental; it’s nutritional genius.
Make-Ahead Guide: Meal Prep Like a Professional
This is one of my favorite recipes for meal preparation because it actually improves as it sits. Here’s exactly how I prep it:
- Prep vegetables the day before: Shred your cabbage and carrots, chop your onion and parsley, mince your garlic. Store each in separate containers. This takes 15 minutes and saves you 20 minutes on cooking day.
- Make the full recipe and cool completely: Cook the entire skillet, then spread it on a large plate to cool faster (about 15 minutes). This prevents condensation, which creates mushiness in storage.
- Store in glass containers: Divide into 4 containers if you’re serving four people. Glass containers prevent the flavors from absorbing into plastic and keep the vegetables from getting soggy the way some plastics do.
- Refrigerate for up to 4 days: The flavors actually deepen as spices fully infuse the vegetables. Day three is often the best day.
- Freeze portions for up to 3 months: Flat-freeze individual portions in freezer bags for grab-and-go heat-ups. Thaw overnight in the refrigerator, then reheat gently in a skillet over medium heat with a splash of water.
- Reheat without losing quality: Don’t use high heat on leftovers—it toughens the vegetables. Use medium heat, add a tablespoon of water if needed, and stir frequently for about 4-5 minutes until warmed through.
Common Mistakes to Avoid
After making this hundreds of times, I’ve noticed patterns in what goes wrong. Here’s what to skip:
- Adding the spices after draining the beef: If you add cumin and coriander to raw beef and onion, the spices bloom in the fat and become more flavorful. If you add them after draining, they taste powdery and don’t integrate as well. Timing matters.
- Skipping the cover step with vegetables: I know it seems odd to cover a pan on the stovetop, but those 3-5 minutes of steaming are what soften the cabbage quickly. Without it, you’re stirring cabbage for 25 minutes instead of 15. The trapped steam does the work.
- Overcooking the cabbage into mush: Green cabbage gets soft faster than you’d expect. Aim for tender with slight resistance when you bite it, not translucent and falling apart. Overcooked cabbage loses its nutrients and becomes bitter.
- Using pre-ground spices older than 6 months: Old spices lose their volatile oils and taste like dust. If your cumin and coriander are from that cabinet reshuffle two years ago, replace them. Spices are cheap; they deserve freshness. Smell them first—they should be pungent and aromatic.
Seasonal Variations: Adapt This Recipe Year-Round
One of the best parts about this recipe is how forgiving it is. The base structure stays the same, but the vegetables shift with seasons and what’s affordable:
- Spring (March-May): Replace half the cabbage with shredded spring zucchini. Add fresh peas at the very end (just toss them in raw to preserve their bright sweetness). Swap parsley for fresh tarragon if you have it—it’s a spring herb that adds elegance.
- Summer (June-August): Bell peppers become affordable, so add one chopped red or yellow pepper with your onion. The natural sweetness of summer peppers complements the beef beautifully. Add fresh basil instead of parsley for a completely different but equally delicious flavor profile.
- Fall (September-November): This is prime cabbage season, so the prices drop significantly. Keep your proportions the same but use red cabbage for visual interest. Add ½ teaspoon of smoked paprika (instead of regular) to give it a depth that feels cozy as temperatures drop.
- Winter (December-February): Cabbage is still cheap and stores well. Add ½ small parsnip shredded with your carrots for sweetness and earthiness. Some people add a splash of apple cider vinegar instead of white wine vinegar—the apple notes feel seasonal and warming.
How to Make It Even Healthier
- Add 1 cup of low-sodium beef broth: This deepens the flavor and adds collagen-rich liquid that’s beneficial for gut health and joint support. Add it when you return the beef to the vegetables, then simmer for 5 minutes. It becomes a light stew instead of a dry skillet—both are delicious, but the broth version is more nourishing.
- Use grass-fed ground beef: If your budget allows, grass-fed beef contains higher levels of omega-3 fatty acids and conjugated linoleic acid (CLA), a compound studied for its potential to support body composition. The flavor is also noticeably more complex.
- Add 1 tablespoon of tomato paste: This deepens the umami flavors and adds lycopene, the same antioxidant that makes tomatoes red. Stir it in with your spices in Step 3. It takes zero additional time but multiplies the nutritional density.
- Use half ground beef and half ground mushrooms: Mushrooms (cremini or cremini blend) add umami and fiber while reducing the overall fat and cost. Pulse mushrooms in a food processor until rice-sized, then cook with the beef. This is how professional kitchens stretch ground meat while improving nutrition.
Dietary Modifications
For Keto (Low-Carb): This recipe is naturally keto-friendly because the majority of calories come from protein and fat. The vegetables add only about 8 grams of net carbs per serving (since cabbage is mostly fiber). Keep it as written. If you want it more filling, serve it over cauliflower rice or in lettuce wraps.
For Paleo: This is completely paleo-compliant as written. All ingredients are whole foods with no additives. If your spice blend (baharat) contains any additives, make your own by mixing cumin, coriander, paprika, and a pinch of cinnamon.
For Low-Sodium: Use unsalted beef broth if you add liquid, and go very light on salt during cooking—taste as you go instead of seasoning at the beginning. The garlic, vinegar, and fresh herbs will provide enough flavor without sodium, though it’ll taste noticeably different. I don’t recommend this modification unless medically necessary because salt helps the spices shine.
For Budget-Conscious Modifications: Ground beef is the most expensive component. Substitute with ground turkey (saves about 20%) or ground lamb (same price but richer flavor, so you need less). Ground chicken is cheaper but less flavorful—if you use it, add 1 teaspoon of soy sauce for depth. Ground lentils mixed half-and-half with ground beef stretches the meat further and adds fiber (about 15% savings).
For Dairy-Free/Vegan: Swap ground beef for plant-based ground meat or lentils. Use vegetable broth instead of beef broth. Everything else remains the same. The result is different but genuinely delicious—the spices are what make this special, not the beef itself.
Can I Store Cabbage and Ground Beef Skillet?
Yes, and it stores better than you’d expect. Here’s the breakdown:
Refrigerator Storage: Keep this in an airtight glass container for up to 4 days. The flavors actually improve on day 2 and 3 as the spices fully infuse. On day 4, the vegetables begin losing brightness, though it’s still safe to eat. Reheat gently over medium heat, adding a splash of water if it seems dry.
Freezer Storage: This freezes beautifully for up to 3 months. I recommend portioning it into individual meal-prep containers or freezer bags before freezing. Thaw overnight in the refrigerator (never at room temperature—bacteria loves that). Reheat in a skillet with a tablespoon of water, or in the microwave if you’re in a hurry, though the stovetop method preserves texture better.
Pro Tip for Texture: If you notice some separation or liquid after thawing, drain it off before reheating. This is normal and doesn’t mean anything is wrong—it’s just vegetables releasing moisture during freezing. The vegetables may be slightly softer after freezing and reheating, but they’re still delicious and perfectly safe.
Nutrition Information
Here’s what you’re actually getting in one serving (this recipe makes 4 generous servings):
- Calories: 285 – an appropriate dinner serving that keeps blood sugar stable without excess energy that turns to fat storage
- Protein: 28 grams – nearly all from the beef; this amount triggers satiety hormones and supports muscle maintenance for everyone, but especially important as we age
- Carbohydrates: 12 grams – all from vegetables; these are the good carbs that come with fiber (5 grams), so your blood sugar rises gently instead of spiking
- Fat: 14 grams – primarily from olive oil and beef, with healthy ratios of saturated to unsaturated fat. The unsaturated fat supports brain health and hormone production
- Sodium: 520 milligrams – moderate and within healthy ranges (the recommended daily limit is 2,300 mg, so this meal uses less than 25% of that)
- Fiber: 5 grams – mostly from cabbage and carrots, which supports healthy digestion and feeds beneficial gut bacteria
For comparison, the traditional version of this recipe (heavy on beef, light on vegetables, heavy on salt) runs about 420 calories with more saturated fat, less fiber, and significantly more sodium. This version is nutrition-forward without feeling restricted.
What Can I Serve With Cabbage and Ground Beef Skillet?
This dish is substantial enough to stand alone, but here are thoughtful pairings that complement the flavors and create complete nutrition:
- Over cauliflower rice or regular rice: The spiced meat and vegetables create a sauce that benefits from a neutral base. Cauliflower rice keeps calories lower; regular brown rice adds whole grains and B vitamins. Both work beautifully.
- With an acidic fresh salad with lemon vinaigrette: The acid brightens the warm spices and adds fresh vegetables for even more micronutrients. A simple green salad with lemon juice and olive oil is all you need.
- Wrapped in lettuce leaves: Use butter lettuce or romaine leaves as edible wrappers. This makes it a fun, interactive meal and adds raw crunch against the soft cooked vegetables.
- Alongside roasted root vegetables: Carrots are already in this dish, but roasted beets or parsnips add earthiness and additional vitamins. The roasting brings out natural sweetness that contrasts beautifully with the savory skillet.
- With warm flatbread or pita: If you want to make this a sandwich, warm pita or flatbread and fill it with the skillet mixture. Add a dollop of Greek yogurt if you have it—the cool creaminess balances the warm spices.
Cabbage Ground Beef Recipe
Ingredients
Method
- Start by peeling your yellow onion and cutting it in half. Take one half and finely chop it—these pieces should be ¼ inch or smaller so they soften into the beef and disappear, building flavor rather than adding texture. Set this aside on your cutting board. Take the remaining half and thinly slice it into half-moons. These slices will caramelize later and add visible texture to the finished dish. Keeping them separate gives you two different textural outcomes from one onion, which is smart cooking.
- Place a large, heavy skillet with a lid over medium-high heat. Add 2 tablespoons of extra virgin olive oil—you want it to shimmer (look like water with a sheen of oil on top) but not smoke. This takes about 60 seconds. Once it’s ready, add your chopped onion and stir occasionally for about 3 to 5 minutes. You’re looking for softness and a light golden color, but not browning. If it’s browning, your heat is too high; turn it down. You’ll know it’s ready when the onion smells intensely sweet and fragrant—that’s the natural sugars beginning to caramelize. At the 4-minute mark, add your 2 minced garlic cloves and stir constantly for exactly 30 seconds. This prevents garlic from scorching, which creates bitterness. You want just enough heat to release garlic’s beneficial compounds without destroying its delicate flavor.
- Increase heat to medium-high and add your pound of lean ground beef directly to the pan with the onion and garlic. Using a wooden spoon, break the beef into small, uniform pieces as it cooks. This matters—smaller pieces brown faster and more evenly, developing the flavorful browned exterior that makes this dish taste intentional. Stir occasionally (every minute or so) and let it cook undisturbed between stirs. This gives the beef contact with the hot pan. Cook for 7 to 10 minutes until no pink remains and the beef has developed a rich brown color. Here’s the professional tip I share with clients: don’t drain your beef immediately. Let it rest in the pan for 1 minute so the juices redistribute. This keeps the meat tender rather than dried out. Then, tilt the pan and spoon away excess fat into a small bowl (save it for cooking tomorrow—it’s flavor gold). Now season everything in the pan with ½ teaspoon of cumin, the baharat, coriander, paprika, and a generous pinch each of kosher salt and black pepper. Stir well to coat all the meat. Transfer everything to a clean plate and set aside.
- Return your skillet to the stove and add the remaining 2 tablespoons of olive oil over medium-high heat. Once it shimmers, add your sliced onion, shredded cabbage, shredded carrots, and the remaining ½ teaspoon of cumin. Toss everything to coat thoroughly with oil. This prevents sticking and ensures even cooking. Season generously with kosher salt and black pepper. This step is crucial: cover the pan immediately and let it sit undisturbed for 3 to 5 minutes. The heat and steam trapped inside will cause the cabbage to release its natural moisture, which becomes a light braise. The vegetables soften dramatically in this time, and the carryover heat begins caramelization. You’ll smell sweet, sulfurous aromas—that’s exactly right.
- Uncover the pan carefully (watch for steam). Now continue cooking without the lid, stirring occasionally, for about 15 minutes. You’re looking for the vegetables to become tender and for the cabbage to develop brown, caramelized spots—this is called the Maillard reaction, and it’s what makes simple food taste delicious. The cabbage should be soft enough to break apart with your spoon but still maintain its shape. The vegetables will initially release liquid (which cooks off), then begin to concentrate and brown. When you see golden spots on the cabbage and the volume has reduced by about 40%, you’re there. This happens gradually, so check every 3 to 4 minutes by lifting the lid and looking at the pan’s color.
- Return your cooked beef mixture to the pan with the vegetables and toss everything together thoroughly. Cook for 1 to 2 minutes, just until the beef is warmed through and everything is combined. Remove from heat and stir in your 1 teaspoon of white wine vinegar, chopped scallions, and fresh parsley. Taste the dish and season with a bit more salt or pepper if needed. If you love olive oil, add a final small drizzle here—it brings a bright, fresh finish that elevates everything. Serve warm, and watch how people respond. This isn’t fancy food, but it’s the kind of food that makes people happy because it tastes honest and nourishing.
FAQs
Can I Use Ground Turkey Instead of Beef?
Absolutely. Ground turkey is typically 20% cheaper than ground beef, though it’s leaner. Use 93% lean turkey if available (it won’t dry out). The cooking method stays identical. The flavor will be milder—the beef’s richness is part of this dish’s appeal—but if you add an extra ½ teaspoon of cumin or a teaspoon of soy sauce, you’ll build enough depth that you won’t miss the beef. Many of my clients with digestive sensitivities prefer turkey, so it’s a worthy swap.
What’s Baharat and Can I Substitute It?
Baharat is a Middle Eastern spice blend traditionally containing cumin, coriander, paprika, black pepper, and sometimes cloves, nutmeg, or cinnamon. If you can’t find it at your grocery store, make your own by mixing 1 teaspoon cumin, ½ teaspoon coriander, ½ teaspoon paprika, ¼ teaspoon black pepper, and a pinch of nutmeg. Or simply skip it and use ¾ teaspoon total cumin with the coriander and paprika as written—you’ll lose a bit of complexity but the dish still tastes wonderful. Many grocery stores now carry baharat in the international aisle or spice section for about the same price as individual spices.
How Do I Know When the Cabbage Is Done?
This is the most common question I get. You’re looking for cabbage that’s tender enough to break apart with your spoon but still holds its shape—not mushy or translucent. The edges should show brown, caramelized spots. When you lift a piece with your spoon, it should yield easily without crumbling. If it’s still crisp and snaps when you bite it, cook longer. If it falls apart when you stir, it’s past perfect but still delicious and safe to eat. There’s a window of about 5 minutes where it’s at ideal texture, so check after 15 minutes of uncovered cooking and then every 2 minutes if needed.
Is This Recipe Naturally Gluten-Free?
Yes, completely. Every ingredient is naturally gluten-free—meat, vegetables, spices, and oil contain zero gluten. However, if you use a pre-made baharat blend, check the label because some manufacturers blend it with grains to add bulk and reduce cost. Look for “gluten-free certified” or check the ingredient list. Most pure spice blends are gluten-free, but it’s worth verifying.
Can I Make This in a Slow Cooker or Instant Pot?
You can, though the result is different. For a slow cooker: Brown the beef in a skillet first (don’t skip this—it’s where flavor develops), then transfer everything to your slow cooker with the vegetables, spices, and ½ cup of beef broth. Cook on low for 6 hours. The vegetables get very soft, almost melt-in-your-mouth tender. For an Instant Pot: Brown the beef using the sauté function, add everything else with ½ cup broth, pressure cook for 3 minutes, then quick release. Both methods work, but the stovetop version in this recipe gives you the most flavor and texture control.
More Healthy Recipes You’ll Love
- Roasted Cauliflower Tacos with Chipotle Romesco – another affordable, vegetable-forward meal that feels indulgent but supports your health goals
- Vietnamese Spring Rolls with Crispy Tofu – fresh, bright flavors that pair beautifully with this skillet for variety during the week
- my weeknight pasta – another simple, seasonal meal that proves wholesome food doesn’t need expensive ingredients
Healthy eating isn’t about deprivation or expensive superfoods. It’s about understanding which simple, affordable ingredients nourish your body and respecting them enough to cook with intention. This skillet is exactly that—ground beef and cabbage transformed through technique and thoughtful spicing into something that makes you feel genuinely good, not just full. It’s the kind of meal my mother would recognize, the kind that shows up on tables from Boston to Beirut, adapted and made personal by each cook who makes it. I hope you’ll make it your own too. Don’t forget to mention @affordablefoodideas if you try this recipe!
More Recipes You Will Love
- This Easy Chicken Dinner – Worth adding to your recipe collection.